How to Debloat Windows 11
Windows 11 is here and it comes with lots of new goodies filled here and there. But with each new Windows operating system, comes a new set of bloatware which is there just to annoy you. Moreover, it occupies disk space and shows up everywhere, for no good reason. Fortunately, we have a solution for how to debloat Windows 11 to improve its performance and speed up your newly upgraded Windows OS. Read till the end to know how to remove this pesky bloatware and enjoy a clean Windows 11 environment.
How to Debloat Windows 11
Preparatory Steps
Before you go ahead with debloating Windows 11, there are a few prerequisite steps to be taken to avoid any mishap.
Step 1: Install Latest Updates
Update your Windows to the latest iteration to make sure you are up to date with everything. All the bloatware that comes in the latest iteration will also be deleted thereafter, leaving nothing to chance.
1. Press Windows + I keys simultaneously to open Settings.
2. Then, select Windows Update in the left pane.
3. Now, click on Check for updates button, as shown.
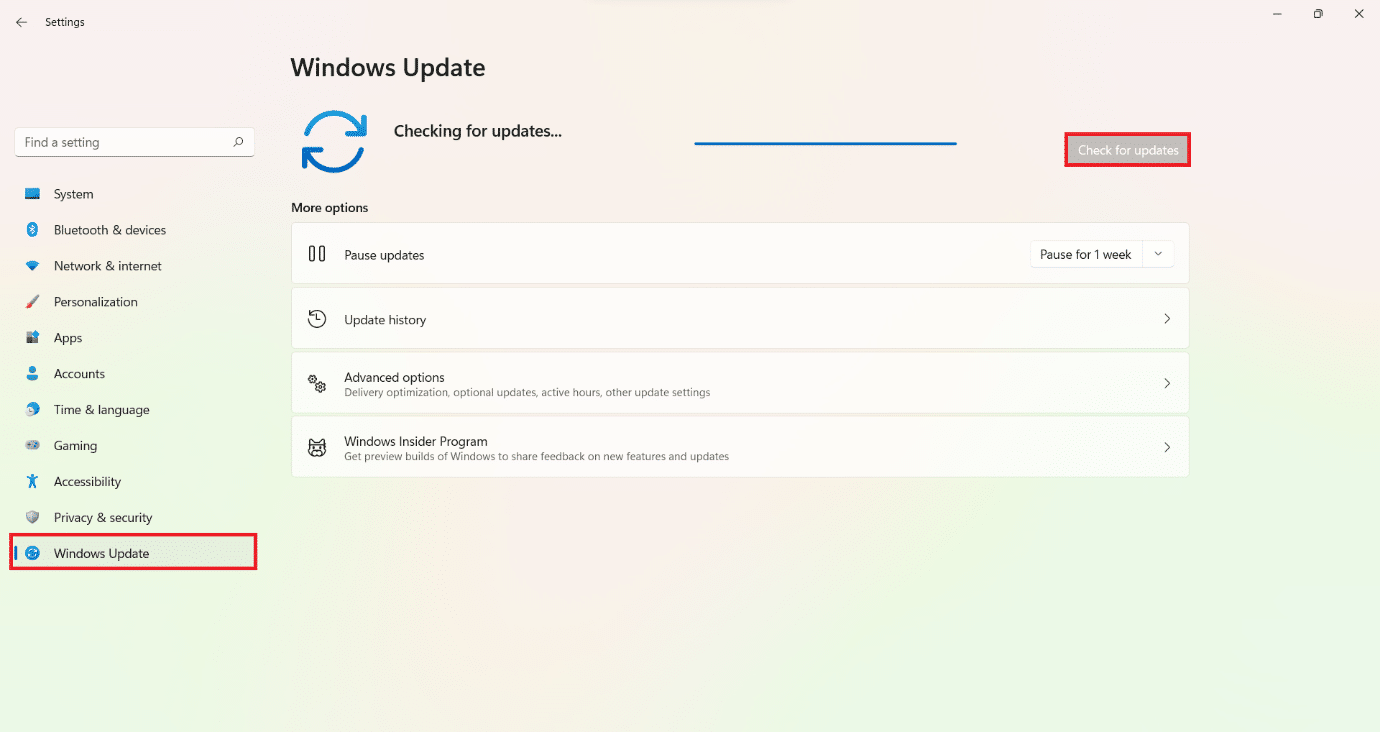
4. Install updates, if available, and click on Restart now after saving all your unsaved work.
Step 2: Create a System Restore Point
Creating a System Restore Point helps you create a save point in case, things go off track. So, that you can simply revert to the point where everything was working as it should have been.
1. Launch Settings app as earlier.
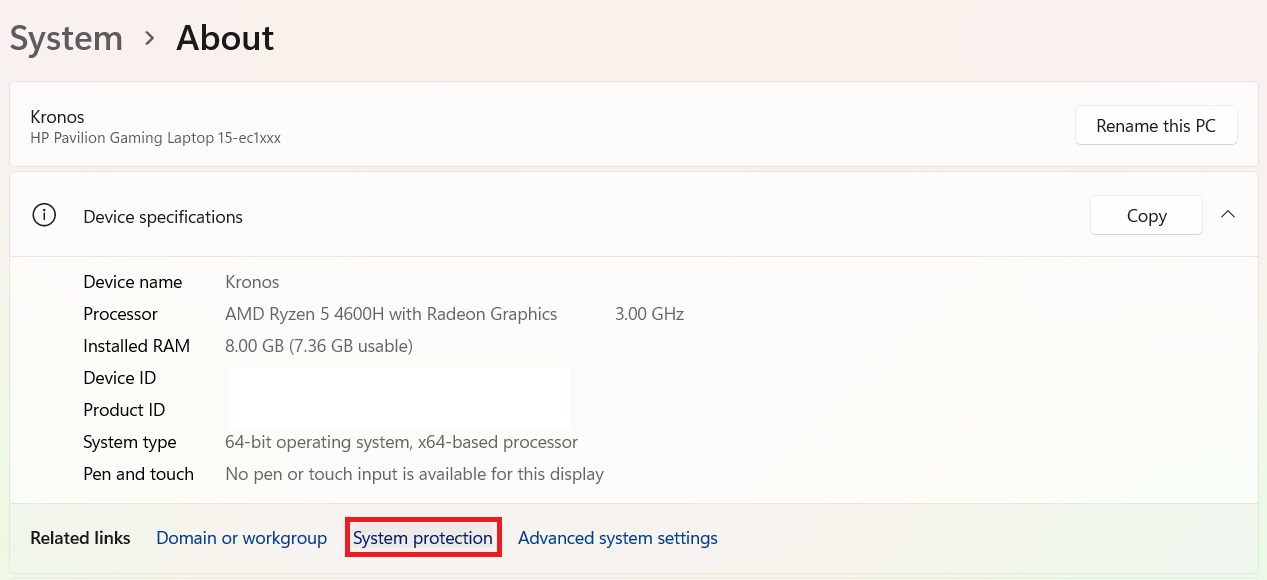
2. Click on System in the left pane and About in the right pane, as illustrated below.
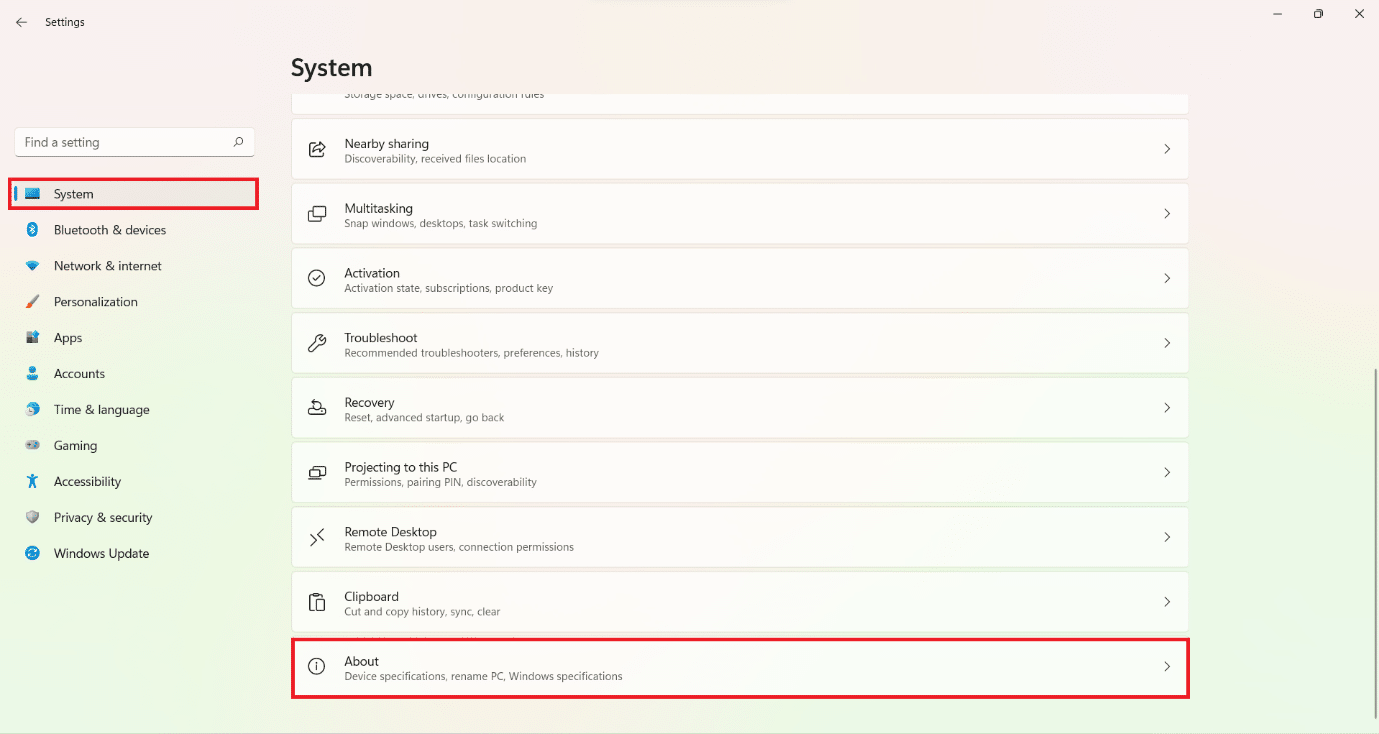
3. Click on System protection.
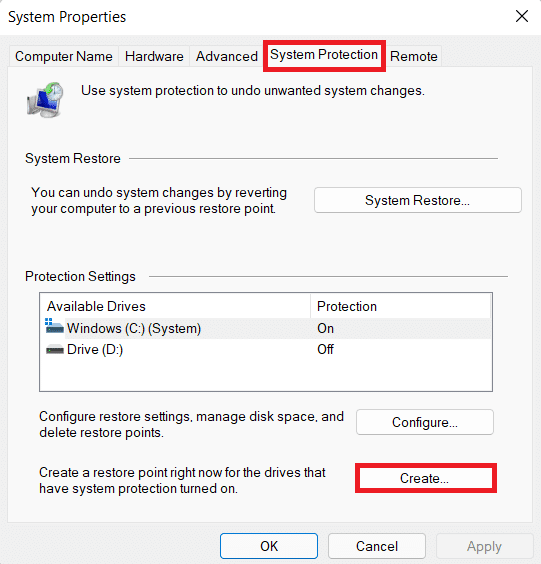
4. Click on Create in the System Protection tab of System Properties window.
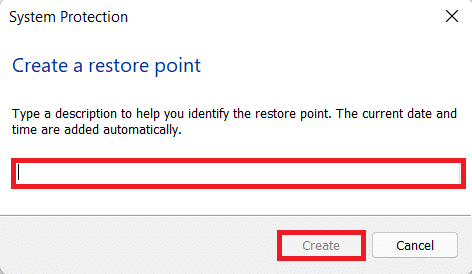
5. Enter a name/description for the new restore point and click on Create.
Additionally, you can read Microsoft doc on Appx module here.
Also Read: Fix Windows 10 Update Pending Install
Method 1: Through Apps and Features
You could find most of the bloatware in your Apps & features list from where you can uninstall it, just like any other application.
1. Press Windows+X keys together to open the Quick Link menu, formerly known as Power User Menu.
2. Select Apps and Features from this list.
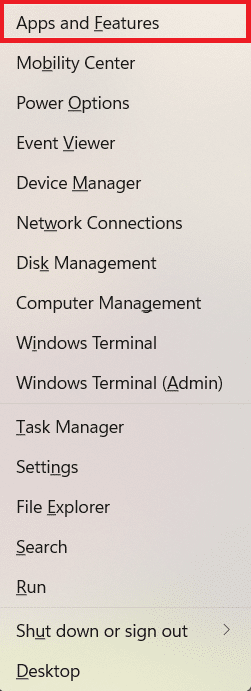
3. Click on the three dotted icon next to the app and select Uninstall option to remove it, as illustrated.

Also Read: Force Uninstall Programs which won’t Uninstall In Windows 10
Method 2: Using Remove AppxPackage Command
The answer to the question: How to debloat Windows 11? lies with Windows PowerShell which can be used to automate tasks by using commands. There are numerous commands which would make debloating a breezy process. So, let us begin!
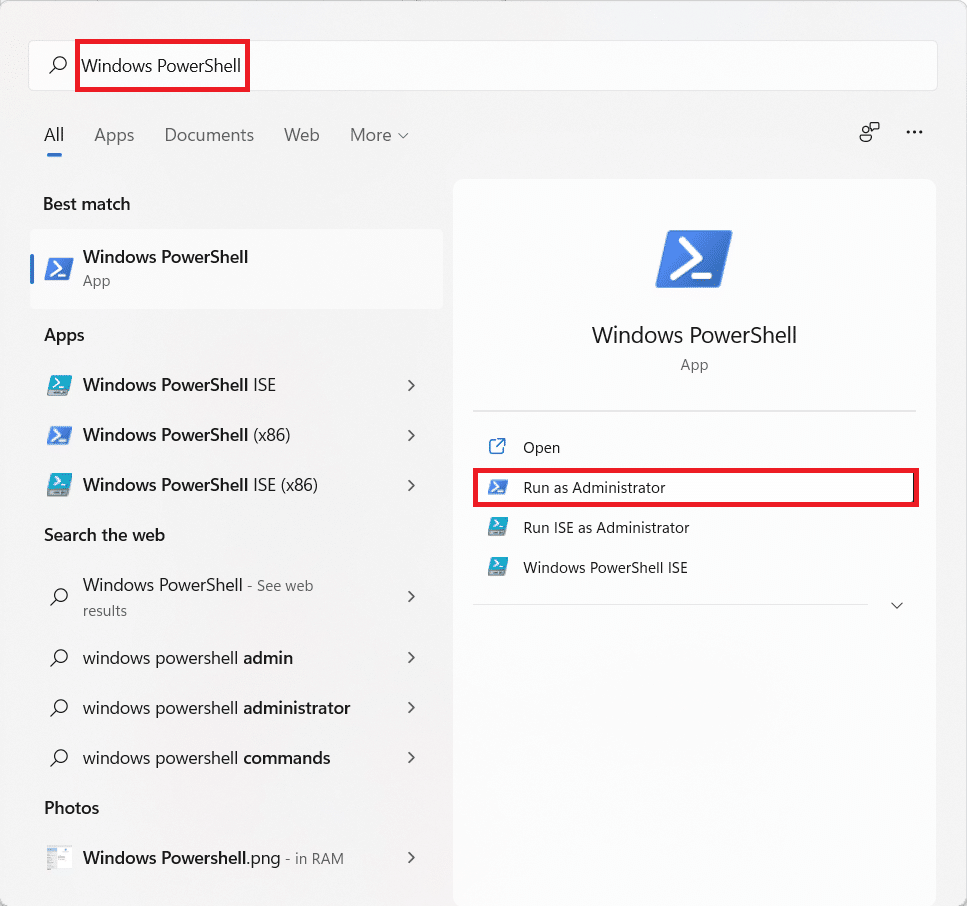
1. Click on the Search icon and type Windows PowerShell.
2. Then, select Run as Administrator, to open elevated PowerShell.
3. Click Yes in the User Account Control dialog box.
Step 4: Retrieving the List of Apps for Different User Accounts
4A. Type the command: Get-AppxPackage and press the Enter key to view the list of all pre-installed apps on your Windows 11 PC for current user viz Administrator.

4B. Type the command: Get-AppxPackage -User <username> and hit Enter to get a list of installed apps for a specific user.
Note: Here, write your username in place of <username>

4C. Type the command: Get-AppxPackage -AllUsers and press Enter key to get a list of installed applications for all users registered on this Windows 11 PC.

4D. Type the command: Get-AppxPackage | Select Name, PackageFullName and hit Enter key to get a scaled-down list of installed apps.

Step 5: Uninstalling Apps for Different User Accounts
5A. Now, type the command: Get-AppxPackage <AppName> | Remove-AppxPackage and hit Enter to delete an app from current user acoount.
Note: Here, replace the name of the application from the list in place of <AppName>.

5B. Alternately, use wildcard operator (*) for <AppName> to make running this command easier. For example: Executing Get-AppxPackage *Twitter* | Remove-AppxPackage command will find all the apps containing twitter in its package name and remove them.

5C. Execute the following command to uninstall a particular app from all user accounts:
Get-AppxPackage -alluser *<AppName>* | Remove-AppxPackage

5D. Type the command given below and press Enter key to remove all pre-installed apps from the current user account: Get-AppxPackage | Remove-AppxPackage

5E. Execute the given command to remove all bloatware from all user accounts on your computer: Get-AppxPackage -allusers | Remove-AppxPackage

5F. Type the following command and press Enter key to remove all in-built apps from a specific user account: Get-AppxPackage -user <Username> | Remove-AppxPackage

5G. Execute the given command to uninstall in-built apps while retaining a particular app or a few specific apps, respectively:
-
Get-AppxPackage | where-object {$_.name –notlike “*<AppName>*”} | Remove-AppxPackage -
Get-AppxPackage | where-object {$_.name –notlike “*<AppName>*”} | where-object {$_.name –notlike “*<AppName>*”} | where-object {$_.name –notlike “*<AppName>*”} | Remove-AppxPackage
Note: Add a where-object {$_.name –notlike “*<AppName>*”} parameter in the command for each app you want to keep.

Method 3: Run DISM Commands
Here’s how to debloat Windows 11 using DISM i.e. Deployment Image Servicing & Management commands:
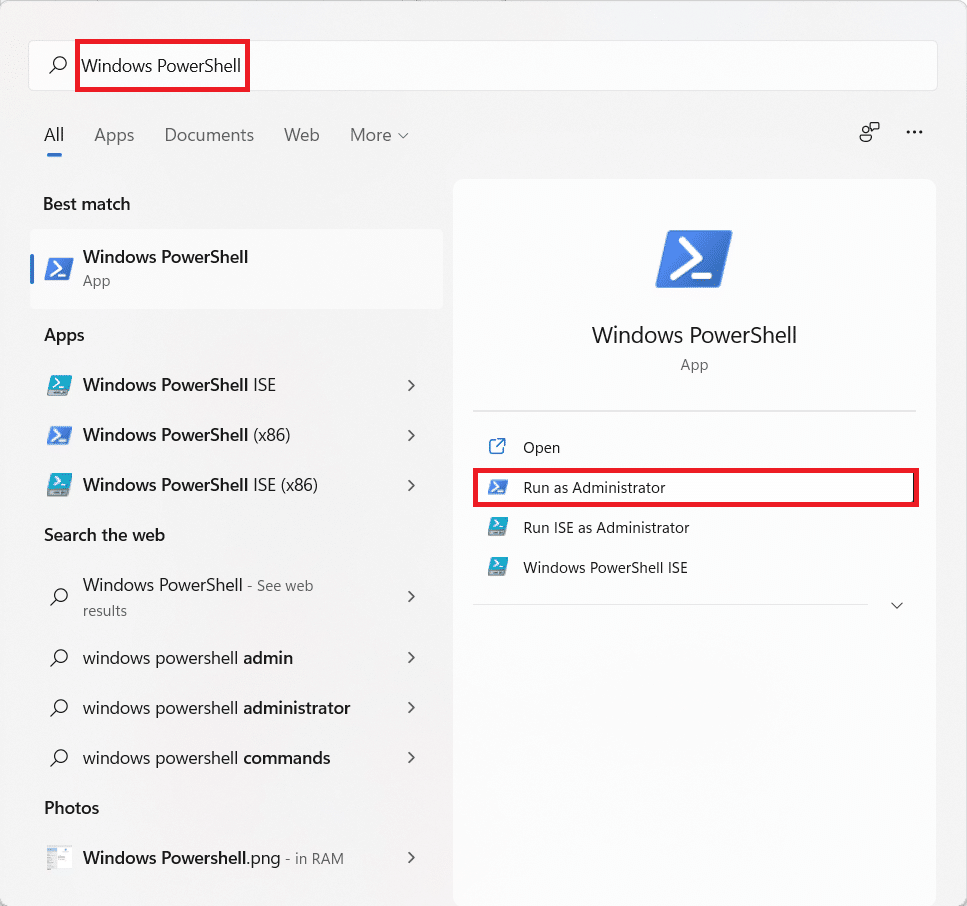
1. Launch Windows PowerShell with administrative privileges, as depicted below.
2. Click on Yes in the User Account Control prompt.
3. Type the given command and press the Enter key to execute:
DISM /Online /Get-ProvisionedAppxPackages | select-string Packagename

4. From the list of applications installed, copy the package name of the application you want to uninstall.
5. Now, type the following command and hit Enter to run it:
DISM /Online /Remove-ProvisionedAppxPackage /PackageName:<PackageName>
6. Here, paste the copied package name replacing <PackageName>.

Also Read: Fix DISM Source Files Could not be Found Error
Direct Commands to Uninstall Common Bloatware Apps
In addition to the methods listed above to uninstall unrequired apps, here’s how to debloat Windows 11 by uninstalling commonly found bloatware:
- 3D Builder: Get-AppxPackage *3dbuilder* | Remove-AppxPackage

- Sway: Get-AppxPackage *sway* | remove-AppxPackage

- Alarms & Clock: Get-AppxPackage *alarms* | Remove-AppxPackage

- Calculator: Get-AppxPackage *calculator* | Remove-AppxPackage

- Calendar/Mail: Get-AppxPackage *communicationsapps* | Remove-AppxPackage

- Get Office: Get-AppxPackage *officehub* | Remove-AppxPackage

- Camera: Get-AppxPackage *camera* | Remove-AppxPackage

- Skype: Get-AppxPackage *skype* | Remove-AppxPackage

- Movies & TV: Get-AppxPackage *zunevideo* | Remove-AppxPackage

- Groove Music & TV: Get-AppxPackage *zune* | Remove-AppxPackage

- Maps: Get-AppxPackage *maps* | Remove-AppxPackage

- Microsoft Solitaire Collection: Get-AppxPackage *solitaire* | Remove-AppxPackage

- Get Started: Get-AppxPackage *getstarted* | Remove-AppxPackage

- Money: Get-AppxPackage *bingfinance* | Remove-AppxPackage

- News: Get-AppxPackage *bingnews* | Remove-AppxPackage

- Sports: Get-AppxPackage *bingsports* | Remove-AppxPackage

- Weather: Get-AppxPackage *bingweather* | Remove-AppxPackage


- OneNote: Get-AppxPackage *onenote* | Remove-AppxPackage

- People: Get-AppxPackage *people* | Remove-AppxPackage

- Your Phone Companion: Get-AppxPackage *yourphone* | Remove-AppxPackage

- Photos: Get-AppxPackage *photos* | Remove-AppxPackage

- Microsoft Store: Get-AppxPackage *windowsstore* | Remove-AppxPackage

- Voice Recorder: Get-AppxPackage *soundrecorder* | Remove-AppxPackage

Also Read: How to Enter BIOS on Windows 10
How to Reinstall In-built Apps
Now that you know how to debloat Windows 11 to improve it’s overall performance, you might need the in-built uninstalled apps at a later stage. Hence, you can use the Windows PowerShell commands to reinstall the built-in apps as well. Read below to know how.
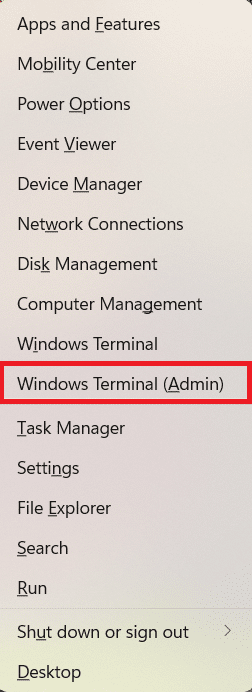
1. Press Windows + X keys simultaneously to open the Quick Link menu.
2. Select Windows Terminal (Admin) from the list.
3. Click on Yes in the User Account Control prompt.
4. Simply, execute the given command:
Get-AppxPackage -AllUsers| Foreach {Add-AppxPackage -DisableDevelopmentMode -Register "$($_.InstallLocation)AppXManifest.xml"}

Pro Tip: Windows PowerShell is now integrated into all new Windows Terminal which is accompanied by Command Prompt. Hence, users can now execute other Shell commands in terminal applications.
Recommended:
We hope you found this article interesting and helpful about how to debloat Windows 11 to improve performance and speed. You can send your suggestions and queries in the comment section down below. We would love to know which topic you want us to explore next.