The ever-expanding library of Steam and the presence of some of the biggest game developers such as Rockstar Games and Bethesda game studios has helped it become one of the leading digital game distribution services currently available on Windows and macOS. The wide variety and number of gamer-friendly features incorporated within the Steam application are also to be thanked for its success. One such feature is the in-game Steam overlay. In this article, we will be discussing what is Steam Overlay and how to disable or enable Steam overlay on Windows 10, both for one game or all games.
How to Disable Steam Overlay in Windows 10
Steam is a cloud-based gaming library where you can buy games online digitally.
- Since it is cloud-based, a large collection of games is stored in the cloud instead of PC memory.
- Your purchase of the games is also secure since it uses modern HTTPS encryption to save your credentials like your purchases, credit card info, etc.
- In Steam, you can play games on both online and offline modes. The offline mode is useful if your PC has no internet access.
However, playing games using Steam on your PC might affect the speed & performance as it takes up nearly 400MB of RAM space.
What is Steam Overlay?
As the name indicates, Steam overlay is an in-game interface that can be accessed amidst a gaming session by pressing Shift + Tab keys, provided the overlay is supported. The overlay is enabled, by default. The in-game overlay also includes a web browser for searches which can come in handy during puzzle missions. Besides the community features, the overlay is required to purchase in-game items such as skins, weapons, add-ons, etc. It allows users quick access to their community features such as:
- capturing gameplay screenshots using the F12 key,
- accessing the Steam friend list,
- chatting with other online friends,
- displaying and sending game invites,
- reading game guides & community hub announcements,
- notifying users about any new achievements unlocked, etc.
Why Disable Steam Overlay?
The in-game Steam overlay is a great feature to have, although, sometimes accessing the overlay can take a toll on your PC performance. This is especially true for systems with average hardware components barely meeting the minimum requirement needed to play games.
- If you access Steam overlay, your PC might lag and result in in-game crashes.
- When playing games, your frame rate will be reduced.
- Your PC might sometimes trigger the overlay resulting in screen freeze & hang.
- It will be distracting if your Steam friends keep messaging you.
Fortunately, Steam allows users to manually enable or disable the in-game overlay, as needed. You can either choose to disable the overlay for all the games at once or only for a specific game.
Option 1: Disable Steam Overlay For All Games
If you rarely find yourself pressing the Shift + Tab keys together to access the in-game overlay, consider disabling it all together using the global Steam Overlay setting. Follow the below-given steps to disable it:
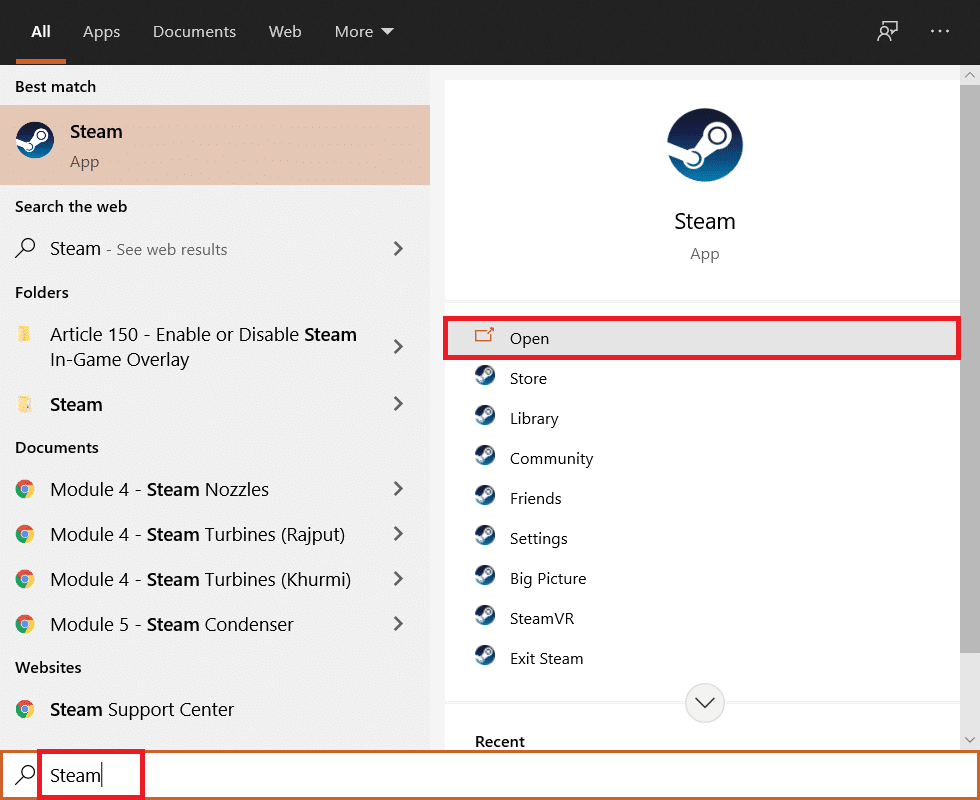
1. Press the Windows + Q keys simultaneously to open the Windows Search menu.
2. Type Steam and click on Open, as shown.
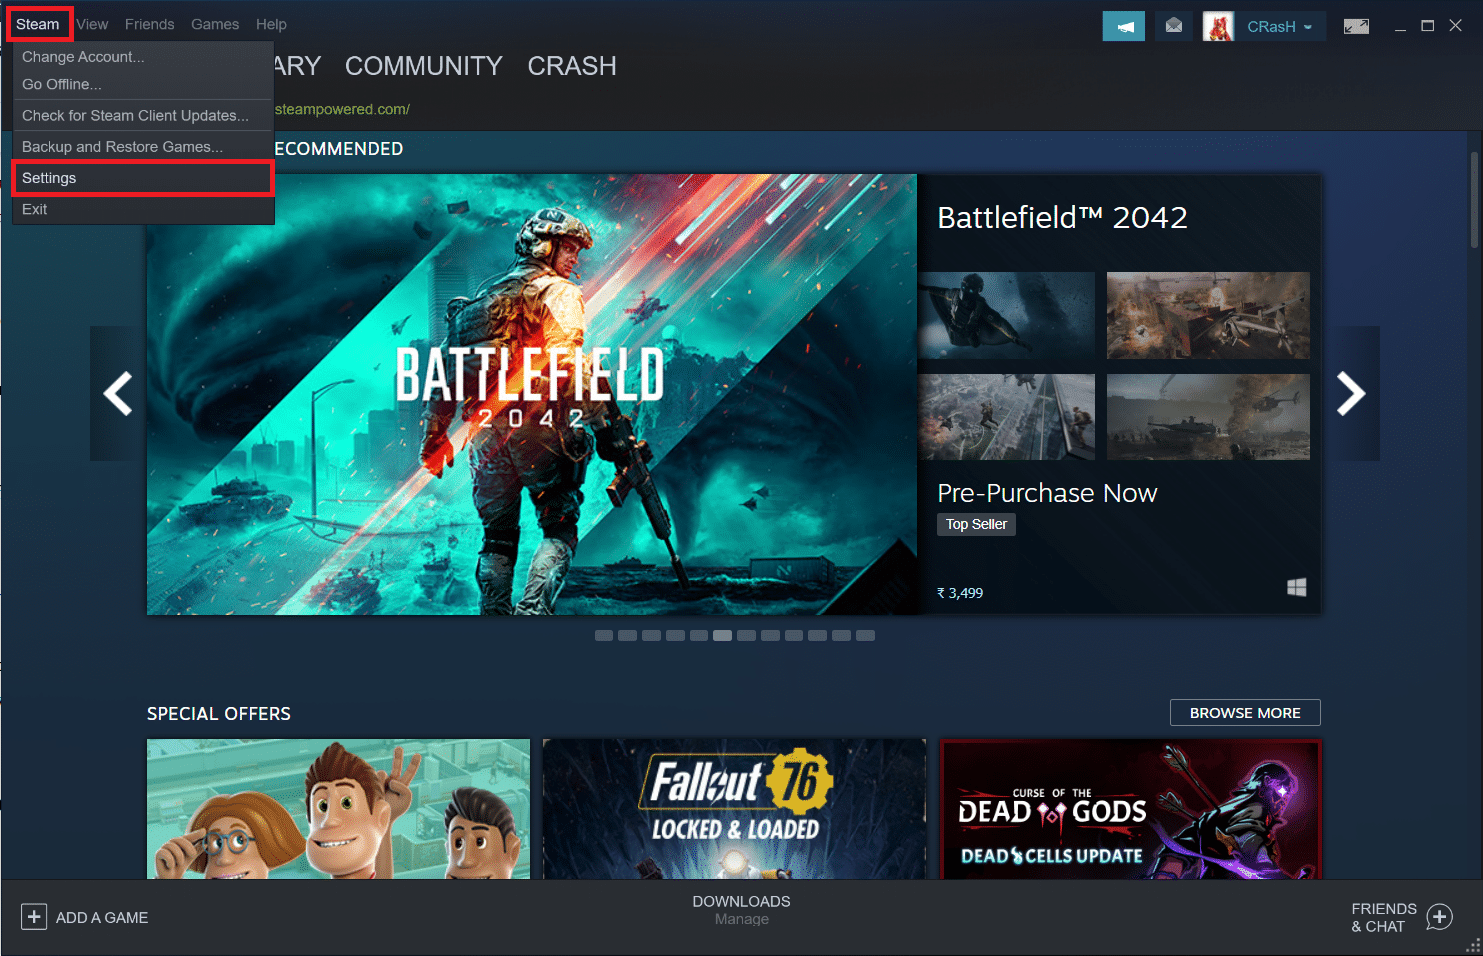
3. Then, click on Steam at the top-left corner and select Settings from the drop-down menu.
Note: If you are using Steam on macOS, click on Preferences instead.
4. Here, navigate to the In-Game tab in the left pane
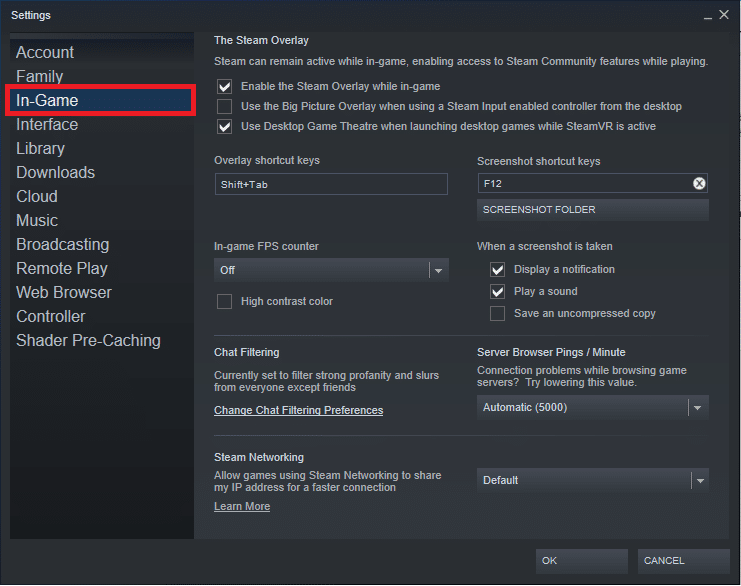
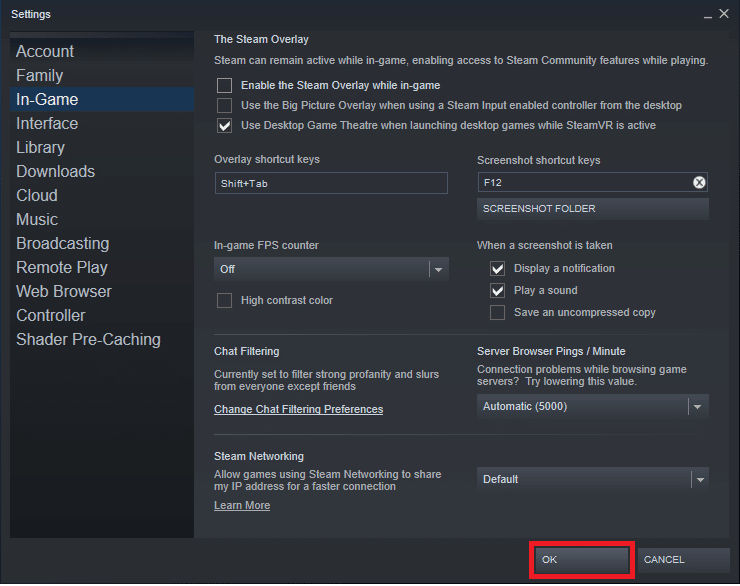
5. On the right pane, uncheck the box next to Enable the Steam Overlay while in-game shown highlighted below.
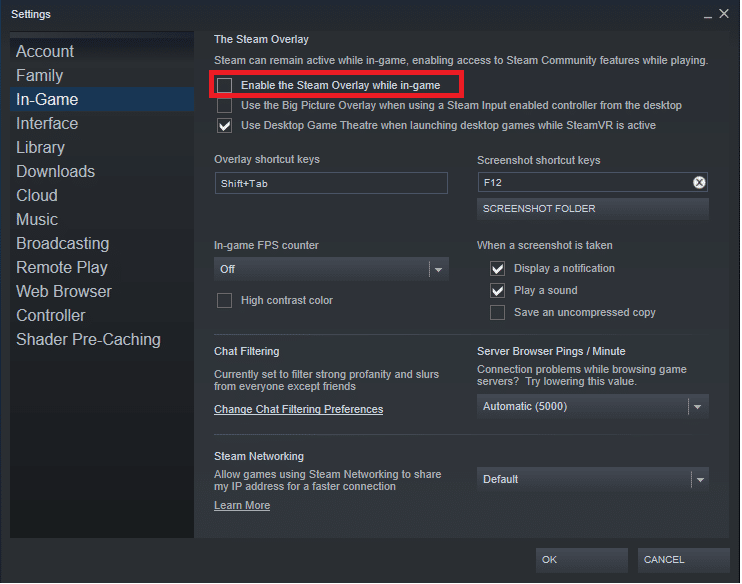
6. Now, click on OK to save the changes and Exit Steam.
Also Read: How to View Hidden Games on Steam
Option 2: Disable For A Specific Game
More often users are looking to disable Steam Overlay for a specific game and the process to do that is as easy as the previous one.
1. Launch Steam as illustrated in Method 1.
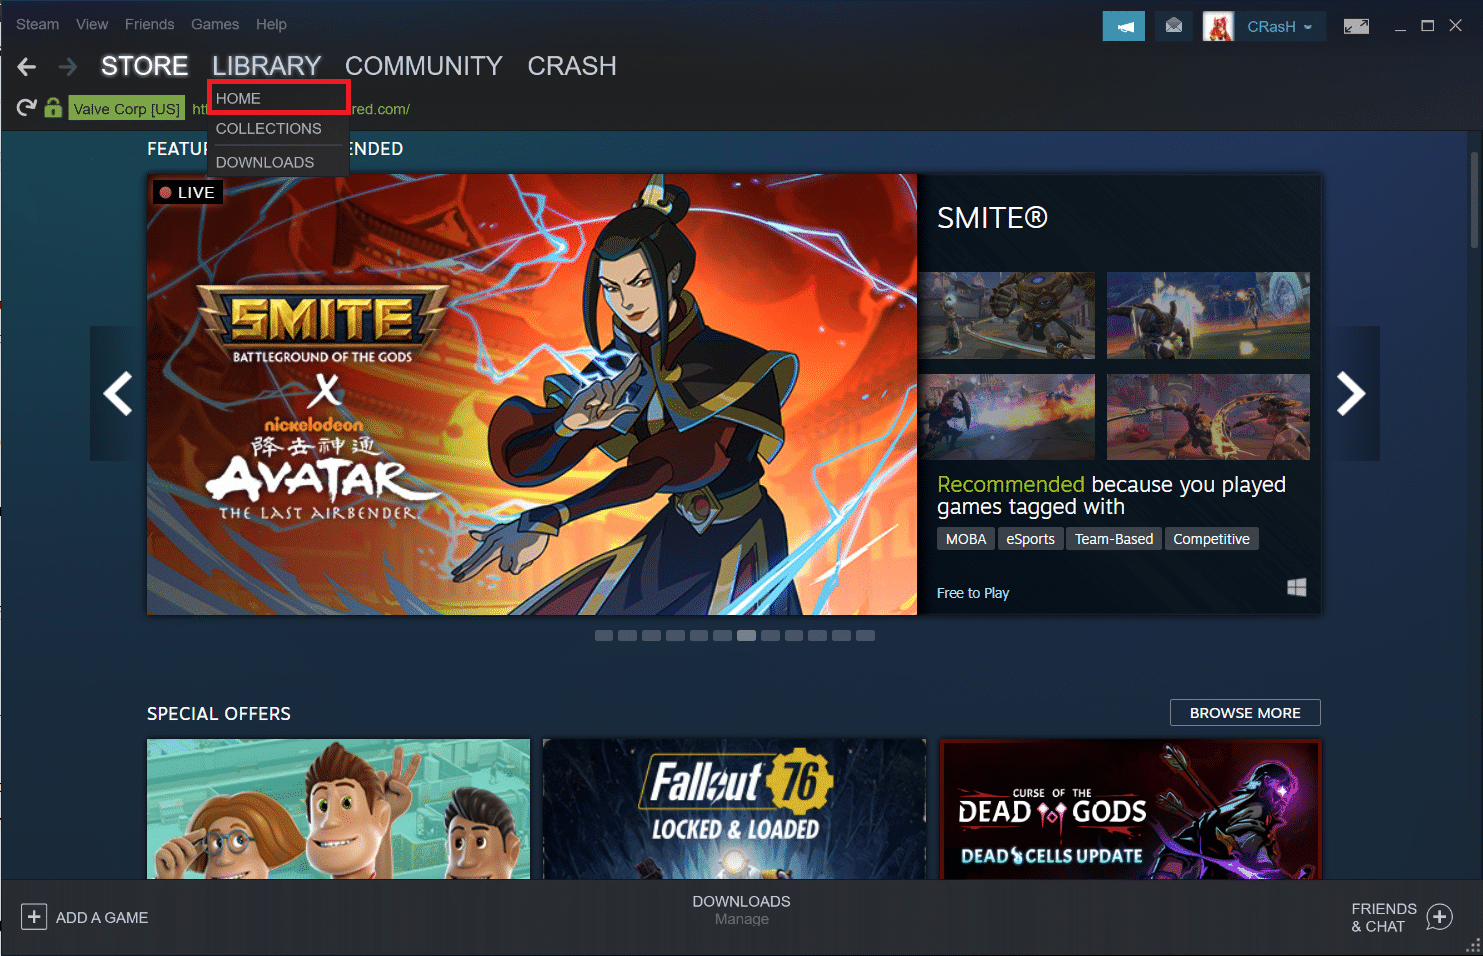
2. Here, hover your mouse cursor over the LIBRARY tab label and click on HOME from the list that unfolds.
3. You will find a list of all the games you own on the left. Right-click on the one you wish to disable In-game Overlay for and select the Properties… option, as depicted.
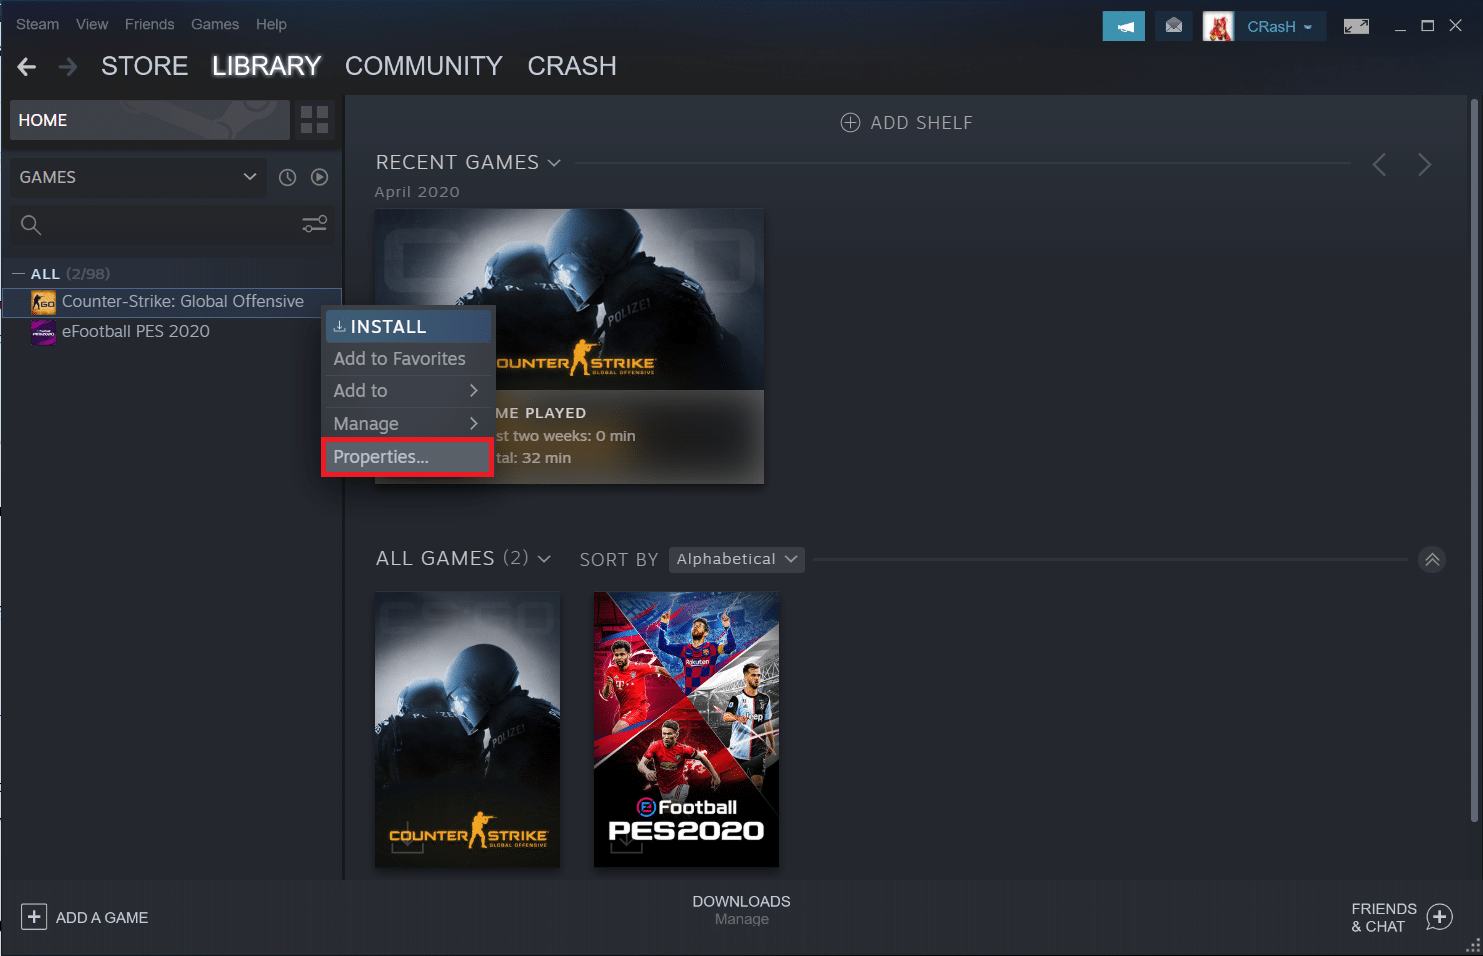
4. To disable Steam overlay, uncheck the box titled Enable the Steam Overlay while in-game in the GENERAL tab, as shown.

The Overlay feature will be disabled for the chosen game only.
Also Read: How to Use Minecraft Colors Codes
Pro Tip: Steam Overlay Enable Process
In the future, if you wish to use Steam Overlay during gameplay again, simply tick the unchecked boxes marked Enable the Steam Overlay while in-game for a specific game or all games, at once.

Additionally, to resolve overlay-related issues, try restarting your PC and your Steam application, restart the GameOverlayUI.exe process from Task Manager or launch GameOverlayUI.exe from C:Program Files (x86)Steam) as an administrator. Check out our guide on How to Fix Steam Keeps Crashing for more troubleshooting tips related to Steam.
Recommended:
We hope you were able to resolve your query on how to disable or enable Steam overlay in Windows 10 PCs. Keep visiting our page for more cool tips & tricks and leave your comments below.