Whenever you purchase an external hard disk or USB flash drive it is important to format it before you can use it. Also, if you shrink your current drive partition on Window to create a new partition from the available space then also you need to format the new partition before you can use it. The reason why it is recommended to format the hard drive is to match the File system of Windows and also to make sure the disk is free of viruses or malware.
And if you are reusing any of your old hard drives then it is a good practice to format the old drives as they may contain some files related to the previous operating system which can cause conflict with your PC. Now remember this that formatting the hard drive will erase all the information on the drive, so it is recommended you create a back of your important files. Now formatting the hard drive sounds really complicated & tricky but in reality, it’s not that difficult. In this guide, we will walk you through the step by step approach to Format Hard Drive on Windows 10, no matter the reason behind the formatting.
How to Format Hard Drive on Windows 10
Make sure to create a restore point just in case something goes wrong.
Method 1: Format a Hard Drive in File Explorer
1.Press Windows Key + E to open File Explorer then open This PC.
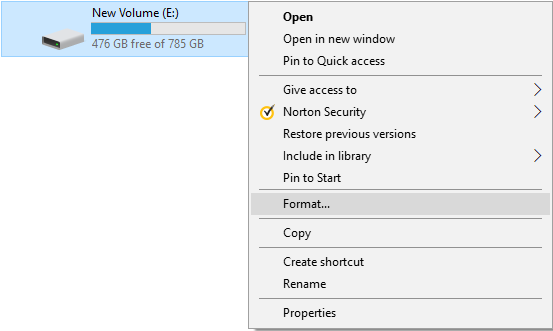
2.Now right-click on any drive which you want to format then select Format from the context menu.
Note: If you format the C: Drive (typically where Windows is installed) then you won’t be able to boot to Windows, as your operating system would also be deleted if you format this drive.
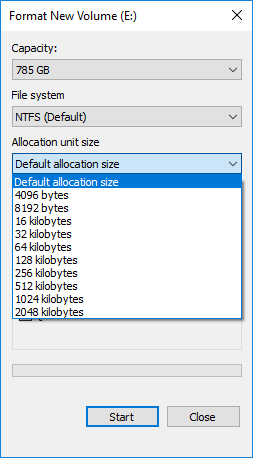
3.Now from the File system drop-down select the supported file system such as FAT, FAT32, exFAT, NTFS, or ReFS, you can select any one of them according to your use, but for Windows 10 it is best to select NTFS.
4.Make sure to leave the allocation unit size (Cluster size) to “Default allocation size“.
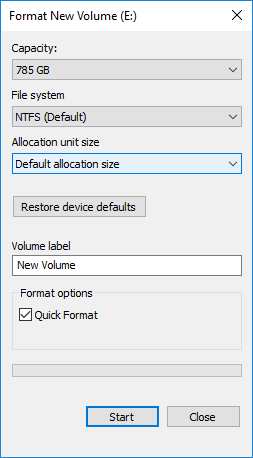
5.Next, you can name this drive anything you like by giving it a name under the “Volume label” field.
6.If you have time then you can uncheck the “Quick Format” option, but if not then checkmark it.
7.Finally, when you ready you can once more review your choices then click Start. Click on OK to confirm your actions.
8.Once the format is complete, a pop-up will open with the “Format Complete.” message, simply click OK.
Method 2: Format Hard Drive in Windows 10 using Disk Management
To start with this method, you need to first open Disk management in your system.
1.Open Disk Management using this guide.
2.It takes a few seconds to open the Disk Management window, so be patient.
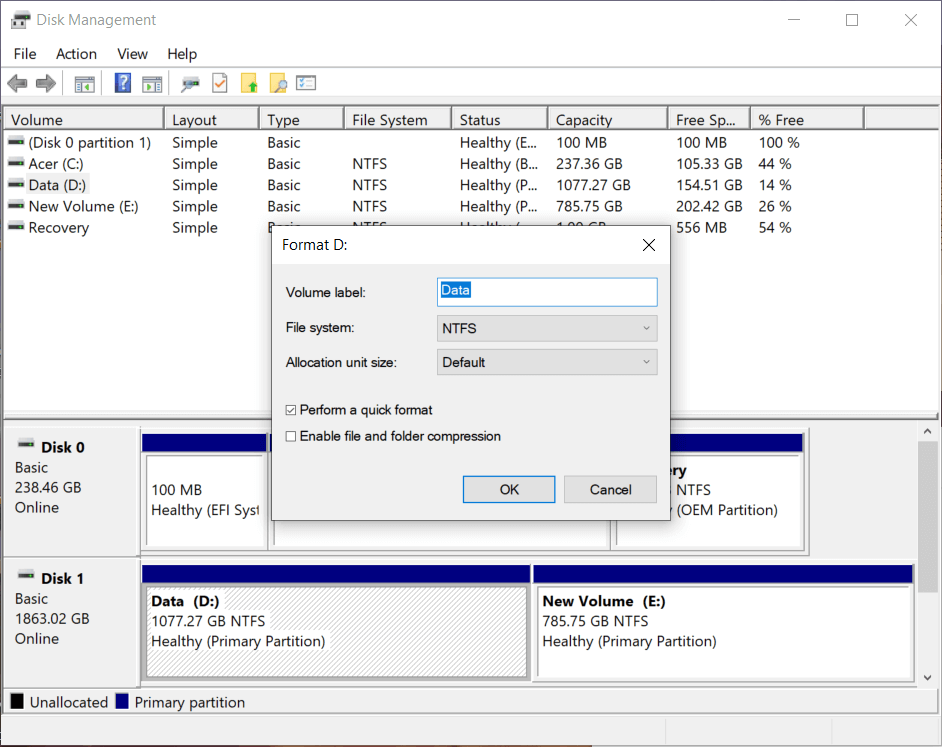
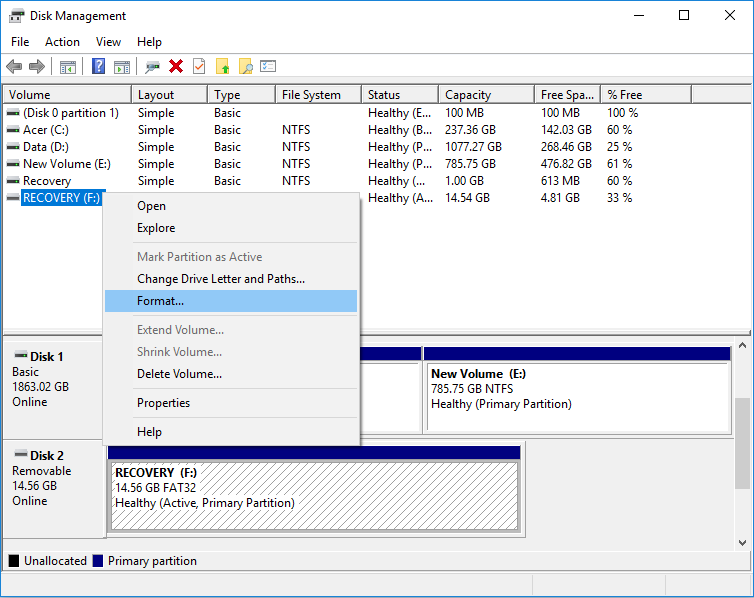
3.Once the Disk management window opens, right-click on any partition, drive, or volume which you want to format and select Format from the context menu.
Existing Drive: If you are formatting an existing drive you need to check the letter of the drive that you are formatting and deleting all the data.
New Drive: You can check it through the File system column to ensure that you are formatting a new drive. All your existing drivers will be showing NTFS/FAT32 sort of file systems while the new drive will be showing RAW. You cannot format the drive in which you have installed the Windows 10 operating system.
Note: Make sure you are formatting the right hard drive since deleting the wrong drive will deleting all your important data.
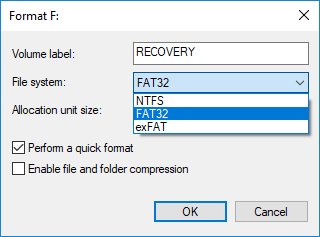
4.Type any name which you want to give your drive under the Volume label field.
5.Select the file systems from FAT, FAT32, exFAT, NTFS, or ReFS, according to your use. For Windows, it is generally NTFS.
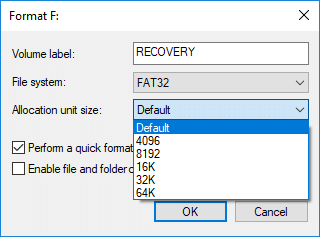
6.Now from Allocation unit size (Cluster size) drop-down, select Default. Depending on this, the system will allocate the best allocation size to the hard drive.
7.Check or uncheck “Perform a quick format” options depending on whether you want to do a quick format or full format.
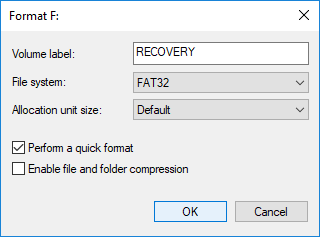
8.Finally, review all your choices:
- Volume label: [label of your choosing]
- File system: NTFS
- Allocation unit size: Default
- Perform a quick format: unchecked
- Enable File and folder compression: unchecked
9.Then click OK and again click on OK to confirm your actions.
10.Windows will show a warning message before you continue to format the drive, click Yes or OK to continue.
11.Windows will start formatting the drive and once the percentage indicator shows 100% then it means that the formatting is completed.
Method 3: Format a Disk or Drive in Windows 10 Using Command Prompt
1.Press Windows Key +X then select Command Prompt (Admin).

2.Type the following in command in cmd one by one and hit Enter after each one:
diskpart
list volume (Note down the volume number of the disk which you want to format)
select volume # (Replace the # with the number which you noted down above)
3.Now, type the below command to either do a full format or a quick format on the disk:
Full format: format fs=File_System label=”Drive_Name”
Quick format: format fs=File_System label=”Drive_Name” quick
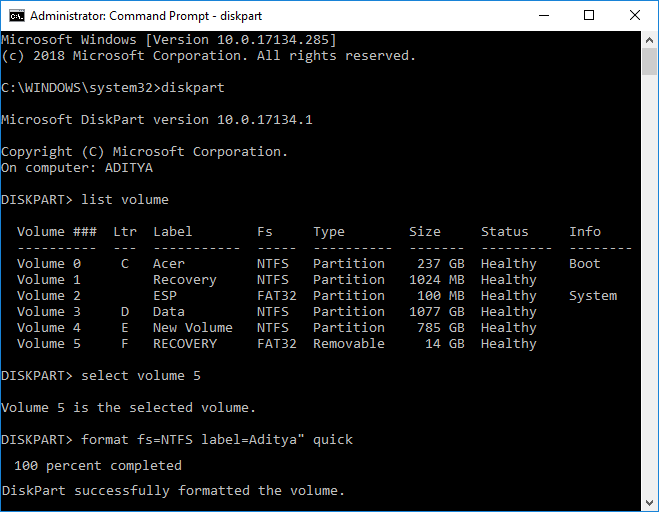
Note: Replace the File_System with the actual file system you want to use with the disk. You can use the following in the above command: FAT, FAT32, exFAT, NTFS, or ReFS. You need to also replace Drive_Name with any name you want to use for this disk such as Local Disk etc. For example, if you want to use NTFS file format then the command would be:
format fs=ntfs label=”Aditya” quick
4.Once the format is complete, you can close Command Prompt.
Finally, you have completed the formatting of your hard drive. You can start adding new data on your drive. It is highly recommended that you should keep a backup of your data so that in case of any mistake you can recover your data. Once the process of formatting started, you cannot recover your data back.
Recommended:
I hope the above steps were able to help you easily Format Hard Drive on Windows 10, but if you still have any questions regarding this guide then feel free to ask them in the comment section.