Here is tips on how to Install Git on Home windows:
Technique 1: Utilizing the Git for Home windows Installer (Beneficial)
-
Obtain the installer: Go to the official Git for Home windows obtain web page https://git-scm.com/downloads. There, you will discover the newest model of the installer for each 64-bit and 32-bit methods. Select the suitable model to your system.
-
Run the installer: Double-click the downloaded installer file (.exe) and observe the on-screen directions.
-
Customization throughout set up: The installer presents a number of choices to customise your Git expertise. Listed here are some key factors:
- Use Git from the Home windows Command Immediate: This selection lets you entry Git instructions immediately from the Command Immediate window. It is really helpful for many customers.
- Affiliate .gitattributes information: This selection permits Git to acknowledge particular configuration information used for code formatting or line endings.
- Checkout as admin: This selection could be useful in case you plan to work with repositories requiring administrative privileges.
You possibly can overview the descriptions for every possibility throughout set up and select the settings that fit your wants.
-
Full the set up: As soon as you’ve got gone by way of the customization choices, observe the remaining steps within the installer wizard to finish the Git set up in your Home windows system.
Technique 2: Utilizing Winget (For Home windows 10 model 1809 and later)
For those who’re utilizing Home windows 10 model 1809 or later, you may as well Install Git utilizing the built-in package deal supervisor Winget.
-
Open Command Immediate: Press the Home windows key, seek for “Command Immediate,” and launch it.
-
Install Git utilizing Winget: Within the Command Immediate window, kind the next command and press Enter:
winget set up git
Winget will obtain and Install Git in your system.
Verifying Git Set up:
As soon as you’ve got put in Git utilizing both methodology, you may confirm the set up by opening a Command Immediate window and typing the next command:
git --version
This command ought to show the put in Git model data, confirming profitable set up.
Extra Notes:
- Take into account including Git to your system path throughout set up for simpler entry from any Command Immediate window.
- Discover the official Git documentation https://git-scm.com/ to study extra about utilizing Git instructions and functionalities.
By following these steps, you must be capable of Install Git in your Home windows system and begin utilizing it for model management in your tasks.
See Additionally:
How to Enable and Disable Hardware Acceleration in Windows 10
How to Stop Windows Update Notifications
Key Takeaways
Obtain the Git installer from the official Git web site at git-scm.com, after which run the executable. You may additionally Install Git by working “winget set up –id Git.Git -e –source winget” in PowerShell.
Git is an important software if you are going to be coding. It allows you to conveniently handle totally different variations of code inside a repository (repo). Git can be the most typical technique to entry GitHub, one of many largest code repositories on this planet. Listed here are a couple of methods to put in Git on Home windows.
Install Git with the Home windows Executable
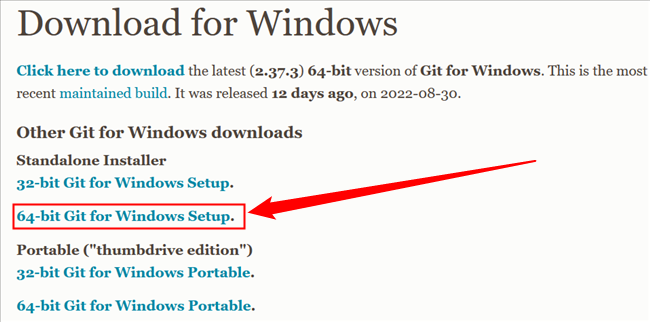
The best technique to get Git is to obtain the executable from the Git website.
Click on “64-bit Git for Home windows Setup” to start out the obtain, after which wait a second — the obtain is just about 50 megabytes, so it should not take very lengthy.
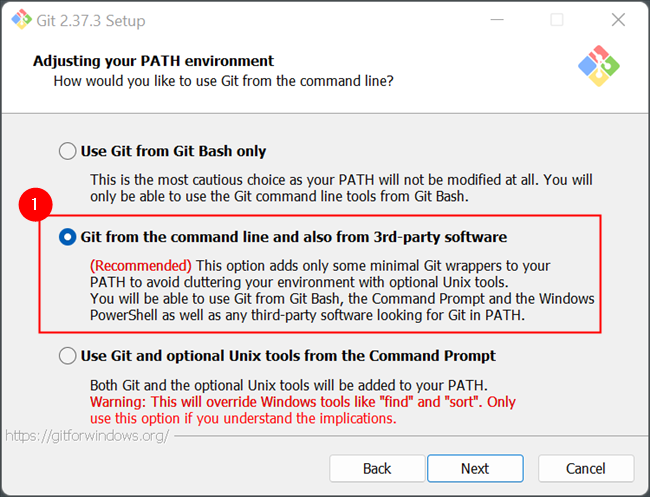
Double-click the executable you simply downloaded, then click on “Subsequent” to maneuver by way of the set up prompts. There are a ton of choices throughout the set up course of — don’t be concerned an excessive amount of about most of them. The default choices will likely be simply effective, however there are two you must be careful for.
The primary is the textual content editor Git will use. The default choice is Vim. Vim is ubiquitous and an indicator of command-line interfaces in all places however studying to make use of its idiosyncratic instructions could be daunting. You need to in all probability choose one thing else as a substitute, like Visible Studio Code, Elegant, NotePad++, or every other plain textual content editor you want.
Simply click on the drop-down menu, after which choose the brand new program from the record.
Attempt Visible Studio Code if you do not know which one to select.
Click on by way of the remaining choices, and await all the pieces to complete downloading. The time requires to obtain all the pieces will differ relying on what you selected to put in. The default choice ends in a obtain that’s about 270 megabytes.
Use Winget to Obtain Git
You too can use Winget to obtain Git in case you’re a fan of command-line interfaces.
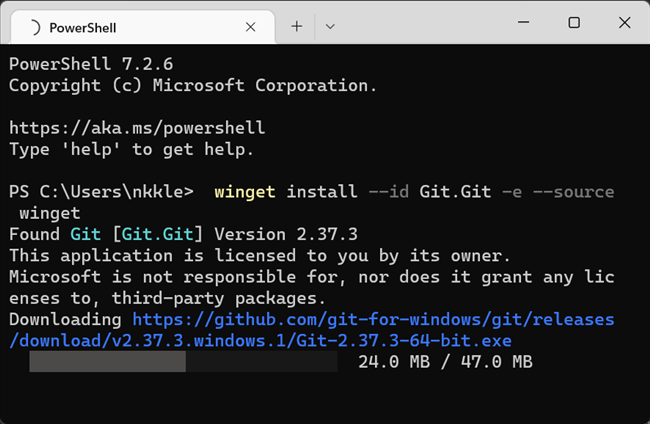
Open up PowerShell, or Home windows Terminal with a PowerShell tab, after which paste or kind:
winget set up --id Git.Git -e --source winget
You may see a couple of obtain bars seem within the Terminal window whereas Winget fetches all the pieces it wants.
A traditional Home windows set up window will seem as the ultimate a part of the set up course of.
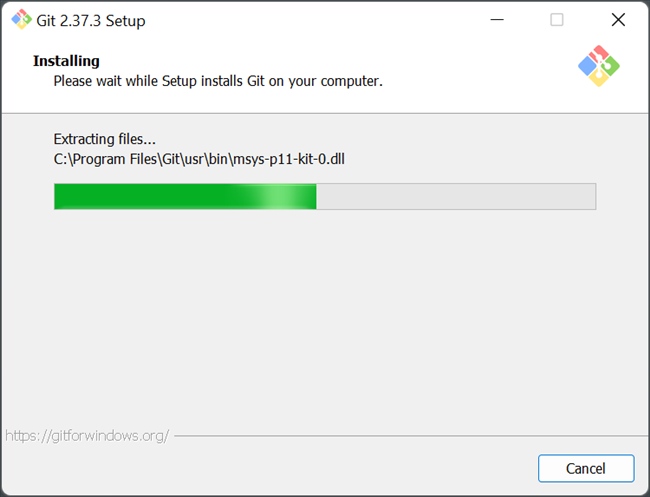
You are good to go after that window closes. You may discover that Git has been added to the PATH. Any applications that require it to put in — like Steady Diffusion — will now work accurately.