How to Log In Automatically to Windows 11

Log In Automatically to Windows 11
Key Takeaways
You will first need to set “DevicePasswordLessBuildVersion” to “0” in the registry. After you have, you can launch the “netplwiz” window, uncheck “Users must enter a user name and password to use this computer,” and provide your account’s password. Windows 11 will then sign you in automatically.
If your PC never leaves your home and you don’t really need a password, automatically logging in will save you the trouble of typing in your password every single time you turn on or restart your PC. Here’s everything you need to know to enable auto login.
You Generally Shouldn’t Use Auto Login
Automatically signing in potentially exposes your sensitive data to anyone that has physical access to your PC. It isn’t as bad as completely removing your Windows 11 password, but it still presents an unnecessary risk.
Anyone with physical access to your PC will likely have full administrative control, which means they can recover your Microsoft password if they really want to. From there, it is a simple matter to gain access to your Microsoft account and everything stored there.
See Also:
How to Make Your Windows 11 PC Never Go To Sleep
How Many Instagram Story Ring Color are There?
If you’re going to use automatic login, we recommend you use a local account instead.
If you just don’t like having to type a password, consider using Windows Hello webcam sign-in instead.
Enable the Option to Bypass Sign-in
Windows 11 still supports automatic sign-in — the option is just disabled by default. We’ll need to use the Registry Editor (Regedit) to tweak a few things to enable it again. Alternatively, you can just download and use the registry key we provide, “Enable_Automatic_Login_Option.zip,” in the next section. It’ll handle everything automatically.
The Windows Registry is essential to the functioning of the Windows 11 operating system and most applications you will ever install. You need to be careful when you’re editing the registry, since an incorrectly deleted or changed value can result in severe errors or even an inoperable PC. You should familiarize yourself a bit with the Windows Registry before proceeding if you’re not familiar with it already.
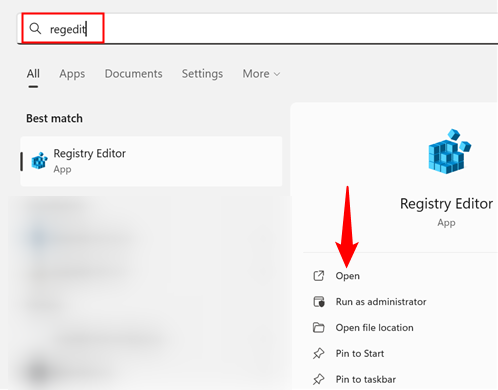
Click the Start button, type “regedit” into the search bar, then hit Enter or click “Open.”
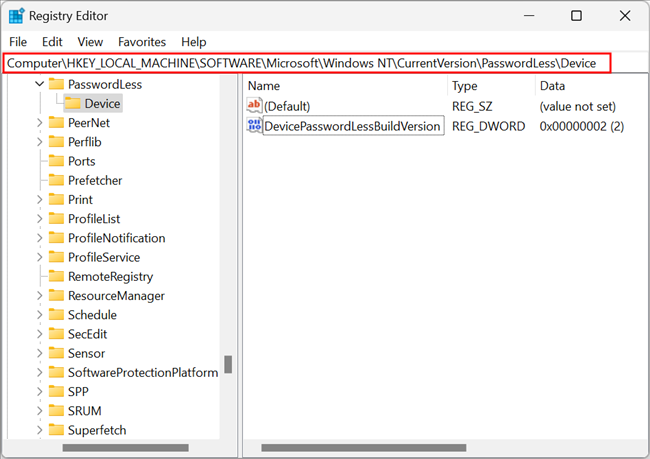
Navigate to the following address by pasting it into Regedit’s address bar:
ComputerHKEY_LOCAL_MACHINESOFTWAREMicrosoftWindows NTCurrentVersionPasswordLessDevice
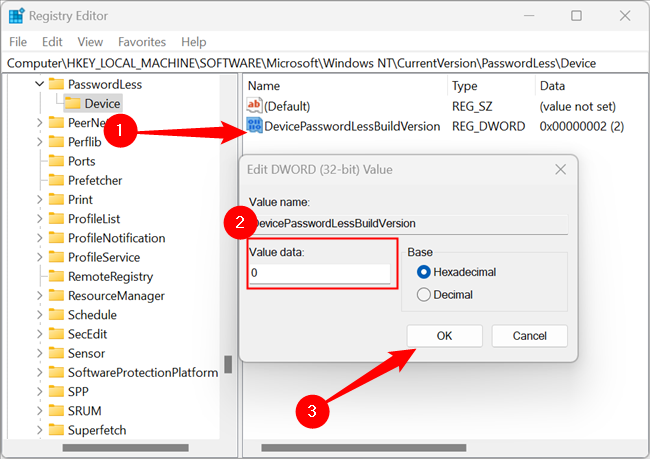
Changing the value from 2 to 0 is what enables automatic login. Our work on the registry is done, and you can close Regedit.
Use Our Registry Hack to Enable the Option Instead
If you don’t want to mess with the registry manually, you can use our pre-made REG file to apply the change automatically. Just download “Enable_Automatic_Login_Option.zip,” open it up in your favorite file archiving program, and double-click “Enable_Automatic_Login_Option.reg.” There is also a “Disable” file included in the ZIP file to undo the change in case you change your mind.
Download Enable_Automatic_Login_Option.zip
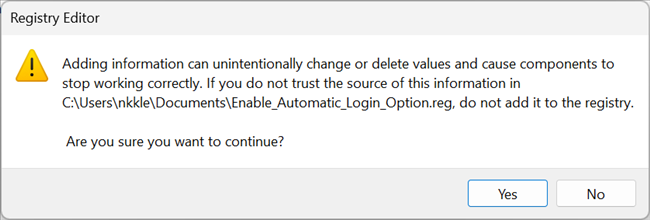
You’ll get a popup warning you that REG files can be harmful to your PC — that is true. A malicious REG file could cause a ton of problems. You can always audit a REG file to determine what it does by opening it up in a plain text editor, like Visual Studio Code, Atom, Notepad, Notepad++, or countless others.
In this case, however, the REG file does only what we outlined above, so just click “Yes.”
Enable Automatic Sign-in
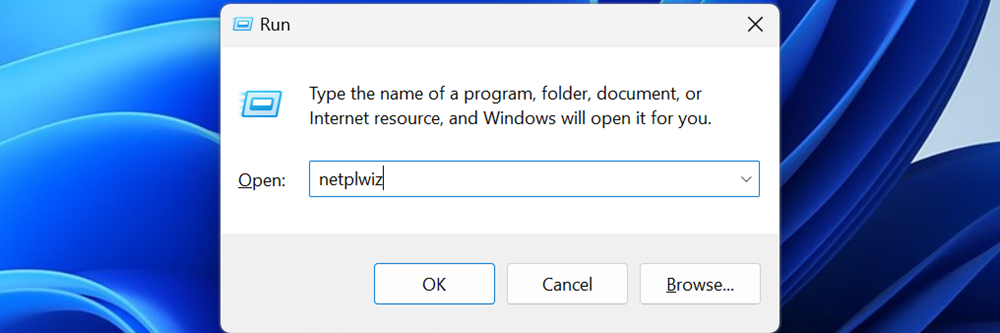
Modifying the registry was the hard part of this job. Now you just need to enable local login. Hit Windows+R to open the run window, type “netplwiz” into the field, then hit Enter or click “OK.”
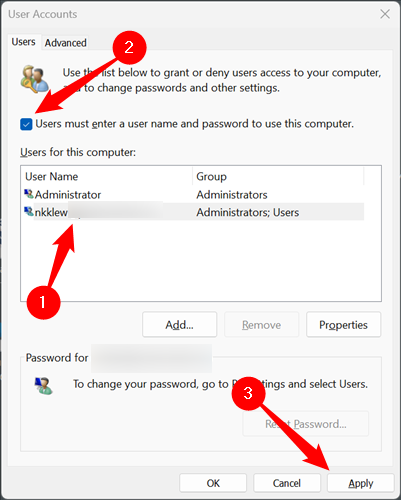
You need to enter your username and password on the next screen. If you’re using a Microsoft account to log in to Windows, the password you need to provide is your Microsoft password.
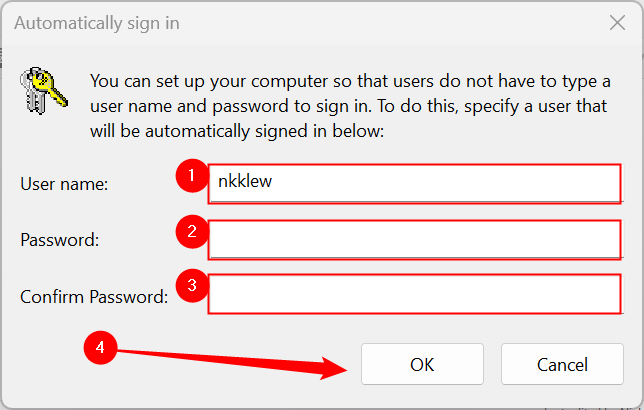
That is it — you’re done. The next time you restart your computer, you’ll automatically log directly into your chosen account. Just keep in mind the security implications.
There are two main methods to log in automatically to Windows 11, but one requires a slight modification in the registry due to a recent security change by Microsoft. Here’s how to achieve automatic login for Windows 11 using both methods:
Method 1: Using Settings (For Users with Windows 11 Version 21H2 or Earlier)
Note: This method is no longer recommended for the latest Windows 11 updates due to security reasons. If you’re on Windows 11 version 21H2 or earlier, you can still use this method, but proceed with caution.
-
Open the Settings app by clicking on the Start menu and selecting the gear icon, or by pressing the Windows key + I shortcut.
-
Navigate to “Accounts” from the Settings options.
-
Click on “Sign-in options” on the right-hand side.
-
Scroll down to the “Advanced sign-in options” section.
-
Look for the setting labeled “Require sign-in for resuming from sleep mode (recommended)”.
-
Toggle the switch to “Off” for this option. This will allow your PC to resume from sleep mode without requiring a password.
-
(Optional) For added security, consider enabling “Windows Hello PIN” as a secondary login method. This way, you’ll still have a secure login option for booting up your PC for the first time or after a restart.
Method 2: Using Registry Editor (Recommended for All Windows 11 Versions)
Important Note: Modifying the registry involves a certain level of technical risk. It’s recommended to create a system restore point before proceeding in case you need to revert any changes. Here’s how to create a restore point: https://support.microsoft.com/en-us/windows/create-a-system-restore-point-77e02e2a-3298-c869-9974-ef5658ea3be9
-
Open the Registry Editor. Press the Windows key + R shortcut to open the Run dialog box. Type “regedit” and press Enter.
-
Navigate to the following key:
HKEY_LOCAL_MACHINE\SOFTWARE\Microsoft\Windows NT\CurrentVersion\Winlogon
- You can navigate through the folders in the left pane of the Registry Editor window.
-
In the right pane of the Registry Editor, locate a value named “AutoLogonEnabled”.
-
If the value “AutoLogonEnabled” doesn’t exist, you can create it. Right-click on an empty space in the right pane, select “New,” and then choose “DWORD (32-bit) Value”. Name the new value “AutoLogonEnabled”.
-
Double-click on the “AutoLogonEnabled” value.
-
In the edit window, set the “Value data” to “1” (one). This enables automatic login.
-
(Optional) Create additional values for automatic login:
- DefaultUserName: Create a new String Value named “DefaultUserName” and set its data to your username for automatic login.
- DefaultDomainName (if applicable): If you’re on a domain network, create a new String Value named “DefaultDomainName” and set its data to your domain name.
- Password: This is the crucial part. Due to security changes, storing your password in plain text in the registry is no longer recommended. However, there’s a workaround using a credential vault. Here’s a guide on how to set up automatic login with a credential vault https://answers.microsoft.com/en-us/windows/forum/all/how-to-login-automatically-to-windows-11/c0e9301e-392e-445a-a5cb-f44d00289715 (Note: This method involves additional technical steps and is only recommended for advanced users comfortable with managing credentials).
-
Click “OK” on the edit window to save the changes.
-
Restart your computer for the changes to take effect.
Using Method 2 is the recommended approach for automatic login on Windows 11, especially with the latest updates. Remember to prioritize security and consider alternative methods like Windows Hello PIN if storing your password in the registry is not desirable.