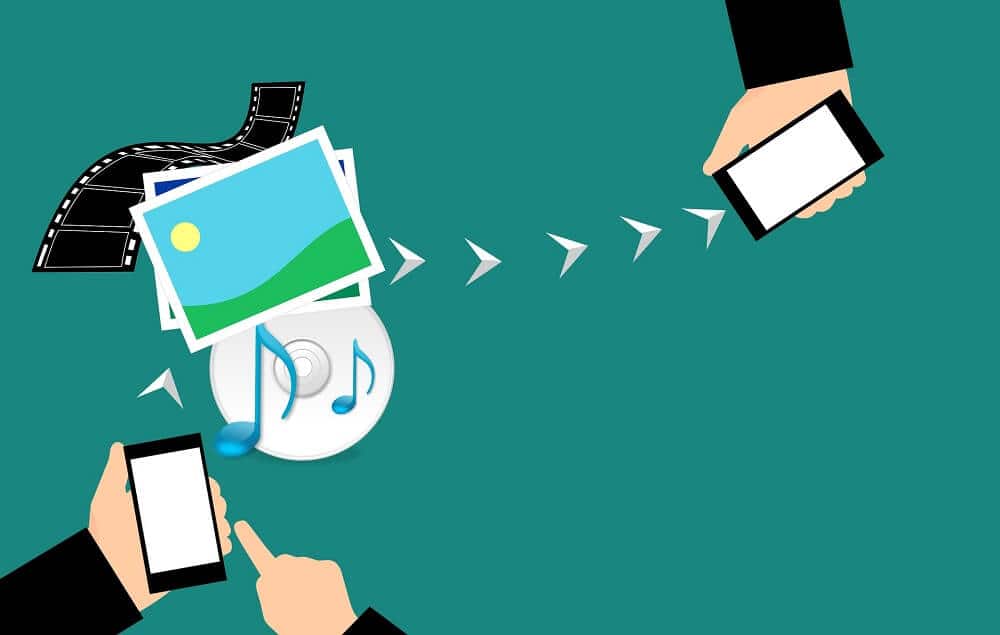
How to Transfer data from your old Android phone to new one

Transferring data from our old smartphone to a new one is a major concern for a lot of Android users. That is exactly why we are here to help you. Thankfully, the Android system has a lot of convenient built-in features that make the data transfer process seamless. It’s backup and restore tools make sure that nothing gets lost in transition. You can rest assured that you will be picking up exactly where you left off. In this article, we are going to discuss in detail the complete process of transferring your data from your old Android phone to a new one.
How to Transfer data from your old Android phone to new one
Our lives are heavily reliant on our smartphones. We use them almost throughout the day, be it for work or recreation. As a result, we end up accumulating a lot of data over the years. This data includes both personal as well as professional files. Under no circumstances, would we want our data to get lost while switching to a new smartphone. So without wasting any time let’s see how you can transfer data from your old smartphone to new one using the below-listed steps:
How to back up data on your old Android phone
The easiest way to transfer your data from your old Android phone to your new one is to use the backup and restore feature of Android. As the name suggests, it is a two-step process. Simply back up all your essential data from your old phone to a cloud server and then restore them by downloading it from the cloud to your new phone. As the name suggests, it is a two-step process. In this section, we are going to discuss the first part of the process, and that is backing up your data.
See Also:
7 Ways to Fix WhatsApp Not Syncing Contacts on Android
How to Restrict YouTube on Android
How to Open Bin File on Android
How to Get Free WiFi on Your Phone
How Much Does it Cost to Fix a Cracked Phone Screen on Android
1. Setting up Backup on Google Drive
All Android smartphones require a Google Account to sign in to the device and use various features, apps, and programs. You must have logged in to or created a Google Account while setting up your phone for the first time. This Google Account is a universal solution to all your Android device-related problems. Using a single account, you can use all the extremely useful apps and services offered by Google and Android.
Since the need of the hour is backing up your data, the one app that will solve all your problem is Google Drive. It is a free cloud storage space provided to you that creates and saves a backup for all your essential data. Therefore, the first thing that you need to make sure is that your Google account is linked to Google Drive, and data backup is enabled. In most cases, it is linked by default, but there is absolutely no harm in making sure. Follow the steps given below to see how:
1. The first thing that you need to do is open Settings on your device.
2. Now scroll down and select the System option.
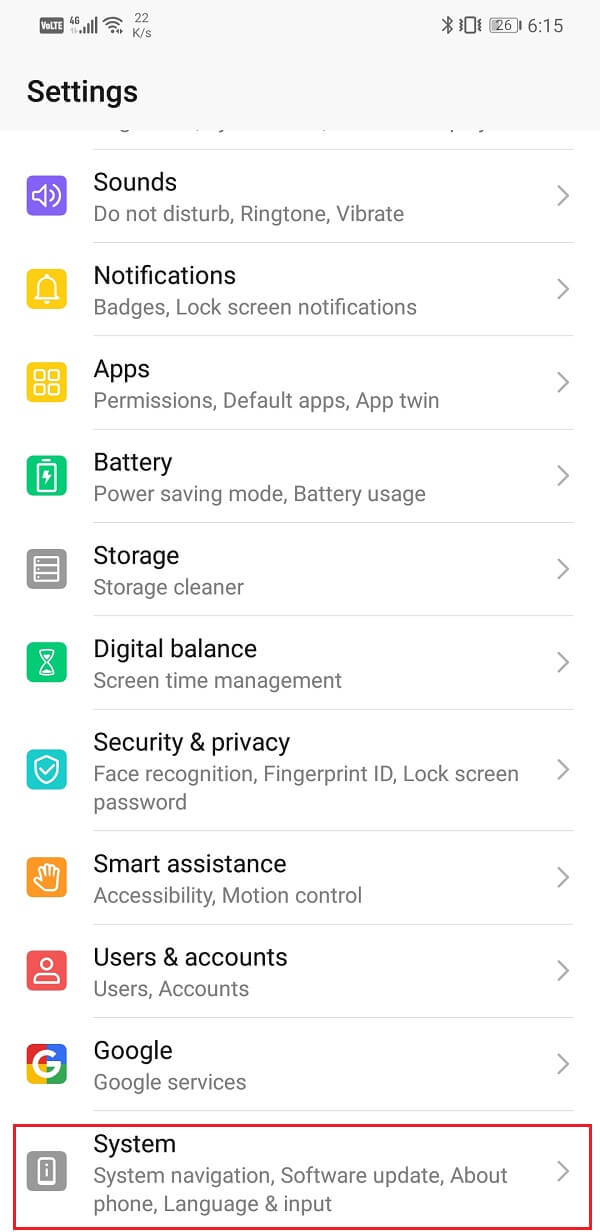
3. Here, tap on the Backup and Restore option.
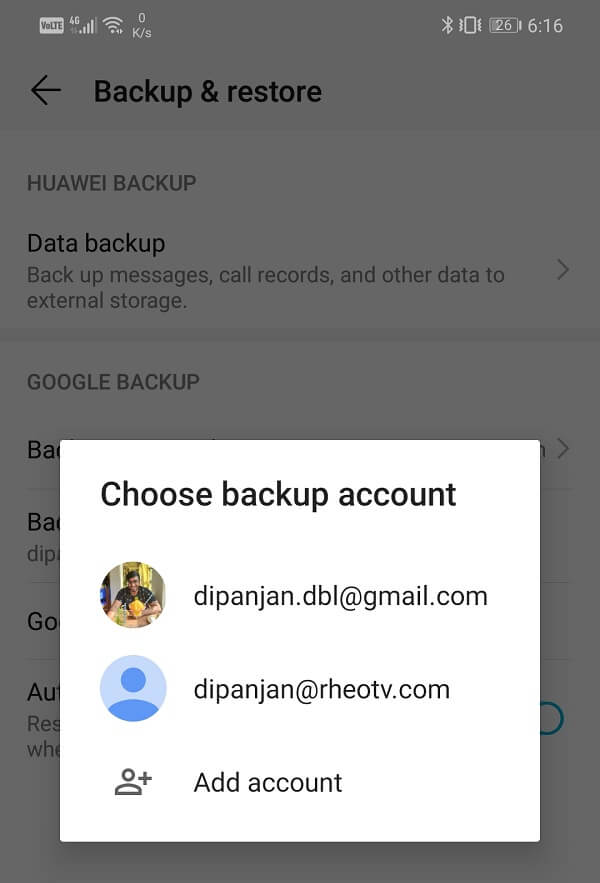
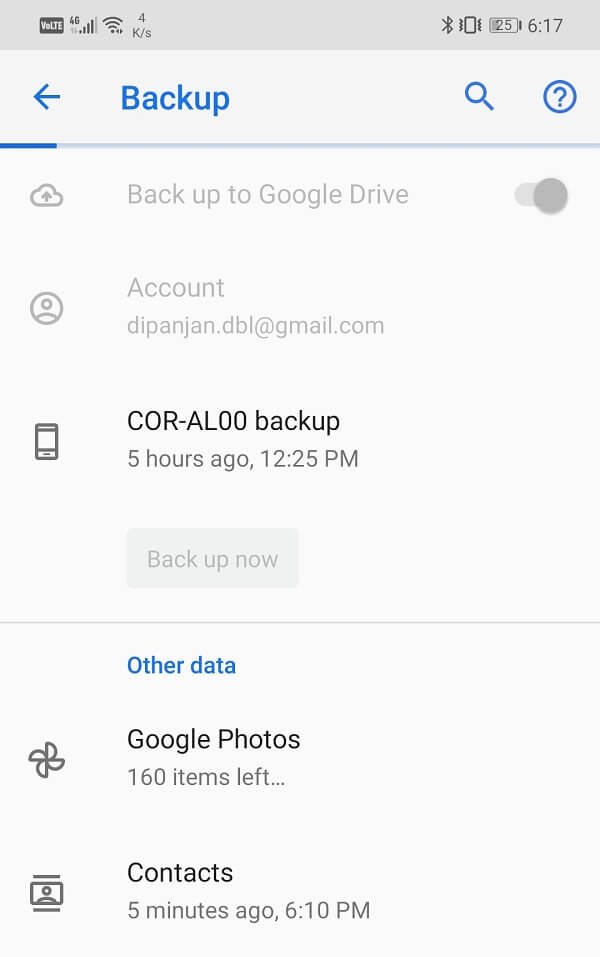
4. Under the Google Backup section, tap on the Backup account option and select your Google account. In case you are logged into multiple Google accounts on the same device, then select your primary account.
5. Now tap on the Google Account option.

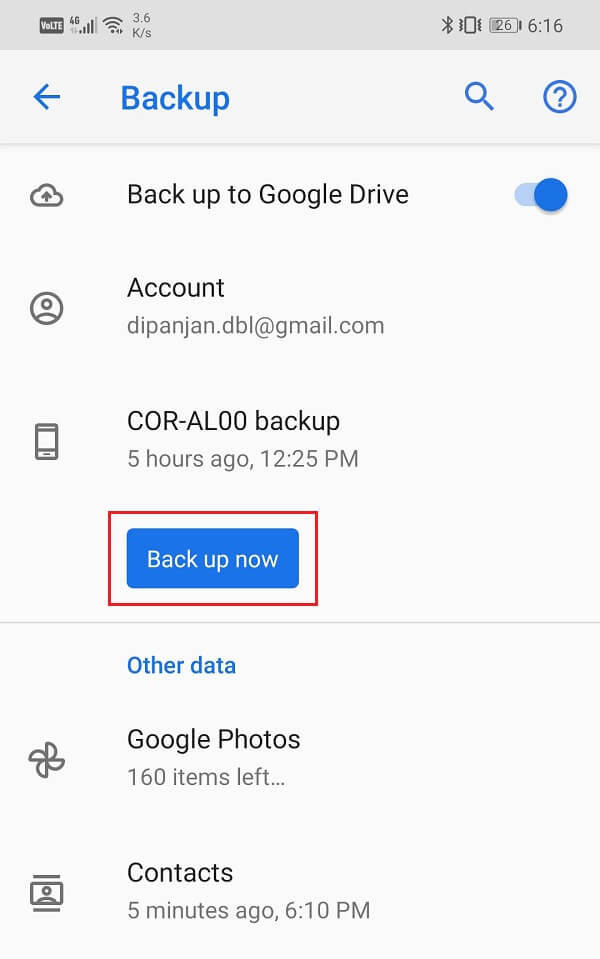
6. Here, make sure that the toggle switch next to “Backup to Google Drive” is turned on.
7. You can also tap on your device’s name and check out the different data items that are getting backed up. It includes app data, device settings, SMS, and call history.
8. Additionally, it also backs up your photos via Google Photos (will be discussed later) and Contacts.
9. Tap on the Back up now button to make sure that everything gets backed up on Google Drive that is linked to your account.

10. Now ideally, a backup should take place automatically, and you need to press the blue back up button manually. However, for this, you need to make sure auto-sync is enabled.
2. Enable Auto-Sync for your Google Account
As mentioned earlier, you have the choice to either manually backup your data using the blue button or set it to automatically back up your data, now and then. Obviously, automatic backup is more convenient, and it is super easy to set it up. All that you need to do is make sure that Auto-sync is enabled for your Google Account. Follow the steps given below to see how:
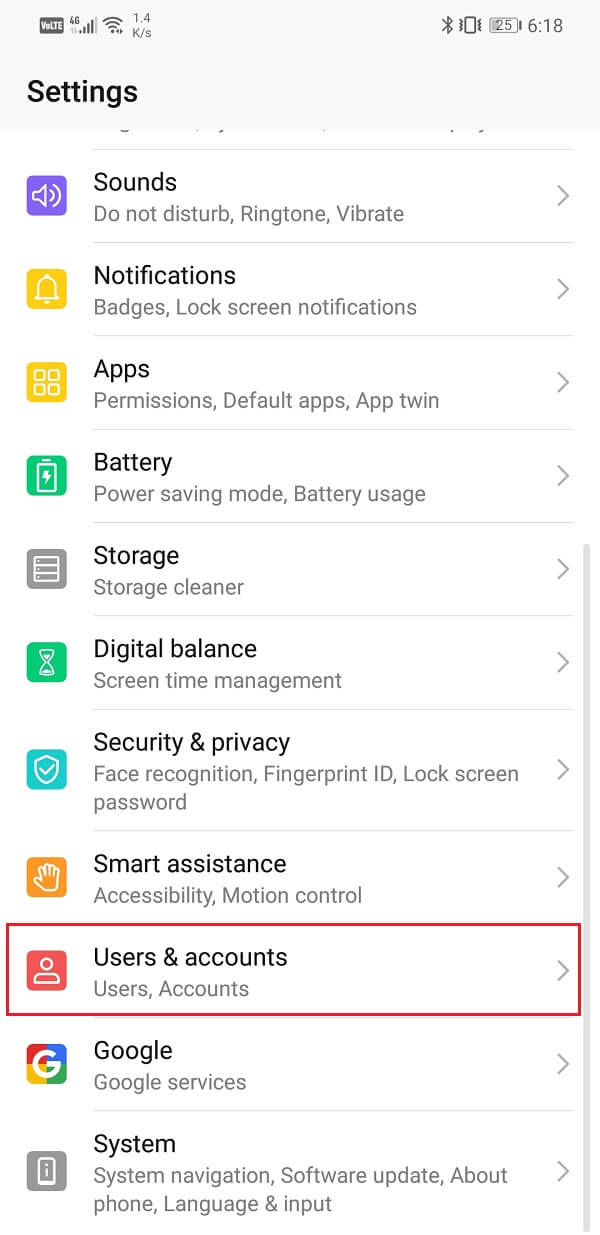
1. Firstly, open Settings on your device.
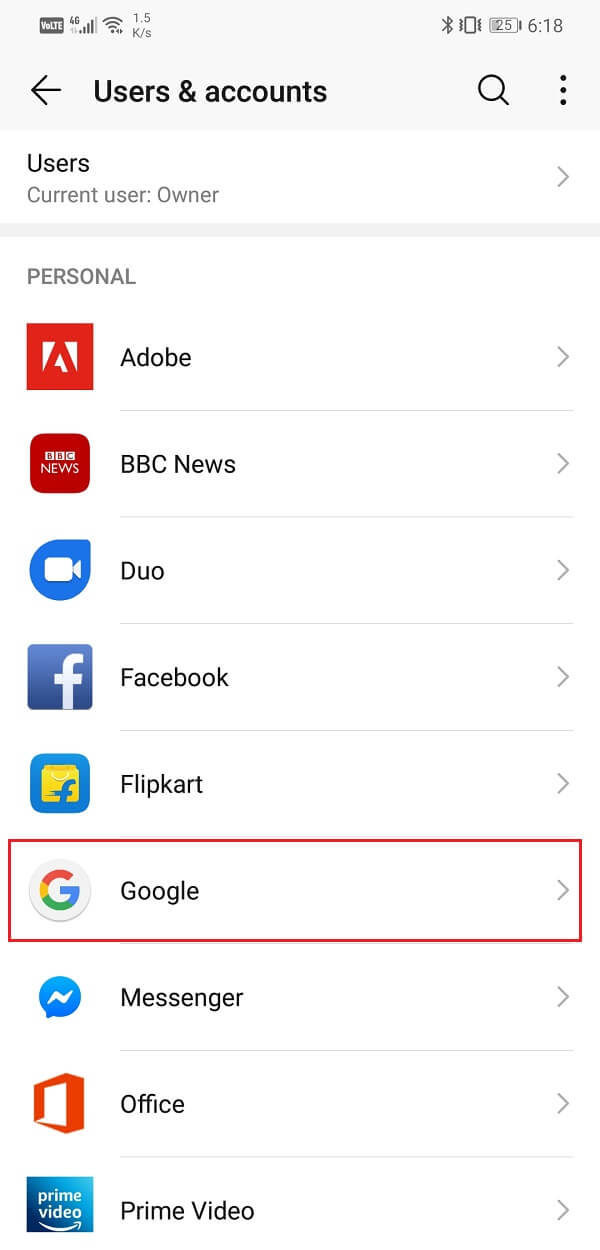
2. Now scroll down and select the Users & accounts option and in here, select the Google option.
3. This will open the Sync settings for your Google Account.
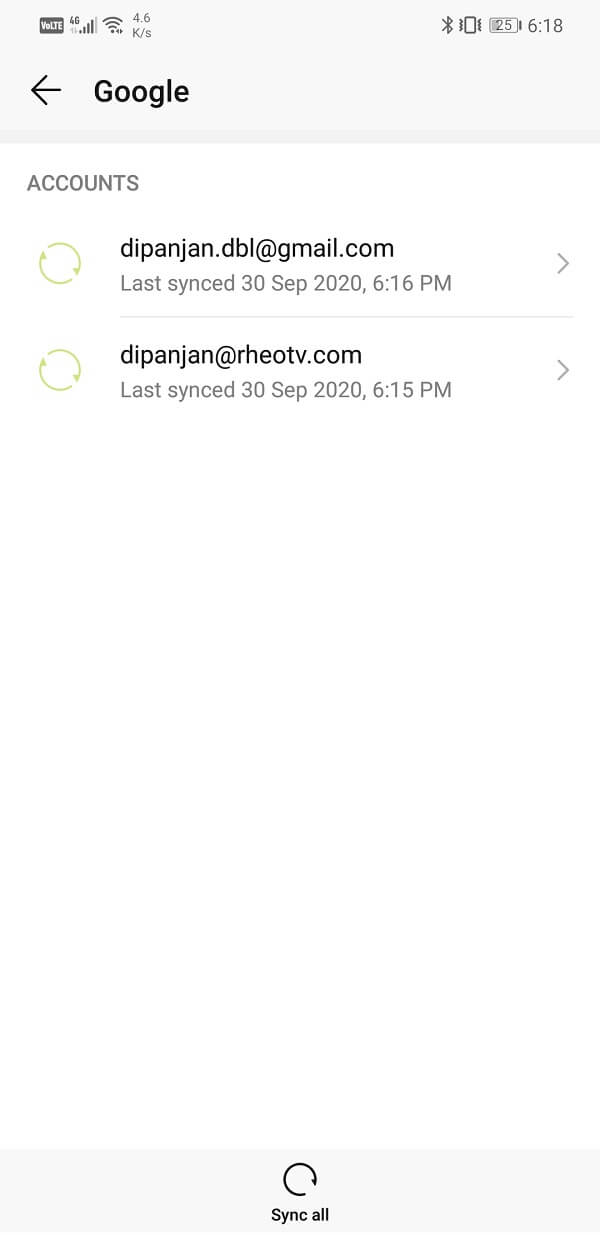
4. Here, make sure that the toggle switch next to essential options like Contacts, Drive, Gmail, Docs, Chrome, etc., is enabled.
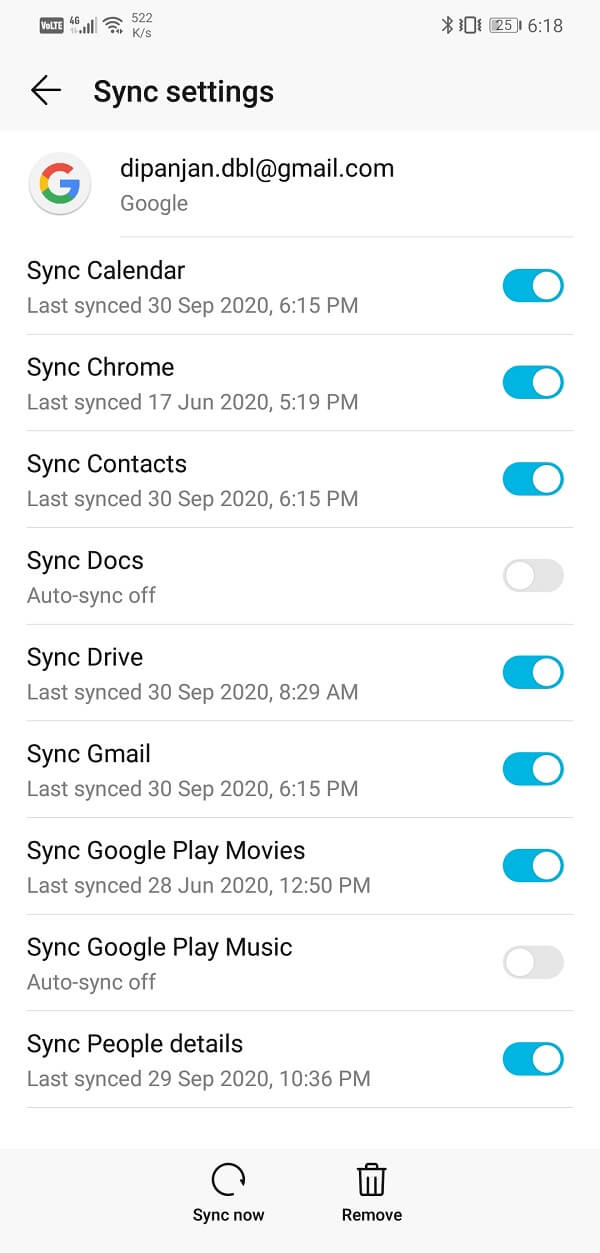
5. That’s it you are all set. All your data will now be get backed up automatically at frequent intervals.
3. Backup your Photos and Videos using Google Photos
When it comes to transferring your media files that include photos and videos, there is no better solution than Google Photos. It is an amazing cloud storage app that automatically backs up your photos and videos on the cloud. This app is a gift from Google to Android users and more so for Google Pixel users as they are entitled to unlimited cloud storage space. There is absolutely no need for Android users to try any other cloud storage service as Google Photos is the best one out there. All that you need to do is sign in with your Google account, and you will be allocated a designated space on the cloud server to store your media files.
The best feature about backing up your media files to Google Photos is that you can access them anytime and anywhere. When you sign to your Google Account on your new device and open Google Photos, you will be able to view and download all your photos. It can even be accessed via the web on a computer. Given below is a step-wise guide to set up media backup on Google Photos:
1. Firstly, open the Google Photos app on your device. This should be a pre-installed app, although if you do not find it, then you can download it for free on Google Play Store and log in with your Google Account.
2. Now tap on your profile picture on the top left-hand side of the screen and select the Settings option.
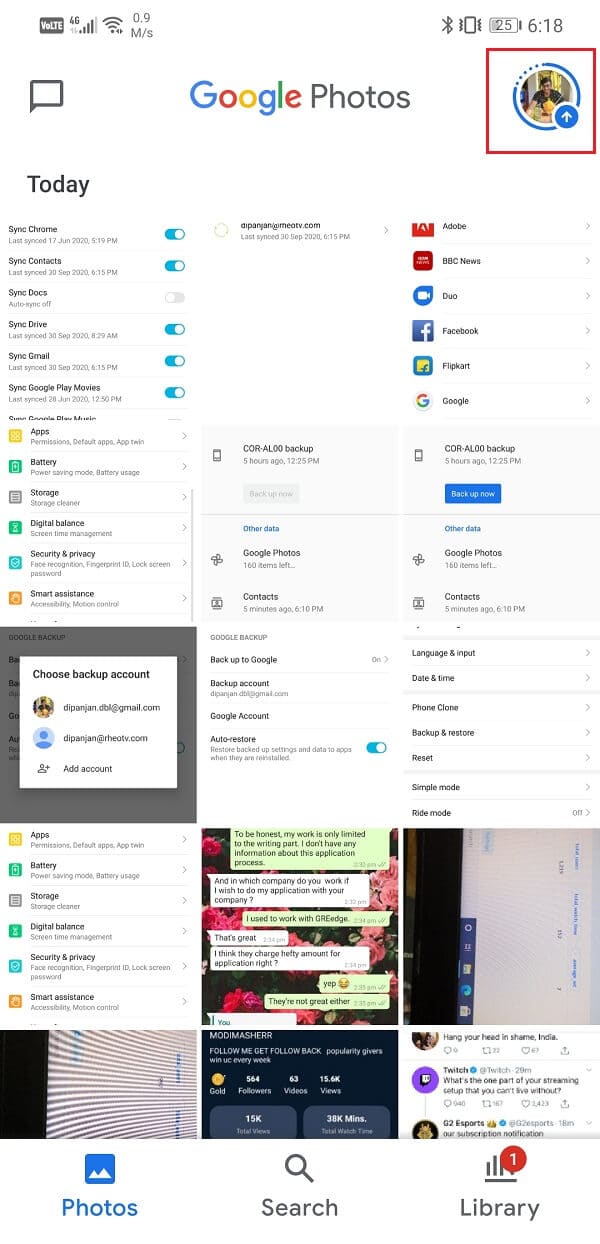
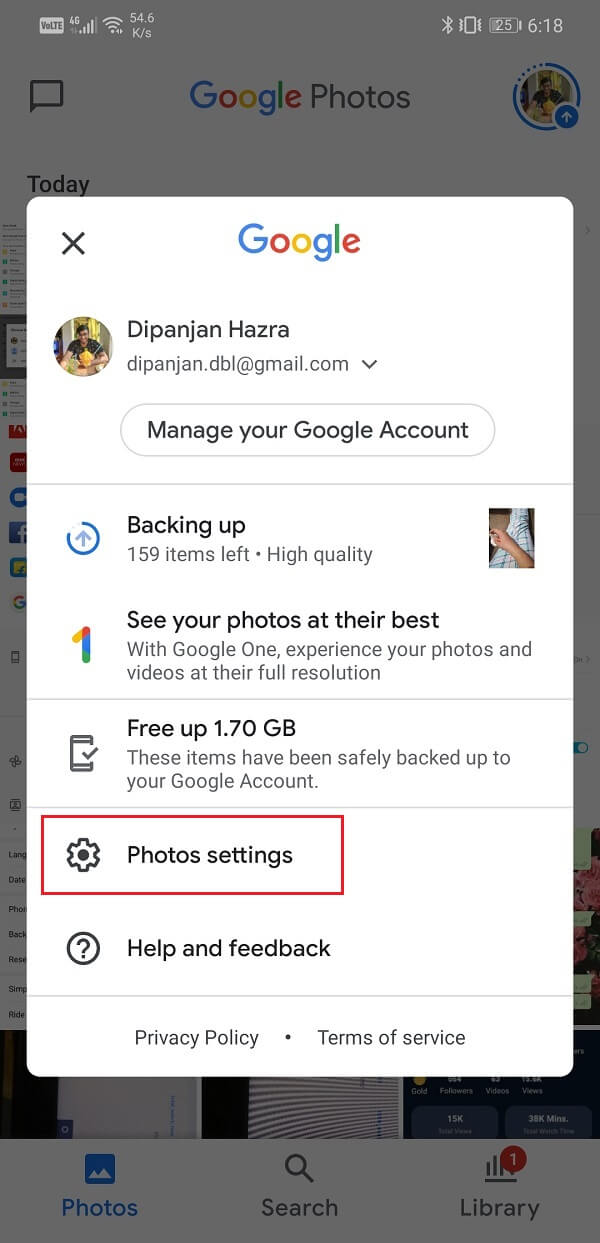
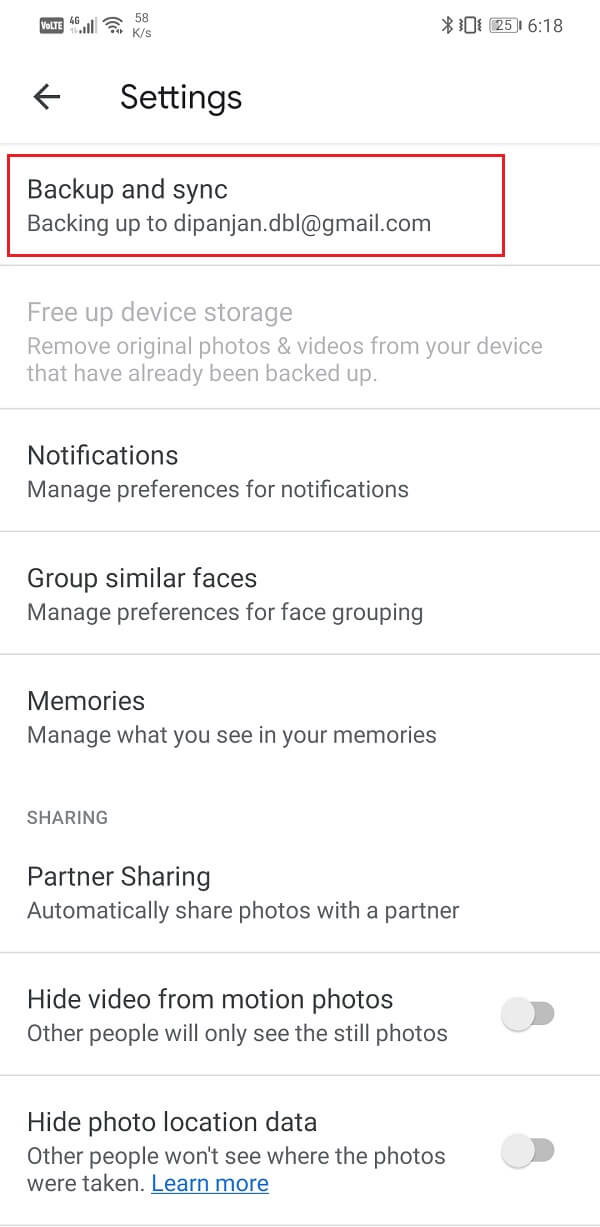
3. After that, select the Backup & sync option and here make sure that the toggle switch next to the Backup & sync is enabled.
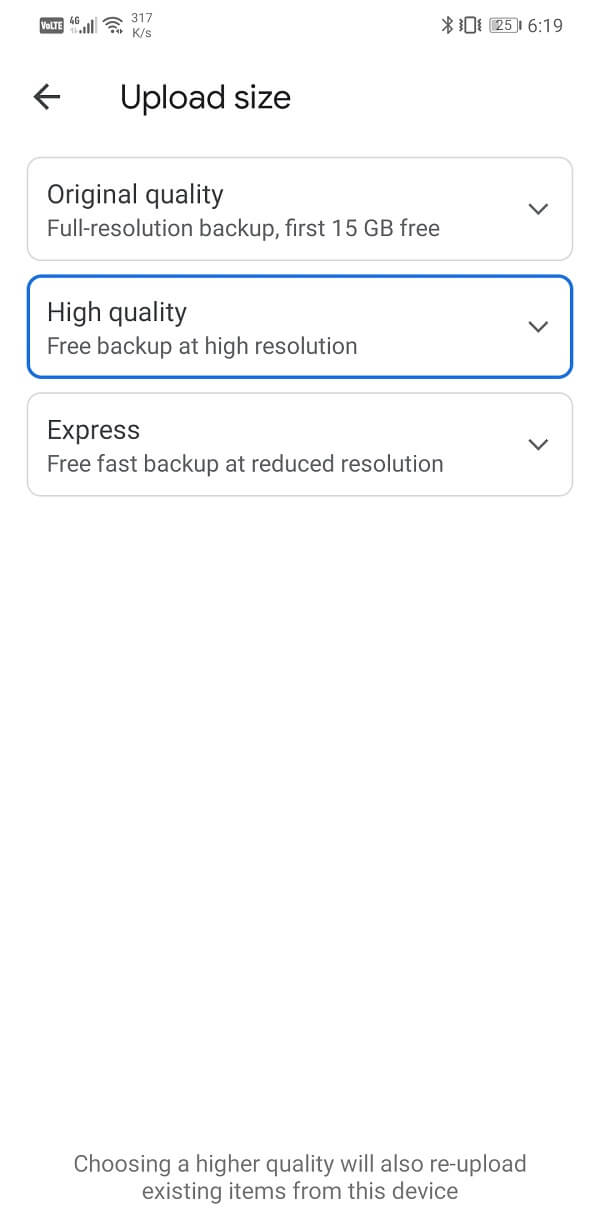
4. Now if you want unlimited storage space and do not own a Google Pixel, then you can simply choose to compromise a little with the upload quality.
5. Tap on the Upload size option, and instead of Original quality, select the High-quality option. Honestly, it wouldn’t make that much of a difference, and we would advise you to opt for the same.
6. By default, only the pictures taken by your Camera are backed up on Google Photos, if you want to add other additional folders or directories, you can do so by tapping on the “Back up device folders”.
7. Here, you need to enable the toggle switch next to the folders whose contents you would like to back up on Google Photos.

8. With that, we have come to the end of the first part of the Data transfer process. If you complete the above-mentioned steps, then all your data will get backed up to the cloud. You can now restore them on your new device by simply signing in to your Google Account and downloading the data from the cloud.
How to Restore Data on your new Android Phone
Until now, we were dealing with the old Android phone and making sure that everything is set on that end. In this section, we are going to discuss the process of setting up your new phone and restoring all your data onto the new device. It would be best if you keep your old phone nearby as that makes the process easier. Although the data has been backed up to the cloud, we would suggest to you to not reset your old device just yet. You can, however, go ahead and switch the SIM card/s and the external memory card (if you have one). After that, follow the steps given below, and they will take you through the entire process:
Let’s start from the very beginning, i.e. when you switch on your device for the first team.
- You will be greeted with a welcome screen and asked to select a language. Do that and tap on the Start/Continue button.
- You should have a Wi-Fi network available so that you can use the internet to sign to your accounts and restore your data.
- If you do not have a Wi-Fi network at home, ask someone in your family to create a mobile hotspot.
- Once you have connected to a network, tap on the Continue button.
- You will be now asked to choose between “Copy your data” and “Set up a new device”. Since we want to restore all your data, choose the Copy of your data option.
- After that, you will be taken to the “Bring your data from…” page.
- If you access your old device as well then, select the “A backup from an Android phone” option as it is the easiest way to transfer all your data.
- Now, you need to follow the on-screen instructions to start the data restoration process. The first instruction will be to open the Google app on the old phone. Do that and tap on the Next button.
- On the old phone simply say Ok Google, followed by “Set up my device”. You can also type in “set up my device” if the voice command is not activated for Google Assistant.
- Your old device will now start searching for nearby devices, and the model number of your new device will eventually appear on the screen. Tap on it.
- Now you will have to verify patterns displayed on both screens, and then the connection will be established between the two.
- Tap on the Next button on the “Confirm your screen lock” page.
- After that, tap on the Copy button on the “Copy to your new device?” page. This will copy the details of your Google Account to the new device.
- On the next page, you will be asked to sign in to your account. The username will already be entered, and you just need to enter the password. Since the data was copied directly from your old device, there won’t be any need for two-factor verification.
- Confirm your screen lock, and you will be taken to the Choose what to restore page.
- If you want all the data to get transferred, then simply tap on the Restore button. Otherwise, you can choose to leave out a few apps by deselecting the checkbox next to them.
- The restoration process will take some time. Once completed, you will have to go through the final steps that involve setting up a screen lock, activating location services, and other manufacturer provided services.
- Simply, follow the on-screen instructions, and you will be all set.
- Since the data has been restored from the cloud, everything including your settings, background, app layout, etc.
Your phone will be ready to use, and the data will continue to get restored over time. Depending on the amount of data and the speed of your internet, it might even take a couple of hours. Meanwhile, you can continue exploring the various features of your new phone.
Also Read: Restore Apps and Settings to a new Android phone from Google Backup
Backup and Restore Other Additional Data
Although Google Drive backup takes care of almost everything, several additional data might get missed out. In this section, we are going to discuss some of them and teach you how to make sure that it gets transferred to your new device.
1. Bookmarks, passwords, and search history
At first, you might not realize its importance, but when you start using your browser (say Chrome) on your new device, you will indeed miss these small and convenient elements that make browsing easier. Over time, we come across several useful websites that we wish to visit later, and we save them as bookmarks. In addition to that, to make things easier, we save our login id and password on our browser so that we do not need to remember and type them in, every single time. Even your search history is important as it allows you to trace back your steps to a website whose information might become relevant in the future.
Therefore, it would be a shame if all this data is not transferred to your new device. Fortunately, for Chrome users, this process is really simple. All that you need to do is sign in to Chrome with your Google Account, and all your data will get synced and backed up. Later, when you sign in to the same account on your new device, you will get back all your bookmarks, passwords, and even the search history. Given below is a step-wise guide to making sure that sync is enabled for Google Chrome:
1. The first thing that you need to do is open the Google Chrome app on your device.
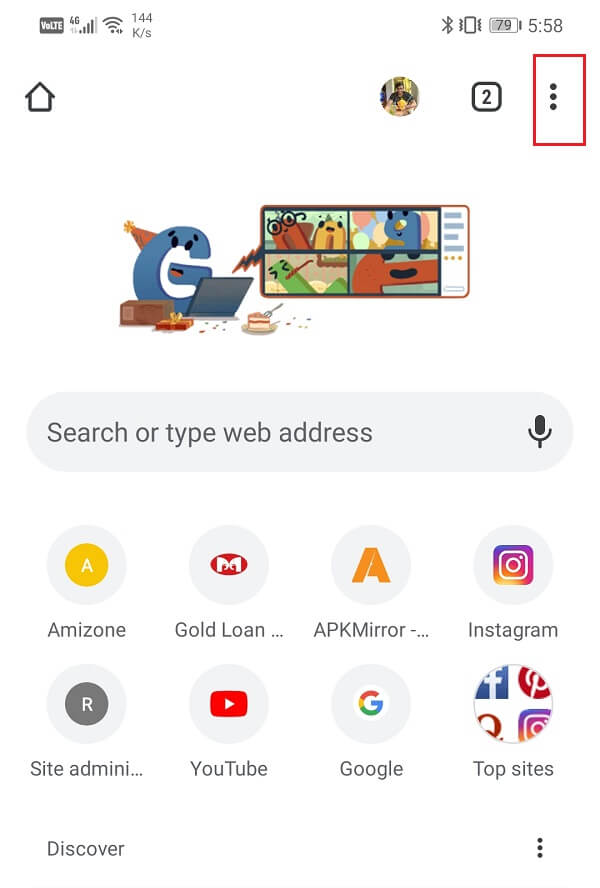
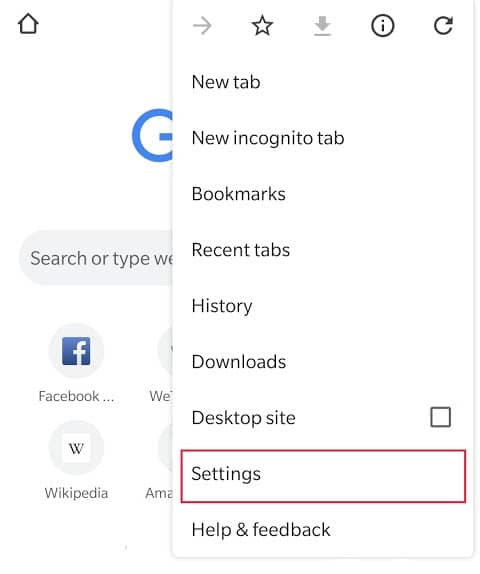
2. Now tap on the three-dot menu on the top-right corner of the screen and select the Settings option.
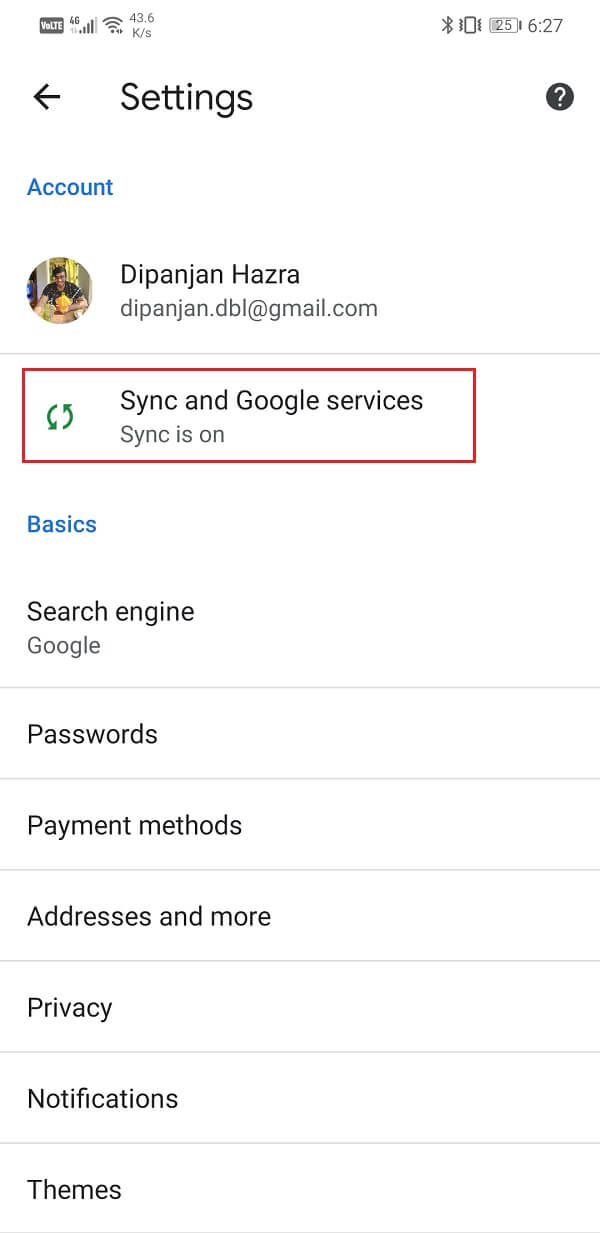
3. Here, you will be able to see your Google account mentioned under the Account header. If not, then it means that you haven’t signed in to Chrome yet. Simply tap on the Add account prompt and sign in to your Google account.
4. Now tap on Sync and Google services option.
5. Here make sure that the toggle switch next to Sync your Chrome data is enabled.
6. To check what is getting synced and backed up, tap on the Manage sync option.
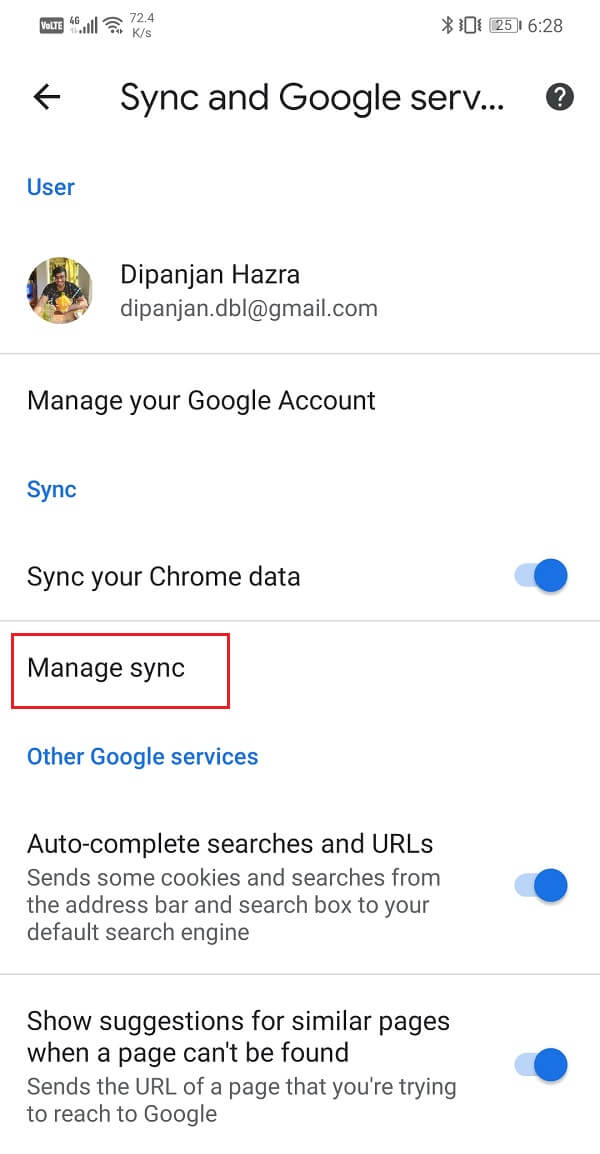
7. Ideally, you would want to sync all your data, so simply enable the toggle switch next to Sync everything option, and you are all set.

2. SMS, MMS, and WhatsApp Chats
Although most of the people have started using online messaging apps like WhatsApp, Messenger, Hike, etc. there are still some people who prefer to use SMS services provided by the carrier. Now, although SMS gets backed up to Google Drive, it does not include any media content. To state it in simple words, your MMS (multimedia messaging service) does not get backed up. Therefore, you won’t be able to restore any photos and videos that were shared in a conversation thread.
To back up these multimedia messages, you need to use a third-party app like SMS Backup+ and SMS Backup and Restore. These apps are available for free on Play Store and can be used to backup all your SMS and MMS. It will upload all the data to its server, and then you can download them to your new device by sampling signing to the same account.
Now for apps like WhatsApp, they have their own built-in data backup system. WhatsApp, for example, has Google Drive integration, and all your chats and media files get backed up on your Drive. You can even choose to backup the videos that you received on chat. To restore your chats and messages, you simply need to log in to your WhatsApp account, and you will be prompted to restore all the chats linked to your account.
3. Music
If most of your songs are locally saved on your device in MP3 format, then it will be quite easy for you to transfer them on to your new phone. The only thing that you will need is a computer to act as an intermediate channel between the two devices. You need to connect your mobile to a computer and locate the directory or folder containing all the MP3 music files and copy the contents onto your computer.
Now, if you are using the same music player as you used to in your old phone, then it will create a similar directory on your new device. All that you need to do is connect your phone to the computer and copy the files to this directory. The best part is that even if you do not find the right directory, you can create a new folder and your music player will be able to find all your songs.
However, if you are using an app like Wynk, Spotify, Saavn, etc., then the songs downloaded will be saved as a part of the app data. These songs will not be found locally saved on your device, and you can’t copy-paste them as discussed previously. Since these apps are either linked to your Google account or your mobile number, your data gets synced. Therefore, all you need to do is sign in to the same account on your new phone, and you will get back your songs. You might have to download them again, but these songs will be visible in your library is greyed out format.
Recommended:
We hope that you find this information helpful and you were able to transfer data from your old Android phone to a new one. Transferring your data is a major concern for all smartphone users while switching to a new device. It would be quite inconvenient if some of your contacts, photos, or app data do not get transferred properly to your new device.
Thankfully, Google and Android make sure that all your data gets synced to your Google Account and gets backed up on the cloud. Apart from that, most of the mobile manufacturers and OEMs have their own data backup tool. Samsung has Smart Switch, HTC has HTC Transfer Tool & S-OFF, LG has Mobile Switch (also known as Sender), etc. You can also use these apps if both your devices are of the same brand.