How To Fix Gmail Queued And Failed Error

Gmail is one of the most widely used email services around the world. This email service is pretty useful for sending business emails, attachments, media, or anything else. However, some Android users face a Gmail queued issue while sending emails with PDF attachments.
The users could not send the emails as the emails get stuck in the outbox folder for some reason. Later, the users receive the failed error for sending the email that is stuck in the outbox folder for hours. We understand this can be frustrating when you are trying to send a business mail to your boss or some assignment to your teacher. Therefore, to help you out, we have a small guide that you can follow to fix Gmail queued and failed error.
Fix Gmail Queued And Failed Error
What are the reasons for Gmail queued and failed error?
Gmail queue means that Gmail is unable to send your mail at the moment, and that is why the mail goes straight to the outbox mail. The mails in the outbox folder are sent out later. However, when Gmail is unable to send the mail from the Outbox,the users get the failed error. We are mentioning some of the possible reasons behind Gmail queued and failed error:
1. Gmail exceeding the threshold limit
Every email service platform has a limitation for sending emails at one time. So there are chances that you are exceeding this limit while sending a specific mail on Gmail. Therefore, when you try to send a mail, it goes to your Outbox and is queued to send later.
See Also:
Fix YouTube Music Not Playing Next Song
14 Ways to Fix AOL Mail Not Working on Android and iOS
10 Ways to Fix Spotify Unable to Login Error
7 Best Fixes for Spotify Something Went Wrong Error on Android
How to Fix Gmail Signature Images Not Displaying Issue
2. Network related issue
There are possibilities that Gmail’s server may be down for some time, and there is a network-related issue between Gmail and the server.
3. Low storage space on the phone
If you send a mail on Gmail, it will occupy the storage space on the app. So if you have low storage on your phone, then there are possibilities that Gmail cannot adjust the data size because of less storage. Therefore, with less storage space on your phone, Gmail may not be able to send out an email, and your email is queued in the Outbox folder.
5 Ways to Fix Gmail Queued and Failed Error
Before discussing different ways via which you can fix the Gmail queued and failed error, there are a few things that you must consider:
- Make sure that the issues are only with the Gmail app and not the web version of Gmail. This way, you can know whether the Gmail server is down or not. However, if you face the same issue on the web version of Gmail, then it is probably some server related issue from the Gmail side.
- Make sure that you are using the latest version of the Gmail app that you install from the Google play store and not from an unknown source.
- Ensure that you are not sending the mail with attachments exceeding 50MB file size.
- Make sure you have a stable internet connection.
After ensuring the above steps, you can try out the following methods to fix Gmail queued and failed error:
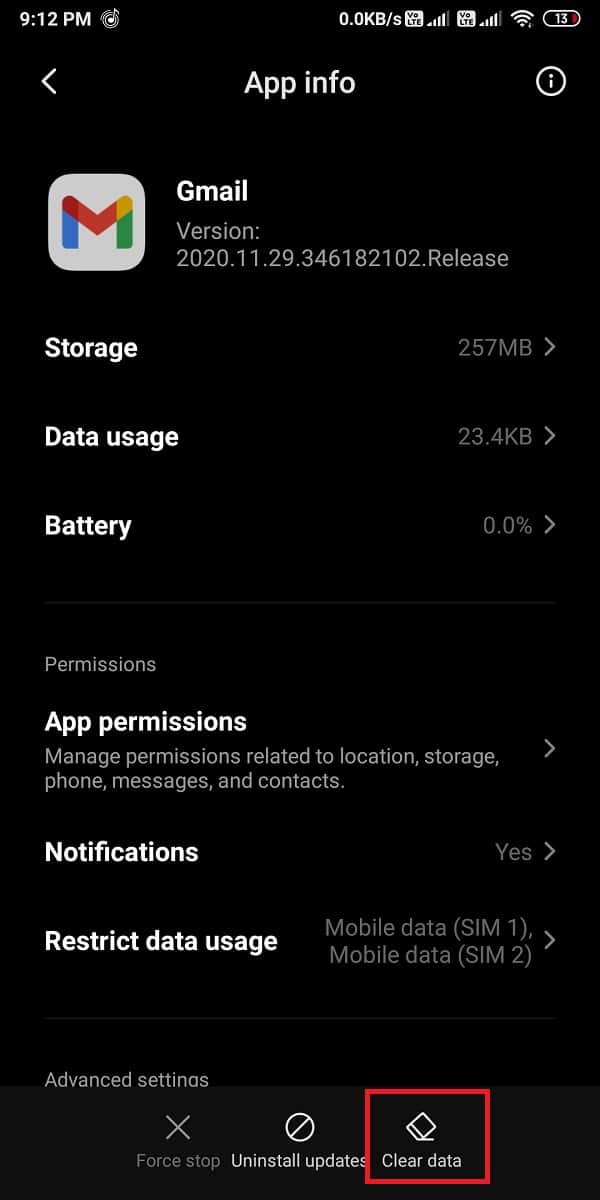
Method 1: Clear Gmail’s Cache & data
To fix queued and failed error on Gmail, you can try to clear the Gmail app’s cache and data. Make sure you close the Gmail app before you clear the cache and data.
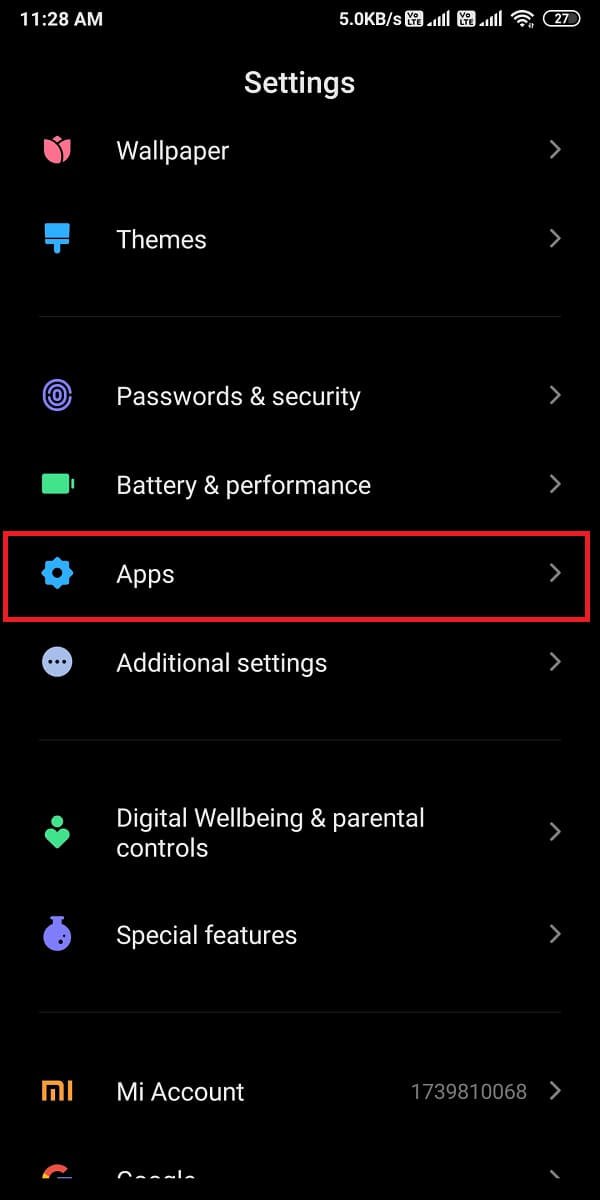
1. Open Settings on your Android phone.
2. Go to the ‘Apps’ tab then tap open ‘Manage Apps.’
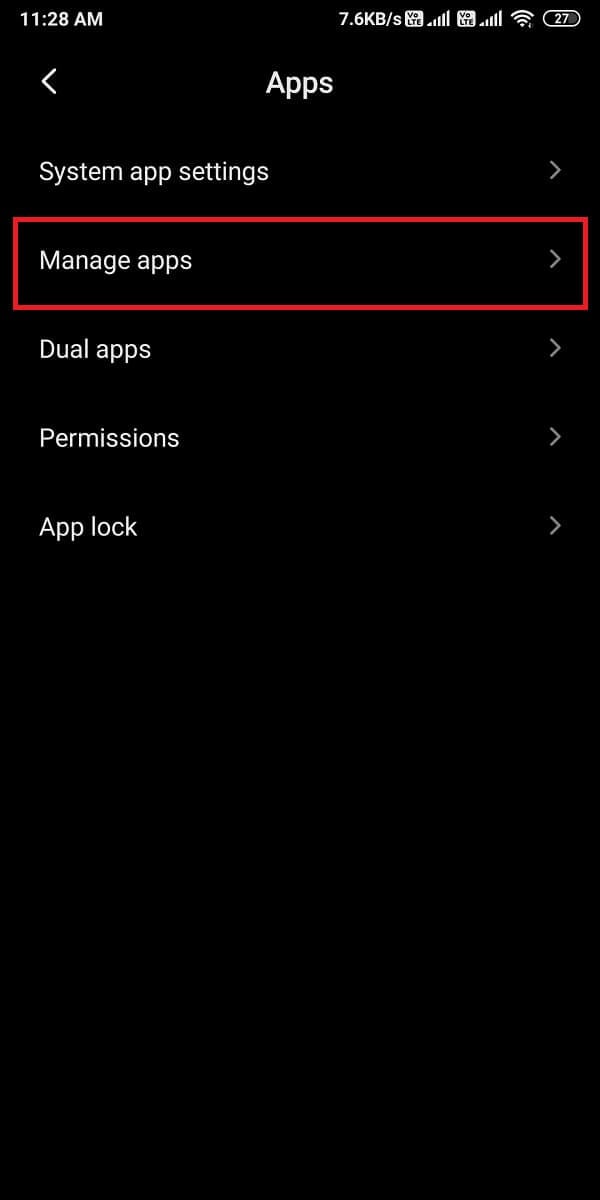
3. Locate and open your Gmail app from the list of applications that you see on the screen.
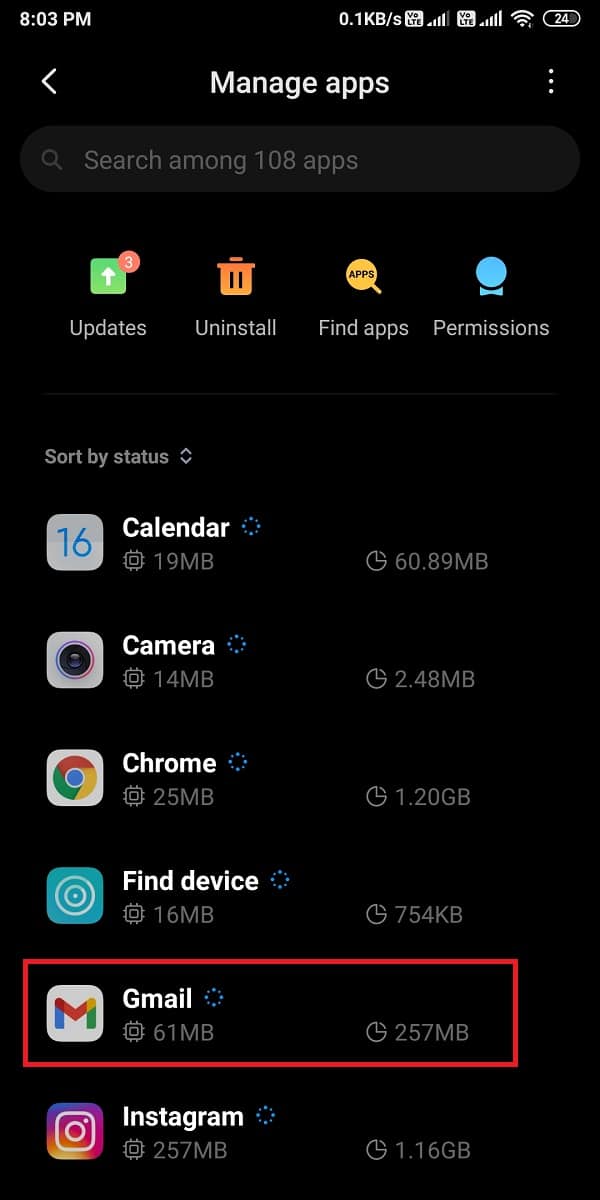
4. Now tap on ‘Clear data’ at the bottom of the screen. A window will pop up, where you have to select ‘Clear cache.’
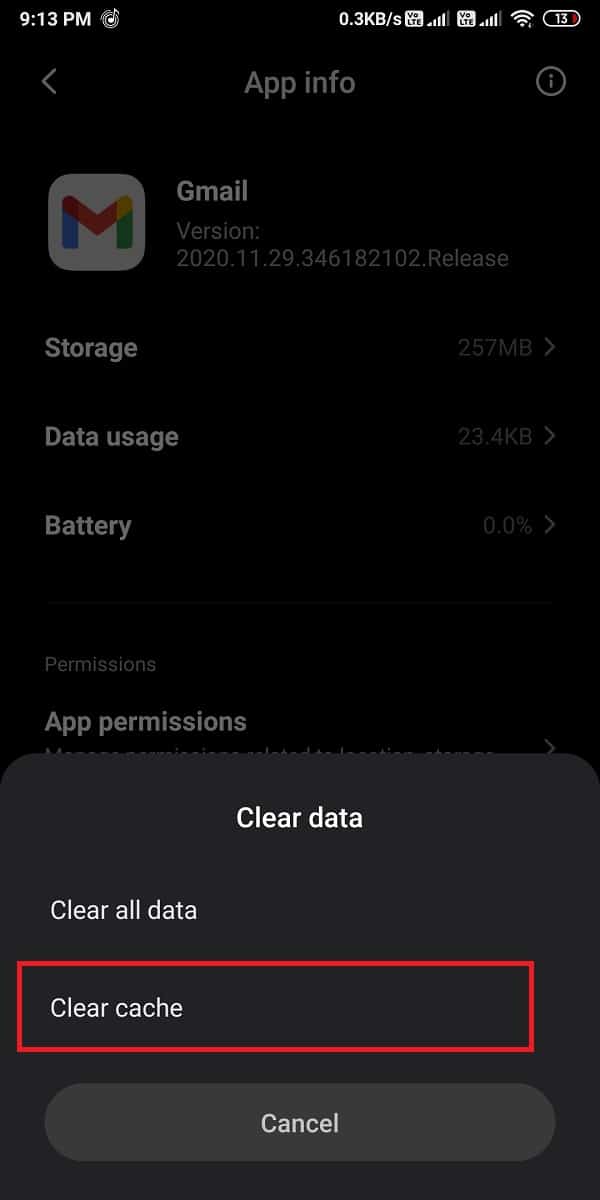
5. Finally, this will clear the cache and data for your Gmail app.
Also Read: Fix Email Address Not Found in Gmail
Method 2: Enable & Disable Gmail Sync Temporarily
You can try to enable and disable the Gmail sync option on your phone to check whether it is functioning properly or not.
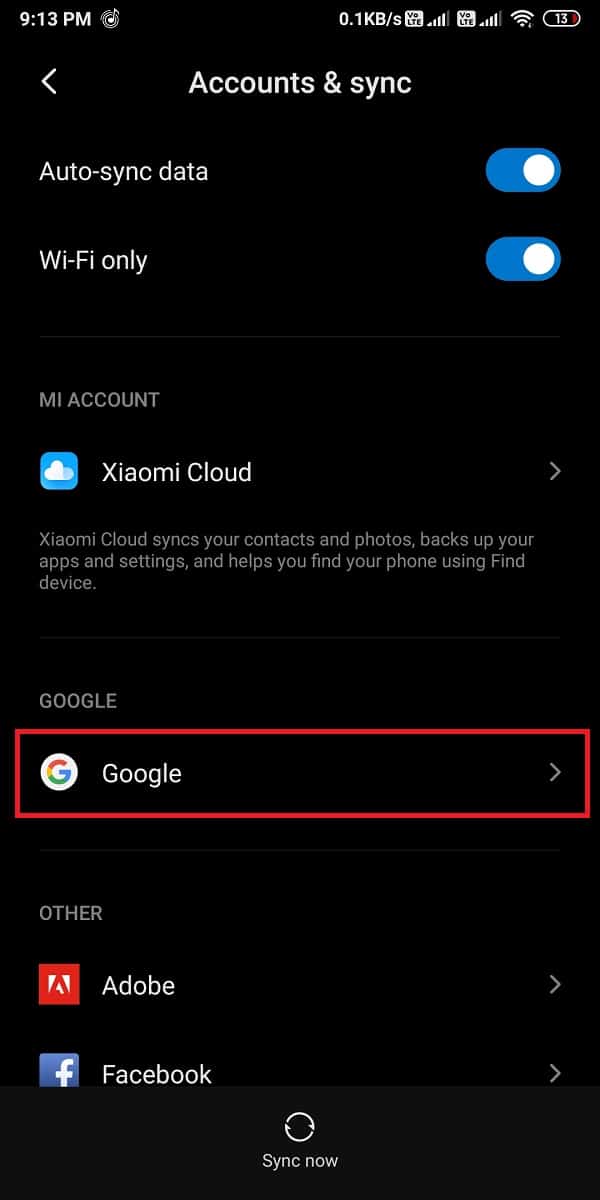
1. Open Settings on your Android phone.
2. Scroll down and tap on ‘Accounts and sync.’

3. In your Accounts and Sync section, you have to tap on ‘Google’ to access your google account.
4. Now, choose the email account that you have linked with Gmail.
5. Uncheck the circle next to ‘Gmail.’
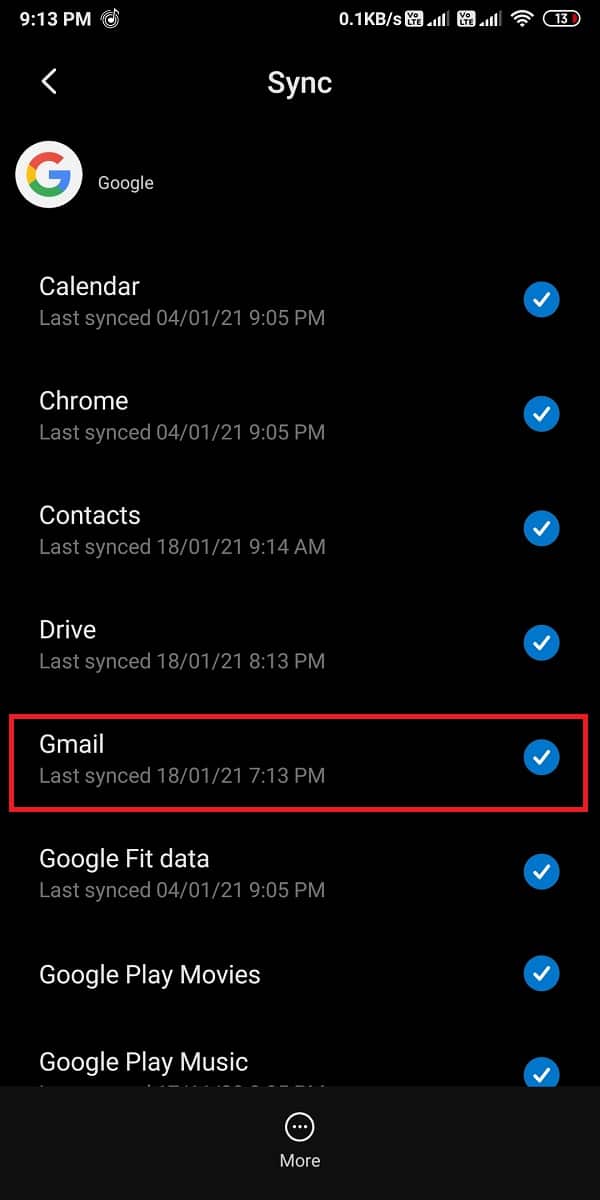
6. Finally, Restart your phone and again enable the ‘Gmail’ sync option.
Method 3: Remove and Set up your Gmail Account again
This can be a lengthy process for users. You can try to remove your google account from your phone and set your account again.
1. Open the Settings on your phone.
2. Go to ‘Accounts and sync.’
3. In your Accounts and Sync section, you have to tap on ‘Google’ to access your google account.
4. Select your email account that is linked with your Gmail.
5. Now, tap on ‘More’ at the bottom of the screen.
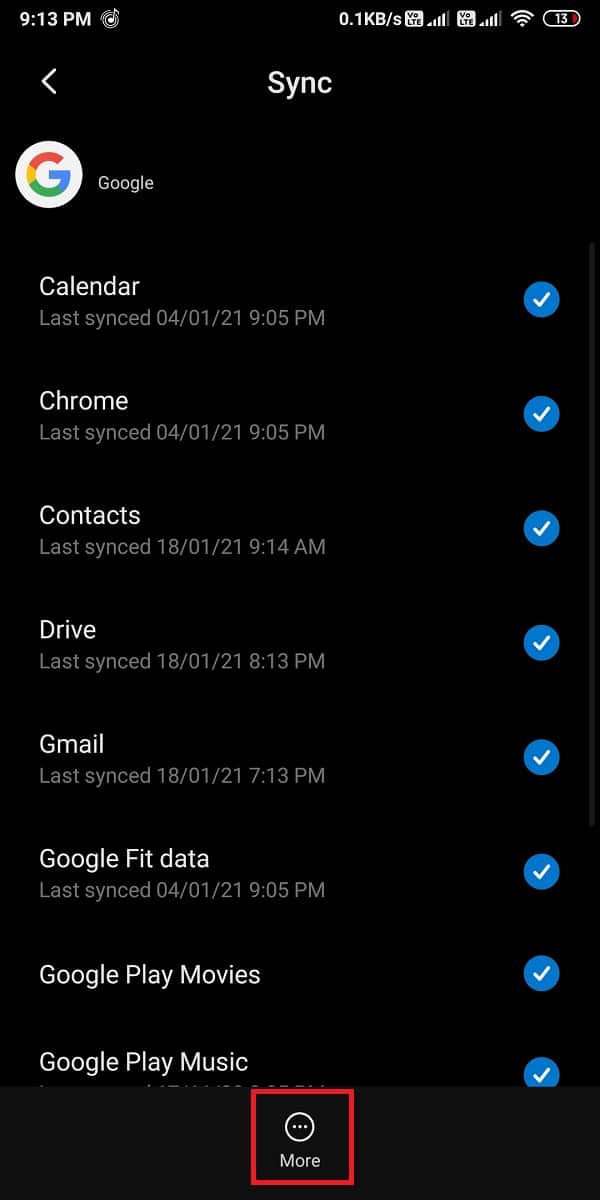
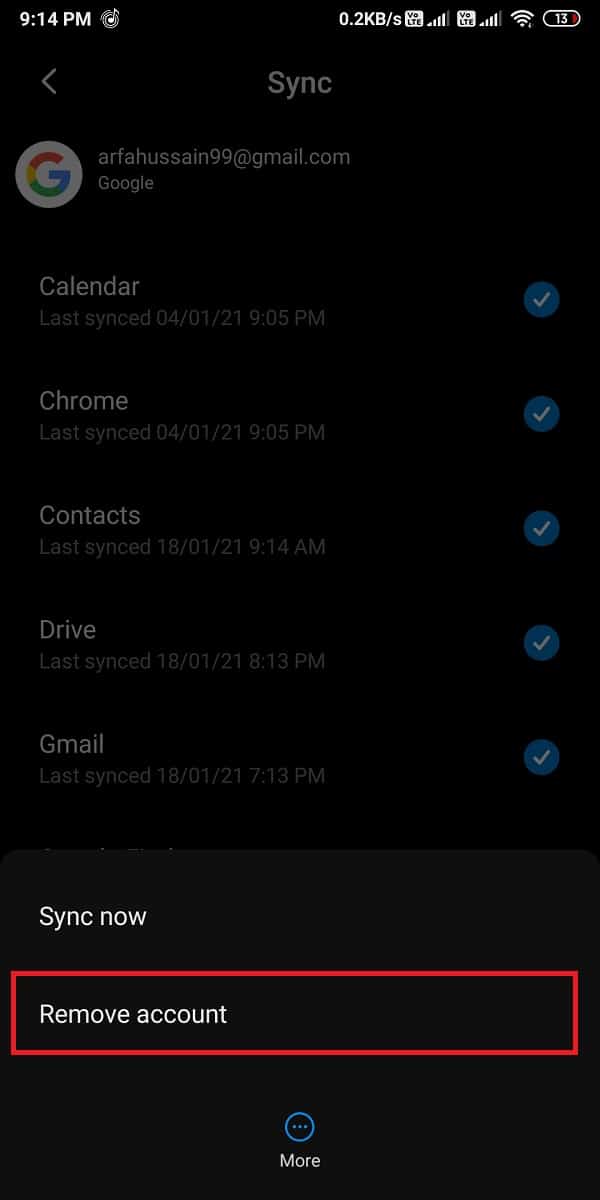
6. Tap on ‘Remove account’ from the list of options.
7. Clear cache and data for Gmail and Restart your phone.
8. Finally, set your Gmail account on your phone again.
Also Read: Fix Gmail not sending emails on Android
Method 4: Decrease the Days to Sync option
Your Gmail account usually retrieve the mails for a few days when you configure the phone with Gmail. Therefore, when you use your Gmail account, it syncs your old emails as well, which may increase the cache and storage size for Gmail. So the best option is to decrease the days for the sync option. This way, Gmail will destroy all the emails from the storage that are over 5 days period.
1. Open your Gmail app on your Android phone.
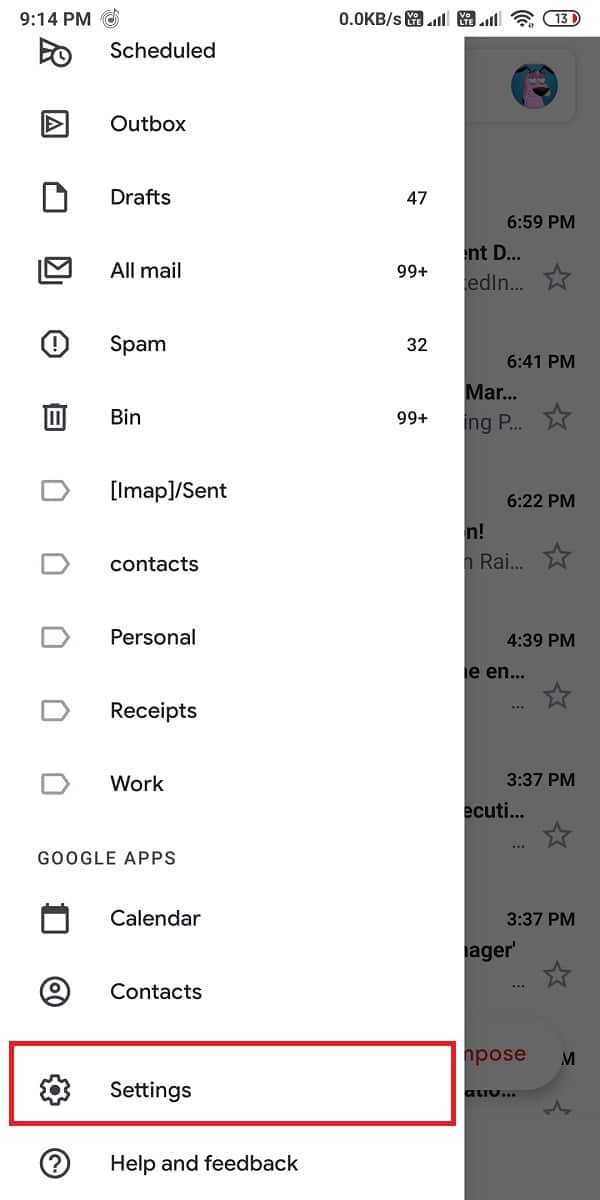
2. Tap on the hamburger icon at the top left corner of the screen.
![]()
3. Scroll down and open Settings.
4. Choose your email account.
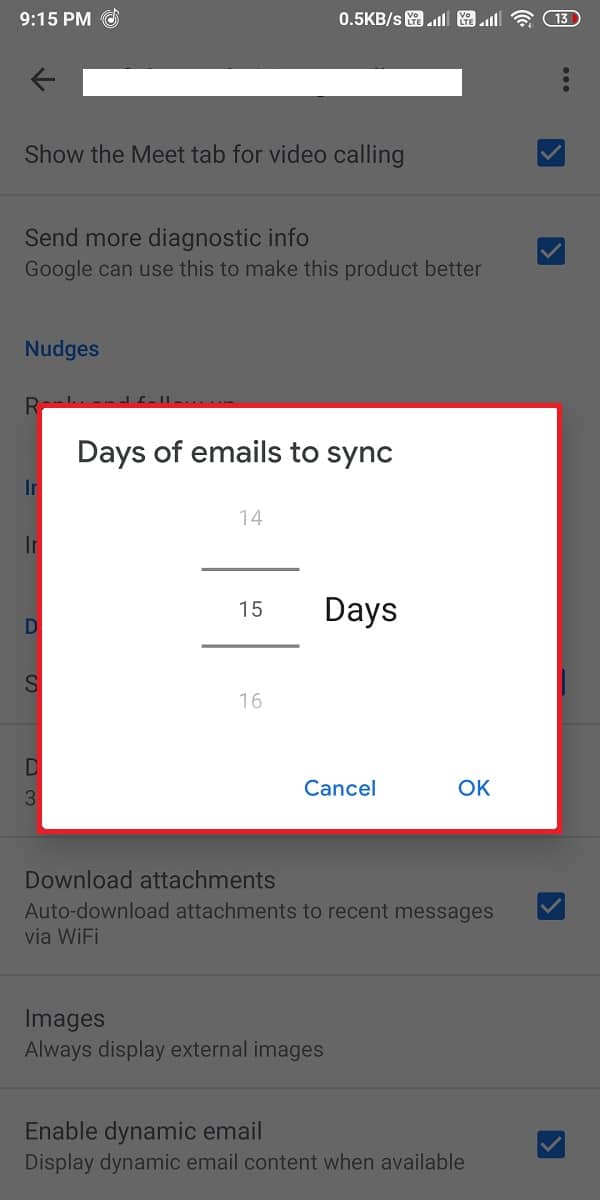
5. Now, scroll down and tap on ‘Days of emails to sync.’
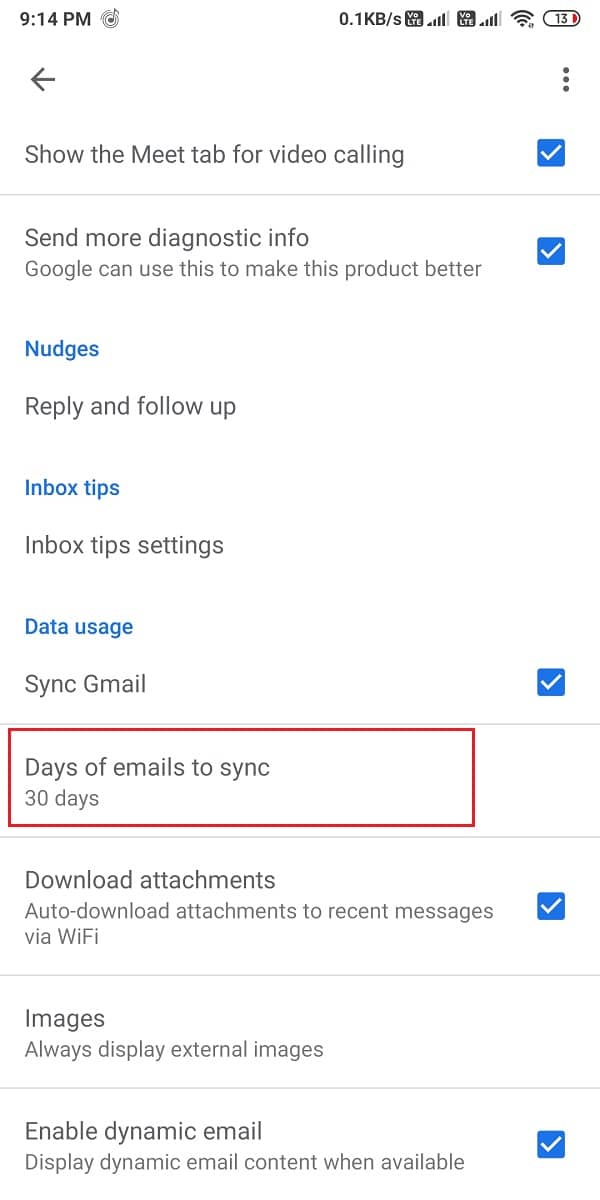
6. Finally, decrease the days to 30 days or less. In our case, we are making it 15 days.
After you make the changes, make sure you clear the cache and data for Gmail.
Also Read: Fix Mozilla Firefox Couldn’t Load XPCOM Error on Windows 10
Method 5: Keep Background Data-Enabled for Gmail
Usually, the background data is enabled by default for the Gmail app. However, if you have mistakenly disabled this feature, you may enable it by following the below steps:
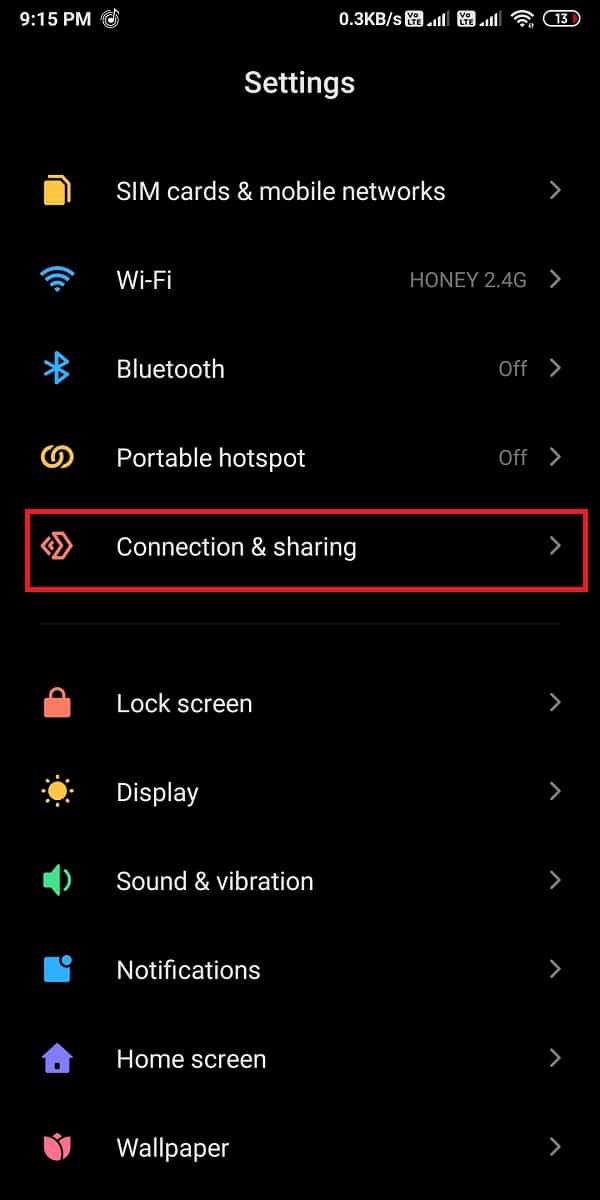
1. Open the Settings on your Android phone.
2. Go to the ‘Connection and Sharing’ tab.
3. Open ‘Data usage’ in the connection and sharing tab.
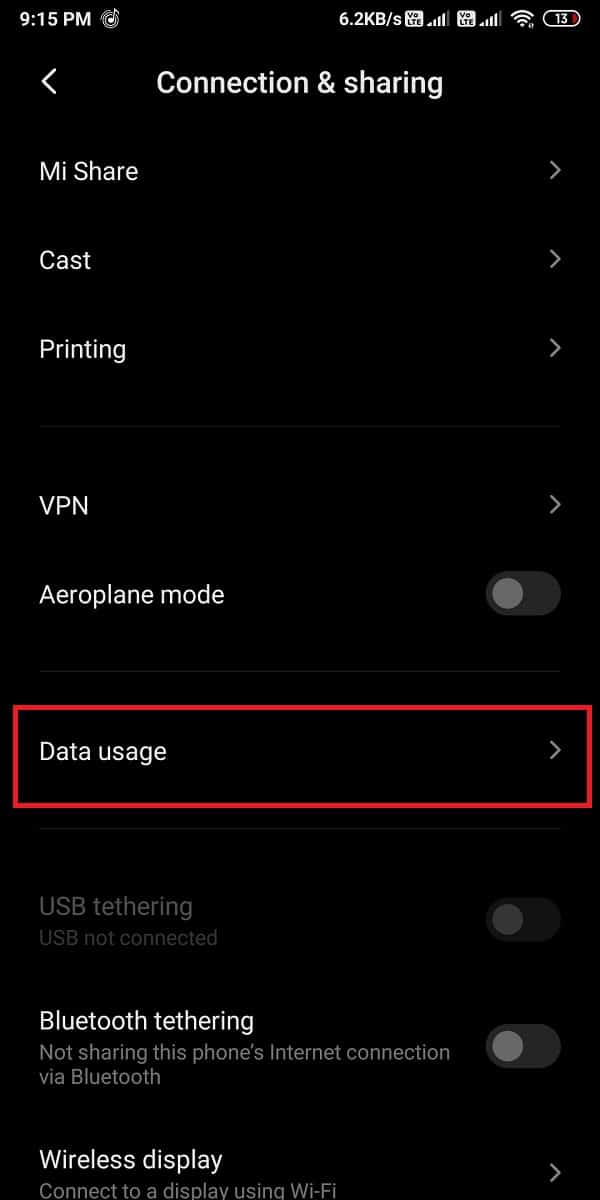
4. Scroll down and locate your Gmail app.
5. Finally, ensure that the toggle for ‘Background data’ is On.
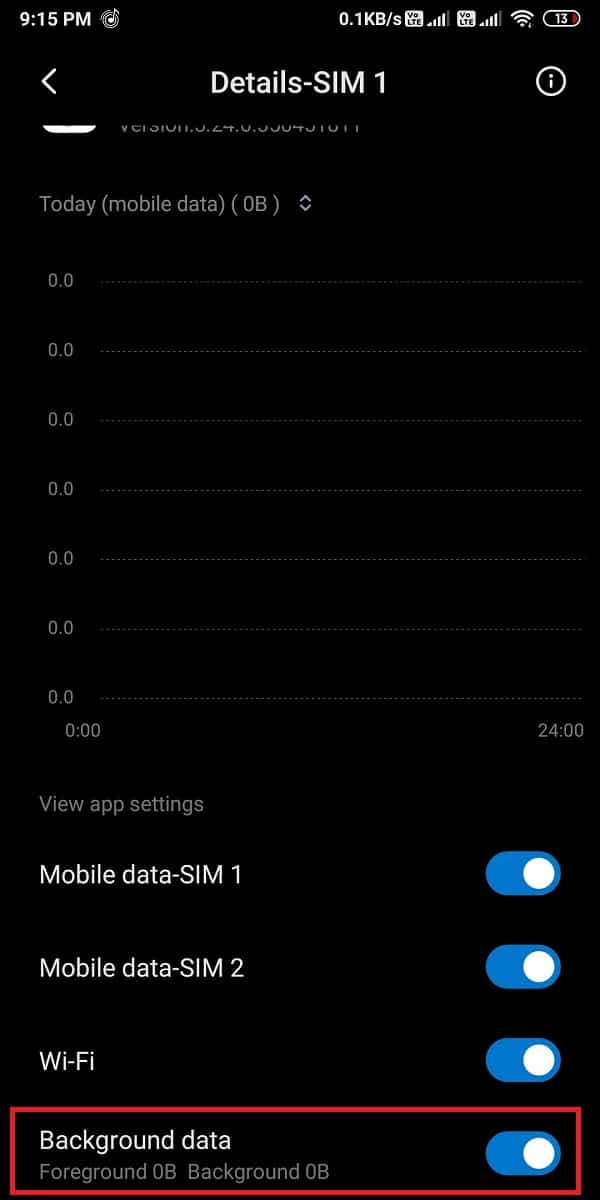
You must ensure that you have a stable internet connection and there are no network issues.
Recommended:
We hope this guide was helpful and you were able to fix Gmail queued and failed error on your Android phone. If any of the methods worked for you, let us know in the comments below.