Windows 10 is one of the best-operating systems out there. It offers the user to customize the user interface according to their needs, including changing themes, colours, mouse pointers, wallpaper etc. There are many third-party tools which help you in some more customization, and you could also tweak the registry to change the look and feel of built-in applications. Anyway, one of the features almost used by everyone is changing the theme of Windows 10, but most of them don’t know that it also affects desktop icons causing grey X.
![]()
By default, themes are allowed to change the desktop icons, and if you have customized the desktop icons then whenever you change the theme, all the customization will be lost. So that’s why you need to prevent themes from changing desktop icons to preserve your custom personalization. Anyway, without wasting any time, let’s see How to Allow or Prevent Windows 10 Themes to Change Desktop Icons with the help of the below-listed tutorial.
Allow or Prevent Windows 10 Themes to Change Desktop Icons
Make sure to create a restore point just in case something goes wrong.
Method 1: Allow or Prevent Windows 10 Themes to Change Desktop Icons
1. Press Windows Key + I to open Settings then click on Personalization.

2. From the left-hand menu, make sure to select Themes.
3. Now, from the far right corner, click on “Desktop icon settings” link.
![]()
4. Now, under Desktop Icons settings, you can uncheck “Allow themes to change desktop icons” to prevent themes from changing the desktop icon.
![]()
5. If you need to allow themes to change desktop icons, then checkmark “Allow themes to change desktop icons“.
6. Click Apply, followed by OK.
7. Reboot your PC to save changes.
Method 2: Allow or Prevent Windows 10 Themes to Change Desktop Icons in Registry Editor
1. Press Windows Key + R then type regedit and hit Enter to open Registry Editor.

2. Navigate to the following registry key:
HKEY_CURRENT_USERSoftwareMicrosoftWindowsCurrentVersionThemes
3. Make sure to select Themes then in the right window double-click on ThemeChangesDesktopIcons DWORD.
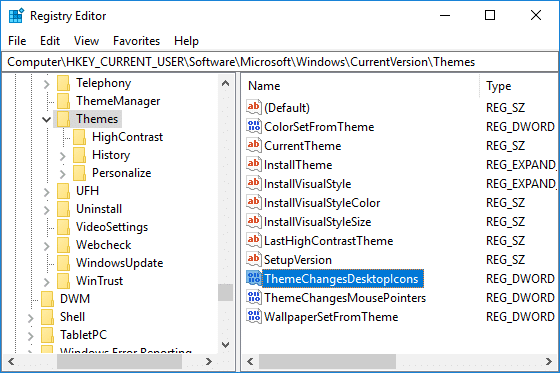
4. Now change the value of ThemeChangesDesktopIcons according to:
To Allow Windows 10 Themes to Change Desktop Icons: 1
To Prevent Windows 10 Themes to Change Desktop Icons: 0
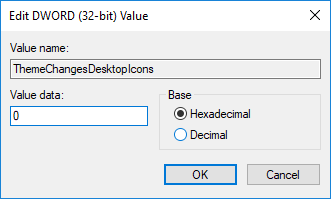
5. Click is Ok then close registry editor.
6. Restart your PC to save changes.
Recommended:
That’s it you have successfully learned How to Allow or Prevent Windows 10 Themes to Change Desktop Icons but if you still have any questions regarding this tutorial then feel free to ask them in the comment’s section.