- in windows 11 by Admin
“Extend Volume” Option Grayed Out in Windows? Try These 5 Fixes
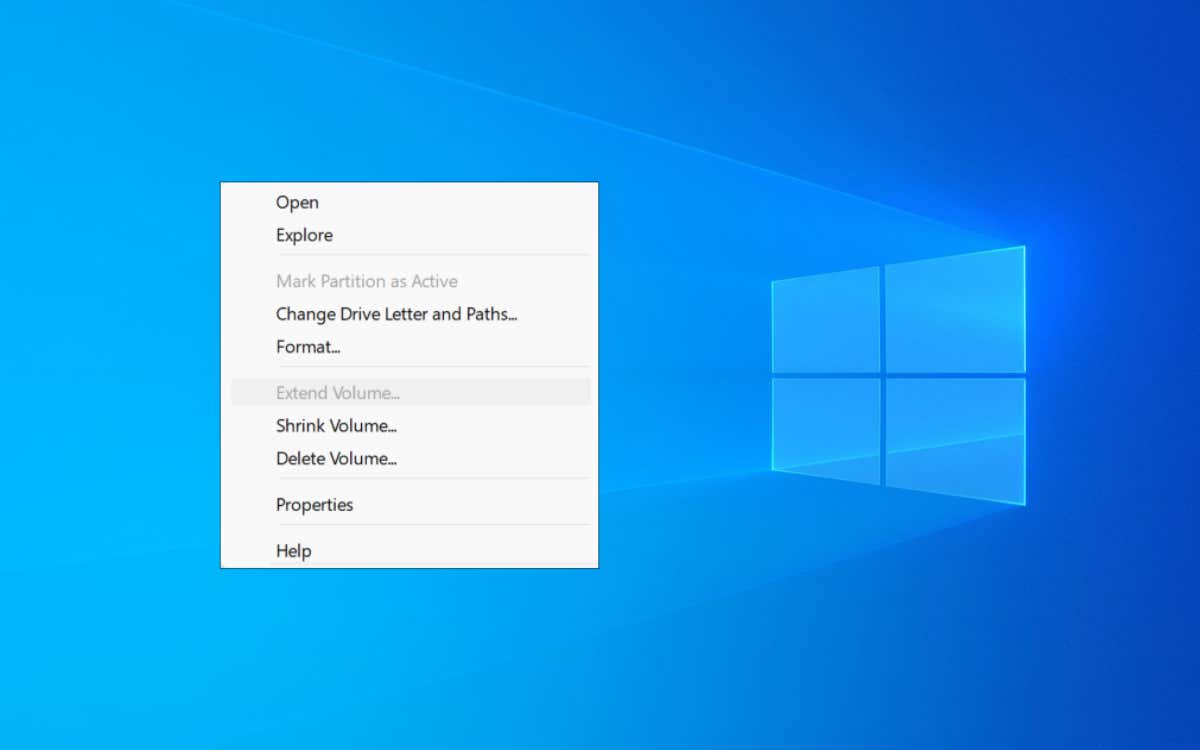
Do you want to increase the size of a volume or partition on your PC but find the “Extend Volume” option in Windows Disk Management grayed out? Learn why that happens and what you can do to fix the issue.
The Disk Management console in Microsoft Windows allows you to easily extend the size of a volume or partition on your PC. But what if the “Extend Volume” option appears grayed out?
There are a few possible causes as to why that happens. Read on to figure out how to fix the extend volume option grayed-out issue in Windows 10 and 11.
Why the “Extend Volume” Option Appears Grayed Out
The “Extend Volume” option for a hard drive or SSD in the Disk Management tool can appear grayed out due to the following reasons:
- There is no unallocated space on the disk.
- The unallocated disk space is not directly to the right of the volume you want to extend.
- The drive partition you want to extend is not in a supported format—NTFS or ReFS.
- The disk uses the older MBR (Master Boot Record) partitioning scheme.
Most of the above problems occur due to limitations with Disk Management. If the following troubleshooting tips sound too complicated, you may want to skip to the section that talks about using a third-party partitioning tool to extend the size of a partition instead.
1. Create Contiguous Unallocated Space
The most common reason you see an “Extend Volume” grayed-out option in the Disk Management console on your computer is when there’s no “unallocated space” on your hard disk or SSD. That’s storage you’ve yet to format with a file system.
Even if Disk Management’s graphical representation of the disk indicates unallocated storage, the “Extend Volume” grayed out option will remain grayed out unless the space is immediately to the right of the volume you want to extend.
For example, let’s assume your computer has two partitions with the C and D drive letters. If you want to extend C drive, you must delete D drive to create unallocated drive space. Using Disk Management’s “Shrink Volume” option on D drive won’t work because D drive will act as a barrier between C drive and the resulting unallocated space.
To delete a partition and create unallocated space:
- Copy any data within the partition to an alternative volume or external disk.
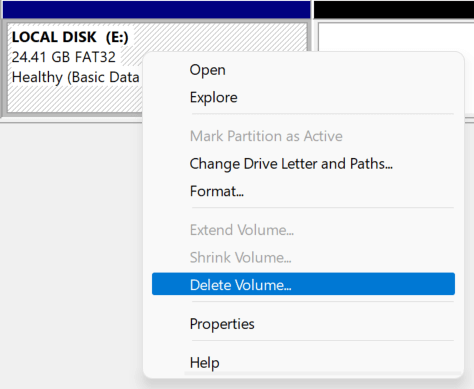
- Right-click the volume or partition in Disk Management and select Delete Volume.
- Select Yes to confirm.
The partition will then show up as unallocated space. You can then extend the volume to the left of the unallocated space without issue.
2. Delete the Recovery Partition
The presence of a recovery partition between the volume you want to extend and any unallocated space can be another reason that causes the “Extend Volume” option in Disk Management to appear grayed out.
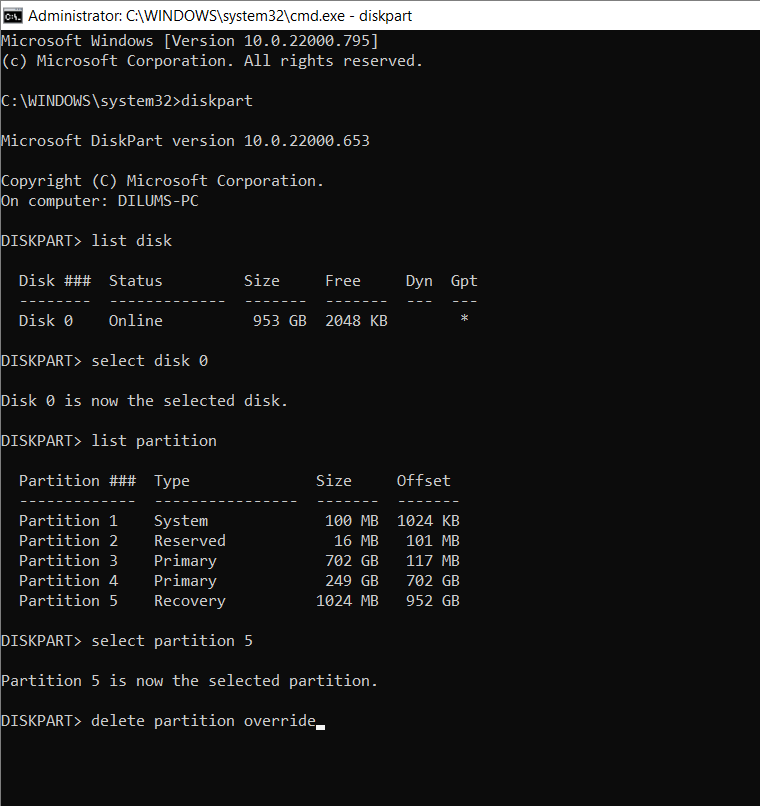
Since the recovery partition helps you restore your computer in case something goes wrong, we advise against deleting it. But if you want to go ahead, you can delete the partition using the DiskPart command-line tool via Windows PowerShell or the Command Prompt console.
However, make sure to create a bootable Windows recovery USB or disc instead to protect your computer against operating system corruption and data loss.
- Right-click the Start button and select Windows PowerShell (Admin). Or, type cmd.exe into the Start menu and select Run as administrator.
- Select Yes on the UAC pop-up.
- Run the following commands in sequence.
- diskpart: Load the DiskPart utility.
- list disk: List all disks on your computer.
- select disk [number]: Select the disk with the recovery partition you want to erase, replacing [number] with the disk number of the disk.
- list partition: List all disk partitions on the drive.
- select partition [number]: Select the recovery partition, replacing [number] with its partition number.
- delete partition override: Delete the recovery partition.
3. Use a Compatible Format
Disk Management only allows you to extend partitions in the NTFS format (or the ReFS format if your Windows edition supports it). That isn’t an issue with the system partition because Windows only runs on NTFS partitions.
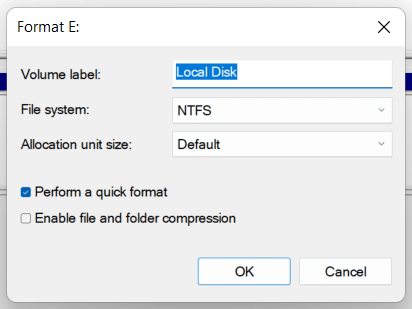
However, if you’re extending a logical partition, it could be in an unsupported format like FAT32. You can use Disk Management to format the volume in NTFS, but that will erase all data on it. So, make sure to back up everything within the partition before you ahead.
- Right-click the partition in Disk Management and select Format.
- Set File System to NTFS on the Format dialog.
- Select OK.
You should now be able to extend the volume, assuming that there’s unallocated space to the right of the drive.
4. Convert MBR to GPT Disk
If you’re attempting to extend a partition or volume on a disk that uses the MBR (Master Boot Record) partition scheme, you might be dealing with the 2TB threshold associated with MBR disks. To fix the problem, you must convert the HDD or SSD from MBR to GPT.
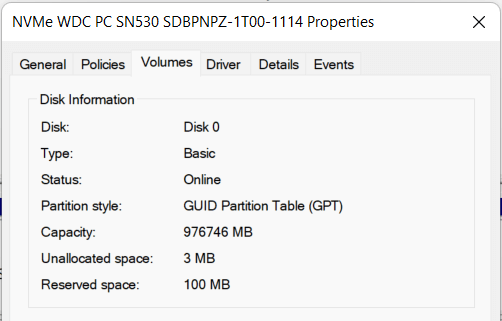
- Right-click the disk in Disk Management and select Properties.
- Switch to the Volumes tab.
- Check the field next to Partition style to determine if it uses the GPT or the MBR partition scheme.
If the disk is in MBR, we recommend that you follow our guide about converting a disk from MBR to GPT without having to reinstall Windows for further instructions.
5. Use Third-Party Partition Manager
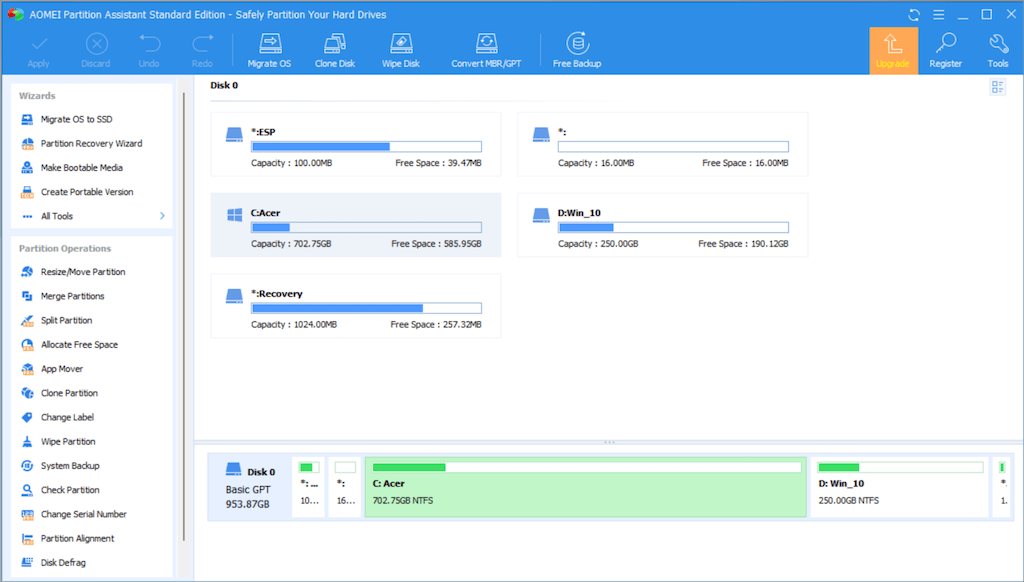
Unlike Disk Management, top third-party disk partitioning tools for Windows are considerably better to use and offer multiple approaches to increasing partition sizes with minimum hassle. For example, the AOMEI Partition Assistant Standard is a free utility that allows you to extend a volume by merging it with other partitions and unallocated storage even if they aren’t contiguous.
AOMEI Partition Assistant Standard also lets you allocate free space from one partition to another, extend drives in formats that Disk Management usually supports, and conveniently convert disks from MBR to GPT if needed. Here are several partition operations in AOMEI that should come in handy.
- Resize Partition: Select a volume and use the Resize Partition option to increase the partition size using unallocated space immediately to the left or right.
- Merge Partition: Merge a partition with unallocated space anywhere on the drive. You can also use this option to merge two partitions.
- Allocate Free Space: Allocate free space from a partition directly to another drive.
- Convert to GPT: Right-click a disk and pick the Convert to GPT. You will have to switch from Legacy BIOS to UEFI manually, though.
However, before using a third-party partitioning tool, we recommend you back up the data on your disk before going ahead. That allows you to restore your data in case something goes wrong.
It’s Best to Avoid Using Disk Management
As you just saw, if the “Extend Volume” option appears grayed out in Disk Management, fixing that can be a hassle unless you use a third-party partitioning tool. Not only is the latter option better at resizing volumes but you also spend less time deleting and moving partitions.
