- in Windows 10 by Admin
How To Create a Windows Service
Sometimes you need an app or script to keep running whether you’re logged into your computer or not. Maybe it’s a PowerShell script to monitor ports or a web server hosting a page on your home network.
The point is that if you want a process, script, or program to run as long as the computer is on, you’ll need to create a Windows Service.
What Do I Need to Create a Windows Service?
To create a Windows service in Windows 10, there are a few prerequisites:
- Administrator access on the computer
- Something to run as a service (PowerShell Script, program, etc.)
- Non-Sucking Service Manager (NSSM) installed
What Is the Non-Sucking Service Manager?
Yes, you can’t drop a name like that without explaining it. Sure the name is unfortunate, yet it is accurate. The Non-Sucking Service Manager (NSSM) is arguably the easiest way to create a Windows service that is both highly reliable and configurable. Plus, it’s free and Open Source Software (OSS).

NSSM can be used through the Windows Command Prompt, or a graphical user interface (GUI). This means anyone can use it. NSSM can be used on any version of Windows going back to, and including, Windows 2000. There are 32-bit and 64-bit versions. If you’re using a 64-bit computer, try that version first. If it doesn’t work, fall back to the 32-bit version.
You can download NSSM from the website, clone NSSM from Git, or install NSSM with Chocolatey. Chocolatey is a package manager for Windows. Installation methods will vary depending on which route you take. Please consult NSSM’s instructions. For our example, we’re downloading from the NSSM website and installing it in C:WINDOWSsystem32.
Create a Windows Service With NSSM
For this example, we’ll create a service out of a PowerShell script to log CPU average load percentage.
- Copy and save this script as log-CPULoadPercentage.ps1 to a place that’s not likely to be accessed by anyone else. Try creating the directory C:/Scripts and storing it there. Also, create a folder in Scripts called Logs. Note that the path to the script is C:/Scripts/log-CPULoadPercentage.ps1. You’ll need that later.
Note: All lines below followed by the # symbol are comments and won’t affect the script.
CLS #Optional. I like to use this to clear the terminal when testing.

#Make sure you have a folder called Logs in the same directory as this script
#The log is where the records will be stored.
Start-Transcript -Path "$PSScriptRootLogslog-CPULoadPercentage-$(get-date -f yyyy-MM-dd).txt" -Append

#While loop keeps it running until manually stopped
While ($True){
     #Creates a timestamp to know when the measurement was taken
     $timeStamp = get-date -f yyyy-MM-h:mm:ss

     #Gets the average load percentage at that time, then waits 5 seconds to do it again.
     $cpuLoadPercent = Get-CimInstance win32_processor | Measure-Object -Property LoadPercentage -Average | Select-Object Average;Start-Sleep -Seconds 5

     #Isolates just the average so there isn't a weird @{Average=13} string
     $cpuLoadPercent = $cpuLoadPercent.Average

     #writes results to screen, or in this case to the log
     Write-Host "$timeStamp CPU Load Percentage $cpuLoadPercent"
}

Stop-Transcript
- This can be done in either the Windows Command Prompt or PowerShell. Open it as Administrator.
- Enter the command nssm install logCPUAvg and run it. The NSSM service installer window will open.

- Click on the ellipses button next to the Path: field, navigate to the powershell.exe that’s normally located at C:WindowsSystem32. Select powershell.exe. The Path: and Startup directory: fields will be automatically populated.

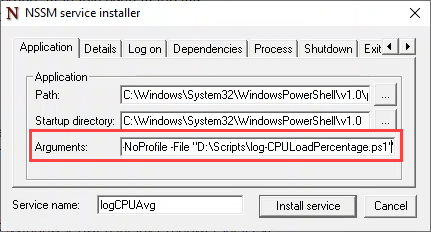
- Enter the following in the Arguments: field: -ExecutionPolicy Bypass -NoProfile -File “C:PathToScriptget-Script.ps1”, where the last part is the path to your PowerShell script and the script name.
- Select the Details tab. Enter what you’d like the service to show up as in the Windows Services manager into the Display name: field. Then, enter what it does in the Description: field. The Startup type: can be set as Automatic, Automatic (Delayed Start), Manual, or Disabled. For this exercise, Automatic is good.

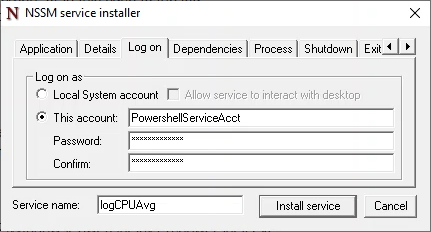
- Select the Log on tab. Select This account: radio button and enter the account and password that the service will run as. You’ll need to choose an account under which the service will run. Ideally, you’ll have a Windows account created just for running this service. This account’s permissions should be limited to only what the service needs to do. You can choose the Local System account, but it’s not recommended for security reasons.
There are several other tabs that can be used to customize the service. For this exercise, the default values in those tabs are sufficient. Select the Install service button.
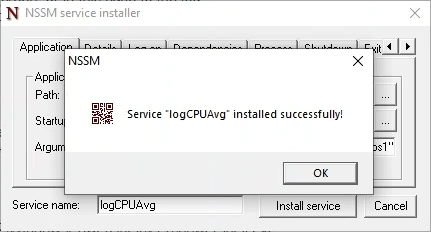
- When the service is installed, you’ll see the Service “logCPUAvg” installed successfully! window. Select OK to close it. That concludes the installation.
- Open the Windows Services Manager and ensure the service is there.

- Run the service to ensure it will run.

- To verify that this service is running, use File Explorer to navigate to where the log is supposed to be saved to see if it exists.

nssm-check-log.png
Removing a Windows Service With NSSM
Maybe you don’t need to monitor your CPU load anymore, so you’d like to get rid of the service. Fortunately, NSSM makes that easy.
- In the Windows Services Manager, stop the service. Do this by selecting the Log CPU Average Load service then either selecting the square stop button in the toolbar or the Stop the service link on the left side.

- Open either the Windows Command Prompt or PowerShell as Administrator.
- Enter the command nssm remove logCPUAvg and execute the command.

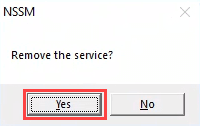
- NSSM will ask you to confirm. Select Yes.
- When the service is removed, you’ll see the Service “logCPUAvg” removed successfully! Confirmation. Select OK and you’re done.

That’s all. It’s a good idea to check the services manager to ensure the service is no longer there. If you still see the service, you may need to refresh the screen and it should be gone.
Services are a great way to run apps or scripts that need to run all the time, restart themselves if they fail, or need privileges different from the current user. If you don’t need your app or script to do all of those things, consider using a Scheduled Task instead.