Laptops and computers have become the one place workstation, especially since the pandemic scenario. You are constantly working on them, teaching & studying online, or using them for gaming & streaming. Hence putting your PC to sleep for constant shifting of chores or entertainment is the best option instead of total shut down. Computers systems too have become private spaces, and password protection serves this purpose with ease. But repeated password requirements for mere waking up of PCs from sleep viz turn on or off Windows 11 with wakeup password can be a tiring parade. We bring you this guide on how to enable or disable wakeup password in Windows 11.

How to Enable or Disable Wakeup Password in Windows 11
There are several ways to configure and set password requirements in Windows 11 according to your convenience. From the very old school options to the latest techniques of the updated interface, there are several ways through which passwords can be turned off and on post-sleep conditions can be configured on Windows 11 laptops/desktops. Moreover, these are quite reversible & moldable. Read the following section and choose the best method which suits you the best.
Method 1: Through Windows Settings
The best way to enable or disable wakeup password in Windows 11 is to use the Windows settings app itself.
1. Open Windows Settings by hitting the Windows + I keys simultaneously.
2. Go to the Accounts section from the left pane of the Settings window, and click on the Sign-in options in the right-pane.
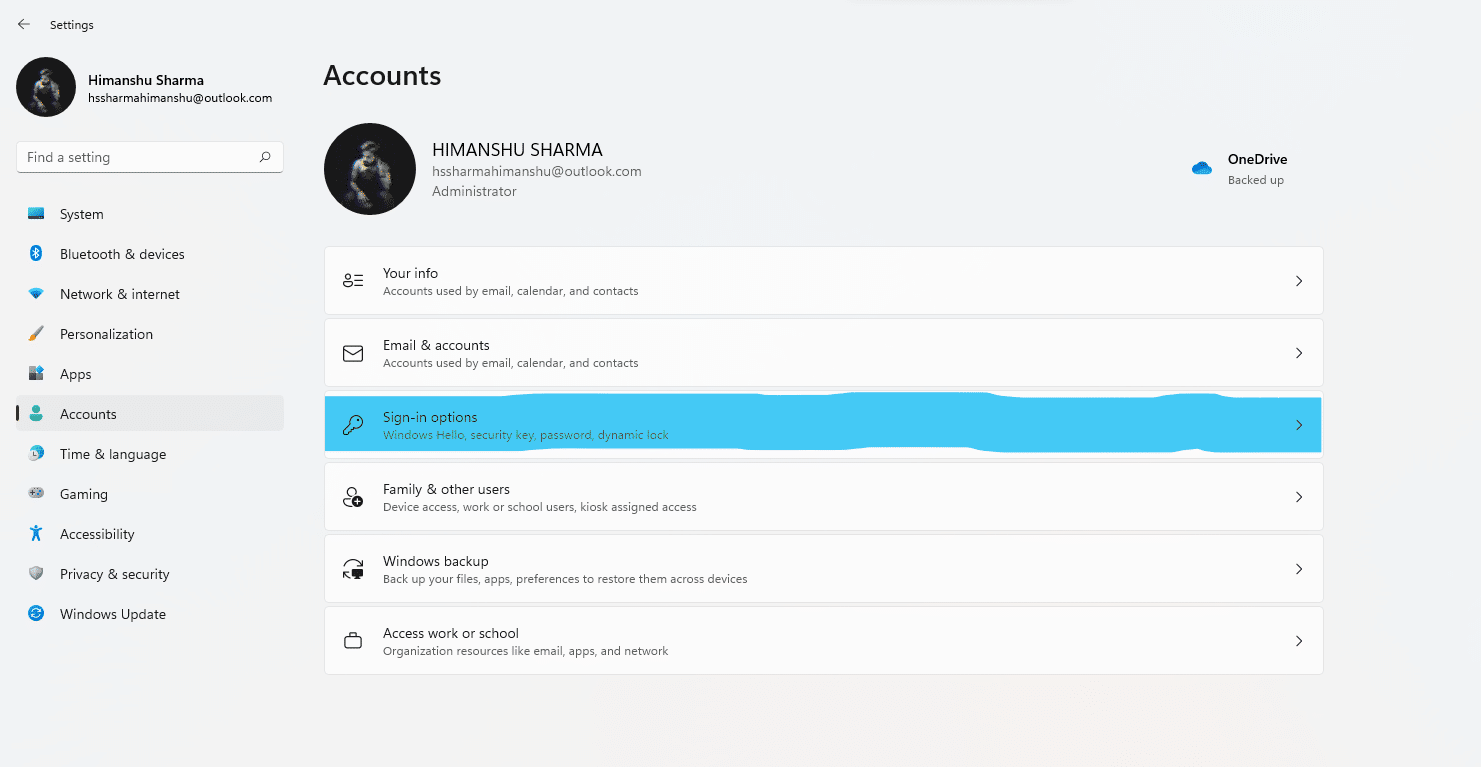
3. Under Additional settings, locate the option asking If you’ve been away, when should Windows require you to sign in again?

4. Here, click on the drop-down menu and select the Never option, as depicted below.

5. Finally, restart your PC.
Now you’ve set your system to turn off password on PC wake up from sleep and can work efficiently according to your way. To learn other alternate methods, keep reading.
Also Read: How to Change Lid Open Action in Windows 11
Method 2: Through Command Prompt
Another way to enable or disable wakeup password in Windows 11 is using Command Prompt to make changes in the sleep settings of the PC. Follow these steps to turn on or off Windows 11 wakeup password via CMD:
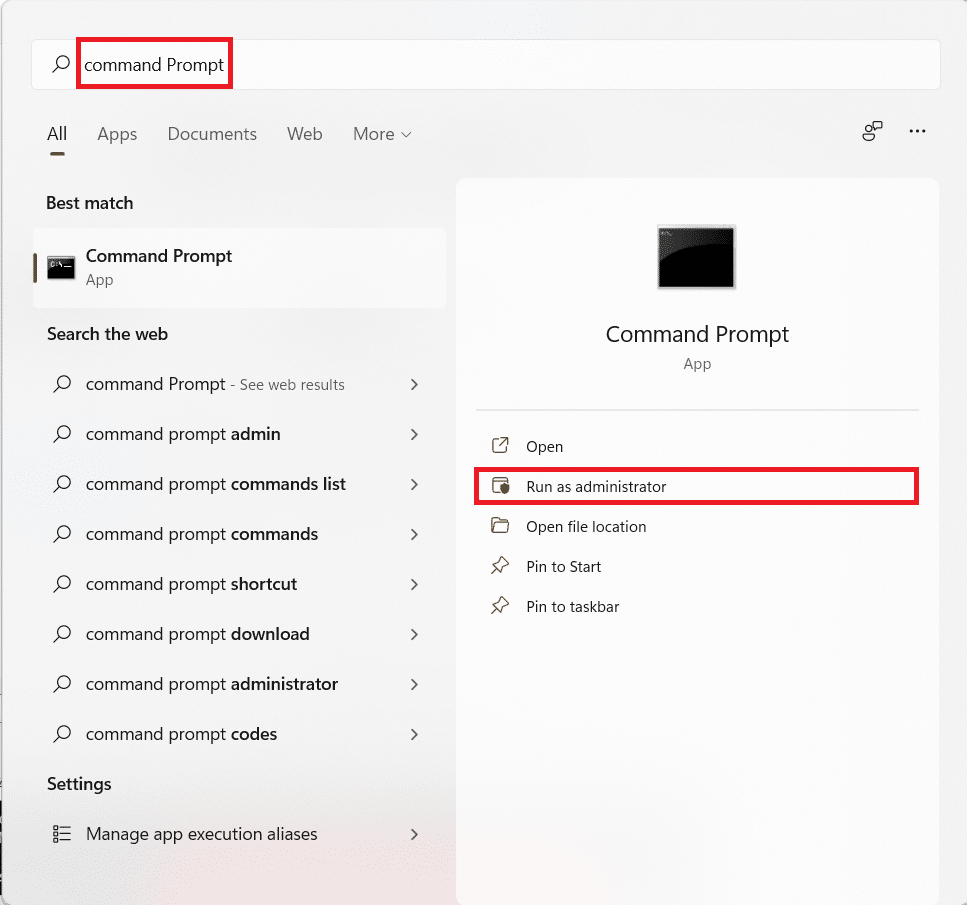
1. Click on the Search icon, type command prompt, and click on Run as administrator.
2. Here, type the following command and press Enter key to execute.
powercfg /SETDCVALUEINDEX SCHEME_CURRENT SUB_NONE CONSOLELOCK 0

3. Again, type the command given below and hit the Enter key to execute it.
powercfg /SETACVALUEINDEX SCHEME_CURRENT SUB_NONE CONSOLELOCK 0

4. Restart your PC after executing the commands.
This is how you command your power configuration to disable the password for waking up windows 11.
Also Read: How to Check if Modern Standby is Supported in Windows 11
Method 3: Through Local Group Policy Editor
Another way to enable or disable wakeup password in Windows 11 is through local group policy editor. First, read our guide on How to Enable Group Policy Editor in Windows 11 Home Edition. Then, follow given steps:
1. Hit the Windows + R keys together to open Run dialog box.
2. Type gpedit.msc and click on OK to open Local Group Policy Editor.

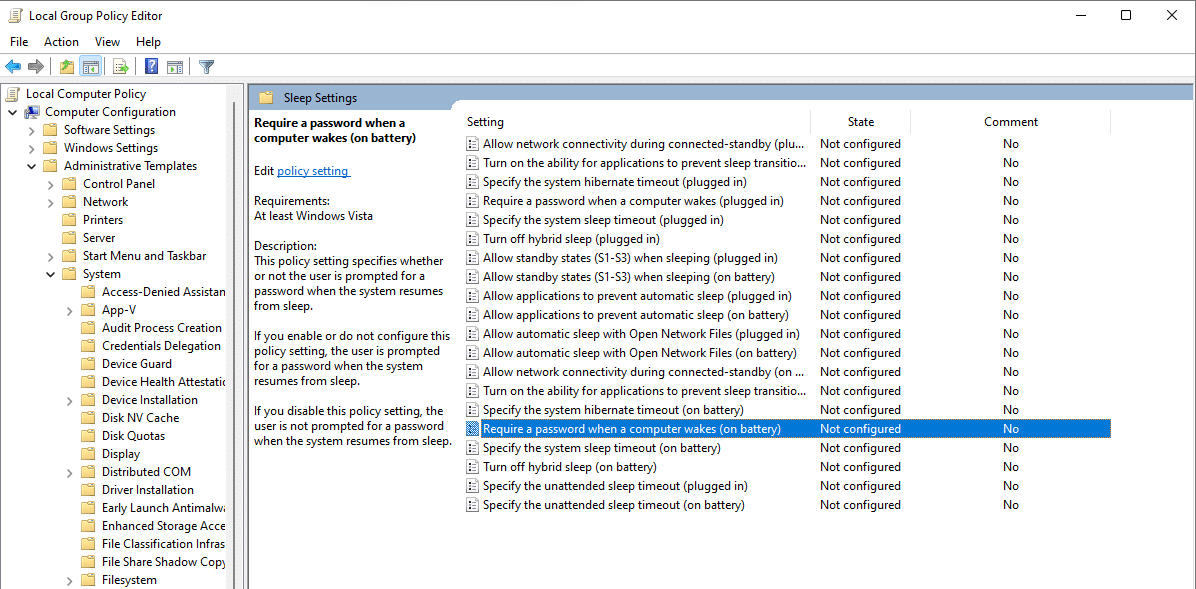
3. Navigate to Computer configuration > Administrative Templates > System > Power management > Sleep settings by double-clicking on each of these folders in the left pane.

4. Locate the option Require a password when a computer wakes (on battery) and double click on it.
5. Now, select the Disabled option to activate the setting.
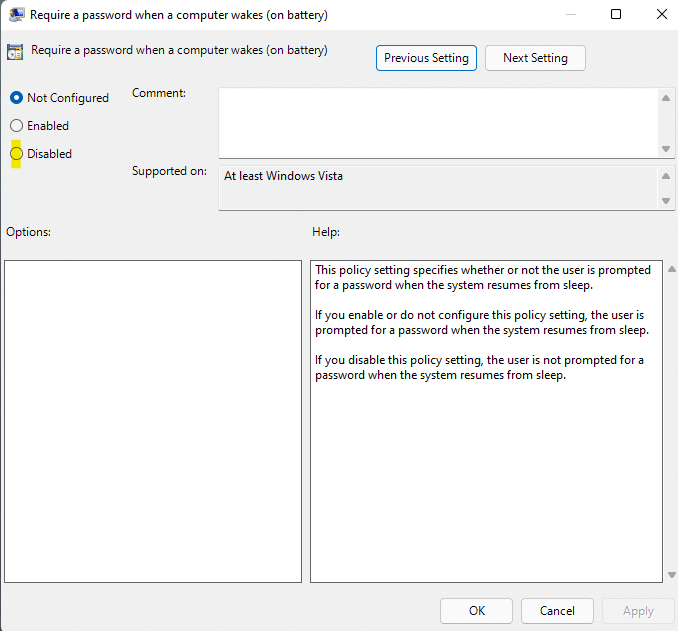
6. Click on Apply > OK to apply these settings.
7. By following steps 4-6, choose Disabled option for Require a password when a computer wakes (plugged in) too.
Note: In order to re-enable wakeup password in Windows 11, set the following settings to Enabled:
- Require a password when a computer wakes (battery)
- Require a password when a computer wakes (plugged in)
Also Read: How to Enable or Disable Mobile Hotspot in Windows 11
Method 4: Through Registry Settings
This is yet another way to turn off wake up after sleep password on Windows PC 11 by creating an exception of power options to bypass password requirement when logging back into the system on sleep. Here’s how to enable or disable wakeup password on Windows 11 via Registry editor:
1. Launch the Run dialog box, type regedit, and hit Enter key to launch Registry Editor.

2. Navigate to the following path from the address bar:
ComputerHKEY_LOCAL_MACHINESOFTWAREPoliciesMicrosoft

3. Right-click the Microsoft folder, choose New > Key as illustrated below.
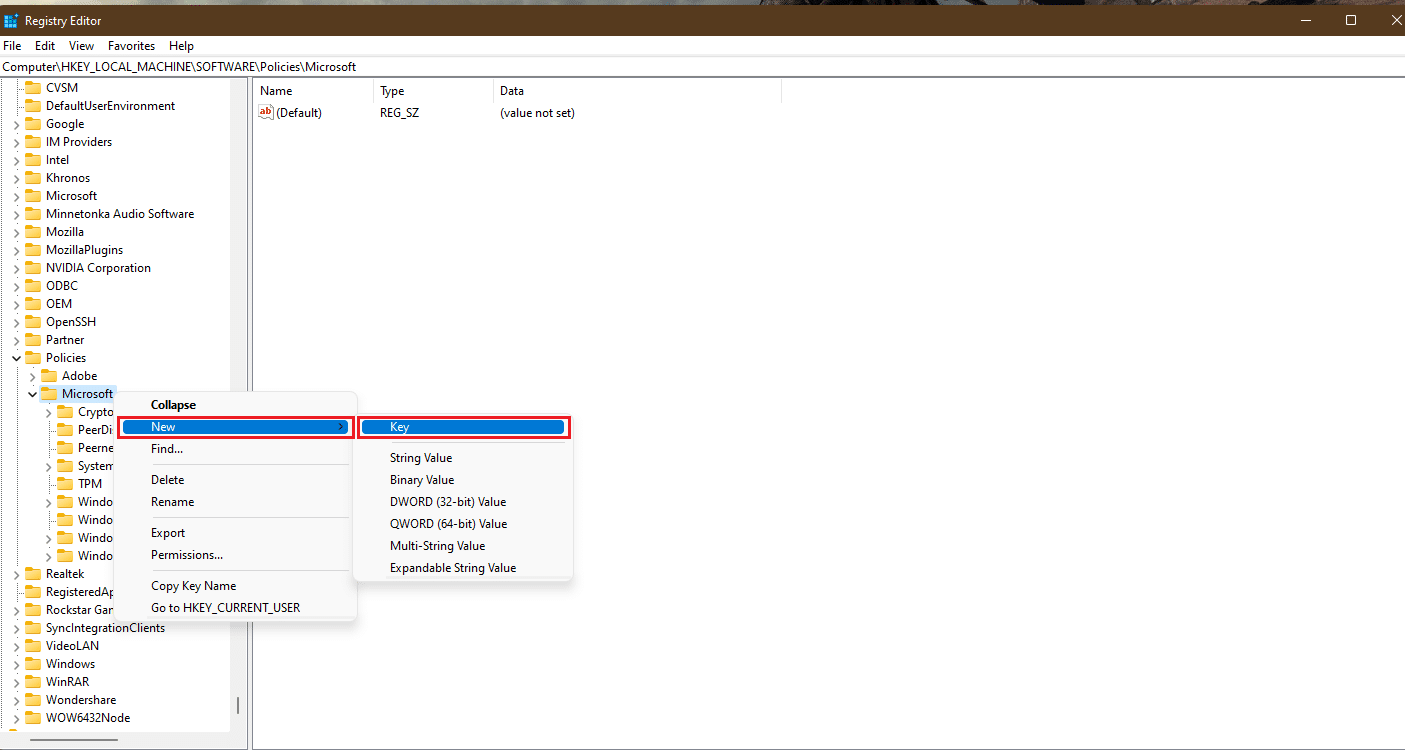
4. A new folder will be created. Rename it to Power by pressing F2 key.

5. Again, right-click on the Power key and select New > Key as earlier. Rename this key as Power settings.

6. Right-click on the empty space, select New > DWORD (32-bit) Value as depicted below.

7. Rename the REG_DWORD created above as DCSettingIndex.

8. Double-click on the DCSettingIndex file and set the Value data to 0.
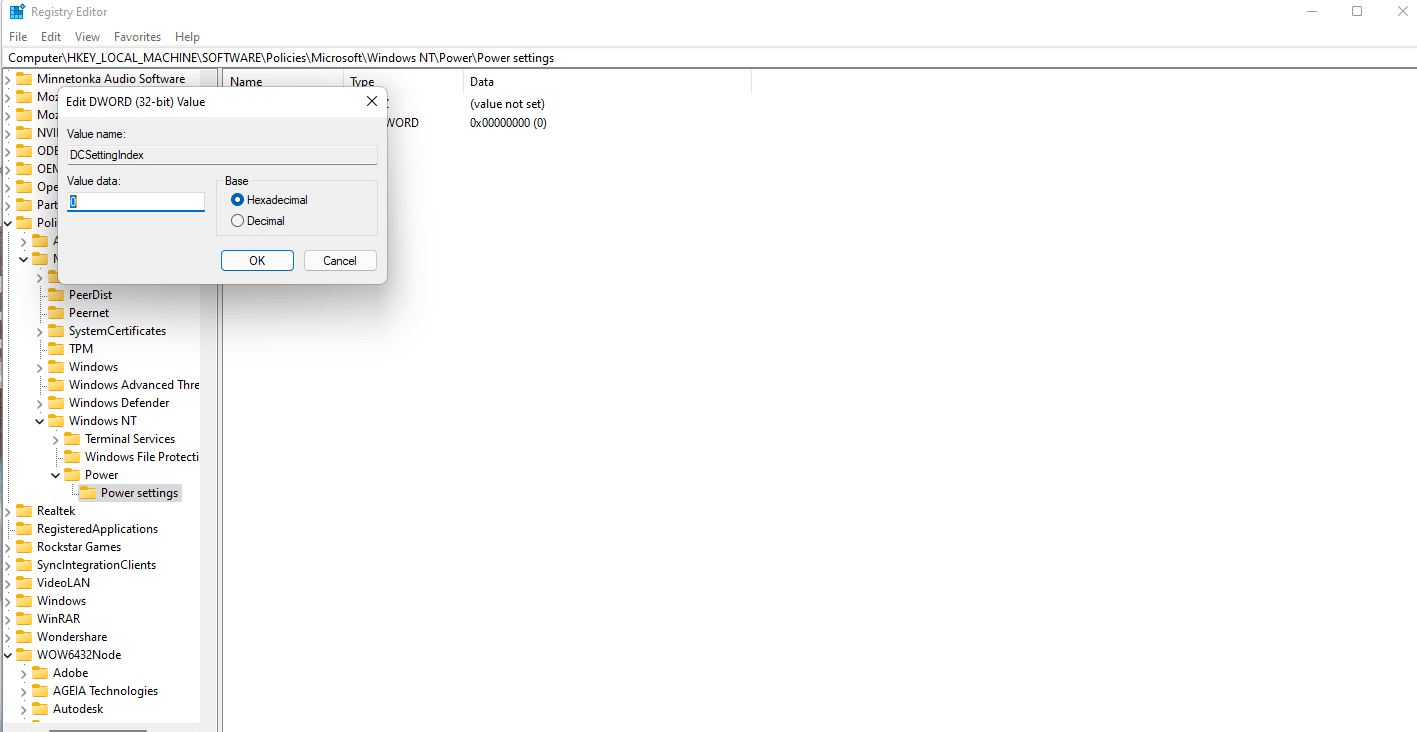
9. Again, repeat step 8 and create a new DWORD (32-bit) Value. Rename the new value as ACSettingIndex as shown.

10. Double-click and set the Value data to 0 for ACSettingIndex value also.
11. Finally, close the Registry Editor and restart your PC to implement said changes.
Note: If you want to enable wakeup password on Windows 11, you must set the Value data for both DCSettingIndex and ACSettingIndex to 1.
Recommended:
We hope we provided you with ample methods to enable or disable wakeup password in Windows 11. Tell us in the comment section your favorite method to alter the settings and also any difficulties you faced while doing so.