Recently the internet has been flooding by users reporting that their PC freezes and buzzing sound in Windows 11 while working. If you are also facing the same issue while working suddenly your screen with the system altogether freezes creating audio buzzing sound, then do not worry! We bring to you a helpful guide that will fix audio buzzing in Windows 11. So, continue reading!
How to Fix Audio Freezing & Buzzing Sounds in Windows 11
If you are doing intense gaming or high-level editing, you may face PC freezes and buzzing sound on Windows 11. However, this issue may happen even if are doing a simple task also. Usually, this issue majorly arises due to hardware problems but since most of the reports have a common pinpoint after upgrade to Windows 11, there can be multiple factors bringing up these problems which are explained in the next section.
Reasons for PC Buzzing and Freezing Issues
There can be a handful of reasons and their combinations in some cases which result in buzzing sounds and freezing issues in Windows 11. We’ve listed some of them below for you to ponder about:
- Overclocking or worn-out cooling fans in the PCs result in buzzing sounds.
- Outdated GPU or display drivers affecting the normal functioning.
- Problems in booting of the system in the normal state due to faulty software.
- Overheating of the CPU due to prolonged heavy usage.
- Entry of dust or foreign particles on the RAM chips straining the hardware of the memory usage.
- Voltage fluctuation issues frying the cable connections on your PC.
Note: Sometimes a simple restart might be the best solution.
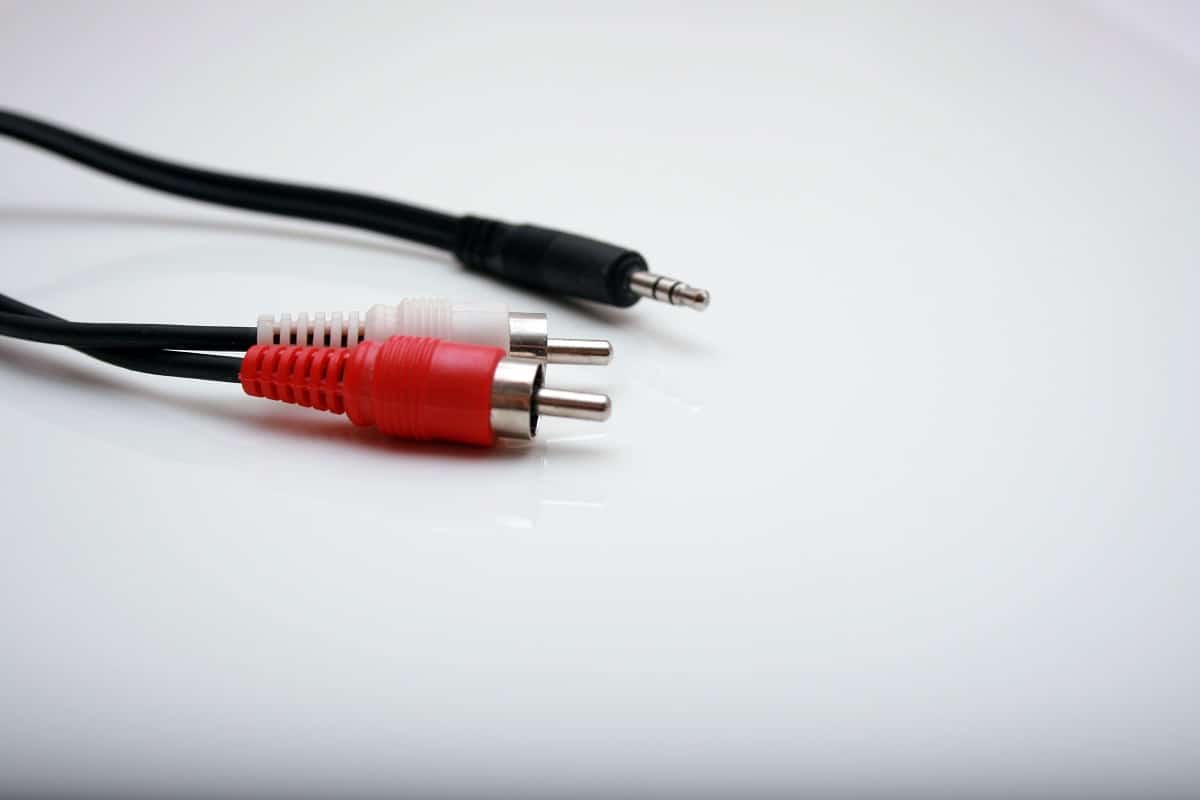
Method 1: Replace Damaged Audio Cables
Sometimes faulty devices or burned-out cables are the sole reasons for such issues. Prolonged or rough usage can wreak havoc on your system and can be very dangerous for other components working normally, especially in the cases of a bad electricity supply. Follow these precautions to fix the said issue.
- Check the main connecting cables to the CPU and the monitor to assure no such connection is stressing the working of the PC
- Replace the cables or/and devices in such a case to avoid any damage further.
Although this wouldn’t be relevant to the users who started facing the issue after upgrading to Windows 11, coincidences define themselves the way they are. Let’s move forward to the next method towards fixing buzzing sounds and freezing issues in Windows 11.
Also Read: Fix Windows 10 No Audio Devices are Installed
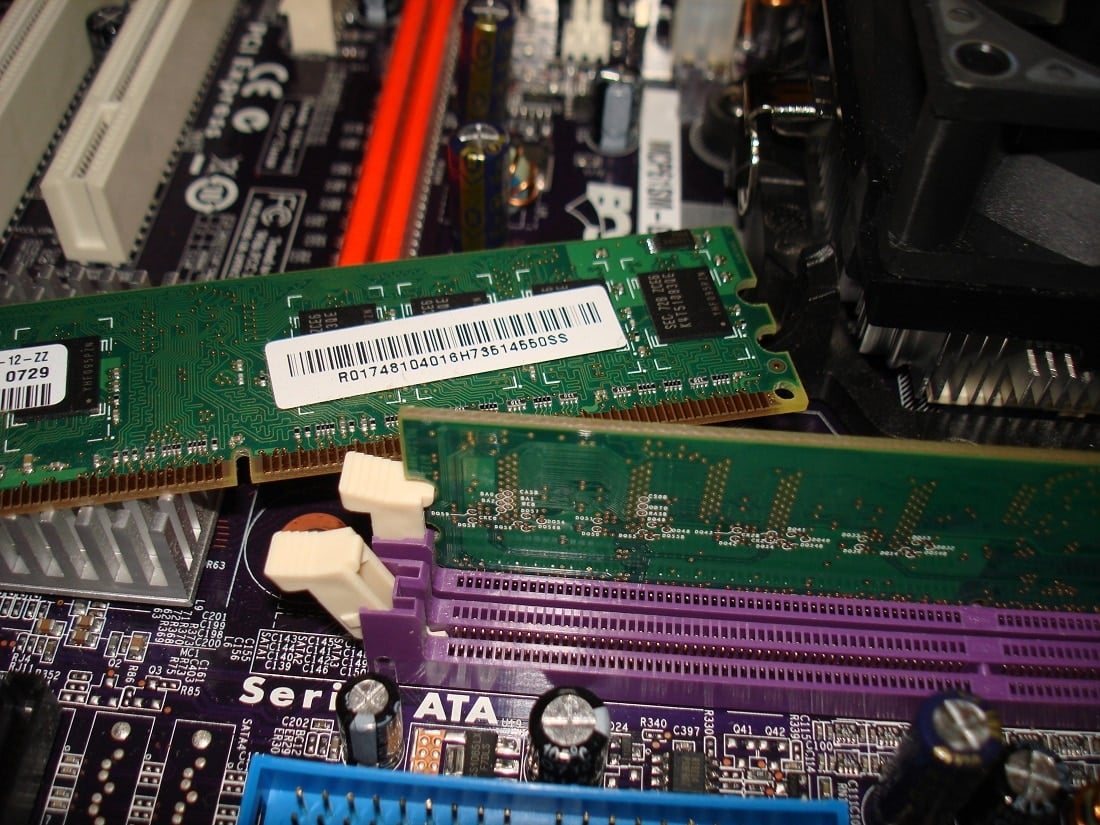
Method 2: Clean RAM Slots
Dust and other foreign particles entering the CPU cabinet can result not only in buzzing and freezing issues but frying out the RAM slots and sticks if coming in contact.
- Open the cabinet yourself or with the help of a technician and clean the RAM sticks and slots along with the interiors of the PC.
Note: This applies mostly for Desktops but if you feel it could be a case for laptops, consider the method.
- If necessary, change the PCI-e slots for the sticks as there are more than 1 slot for the RAM.
- You should not compromise at all if the RAM stick(s) look(s) problematic, then replacing it instantly can save you from a lot of loss in the future costing a cumbersome amount of money. Let’s move to another method.
Method 3: Close Unwanted Background Processes
If you are using your PC with an overclocked processor and graphic cards with intense gaming and editing work, the CPU temperature might be close to the threshold, and hence overheating could be a prime reason for buzzing sound and freezing issues in the system. So, follow these steps to remove unwanted background processes taking high memory usage.
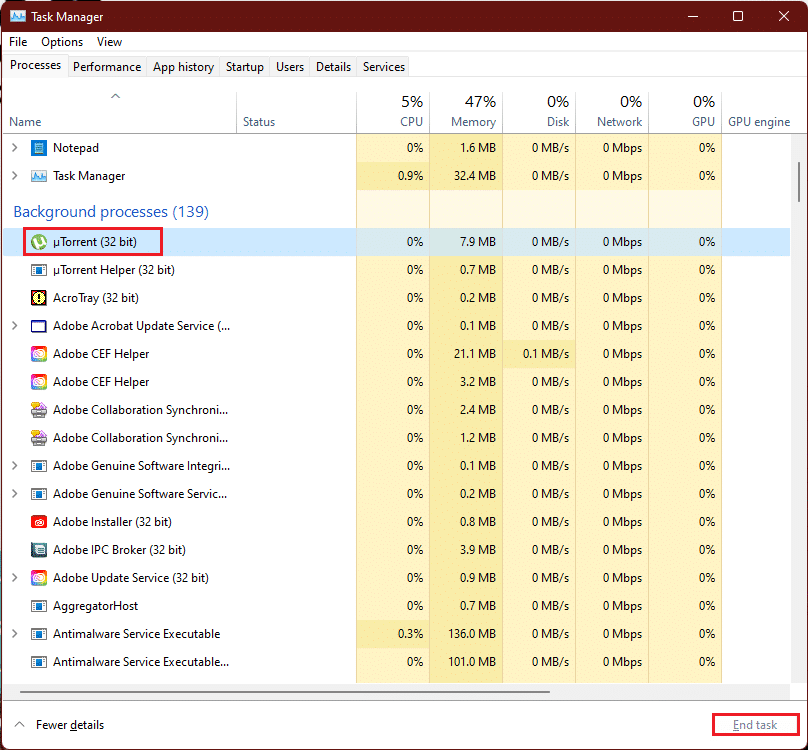
1. Press Ctrl + Shift + Esc keys together to open Task Manager.
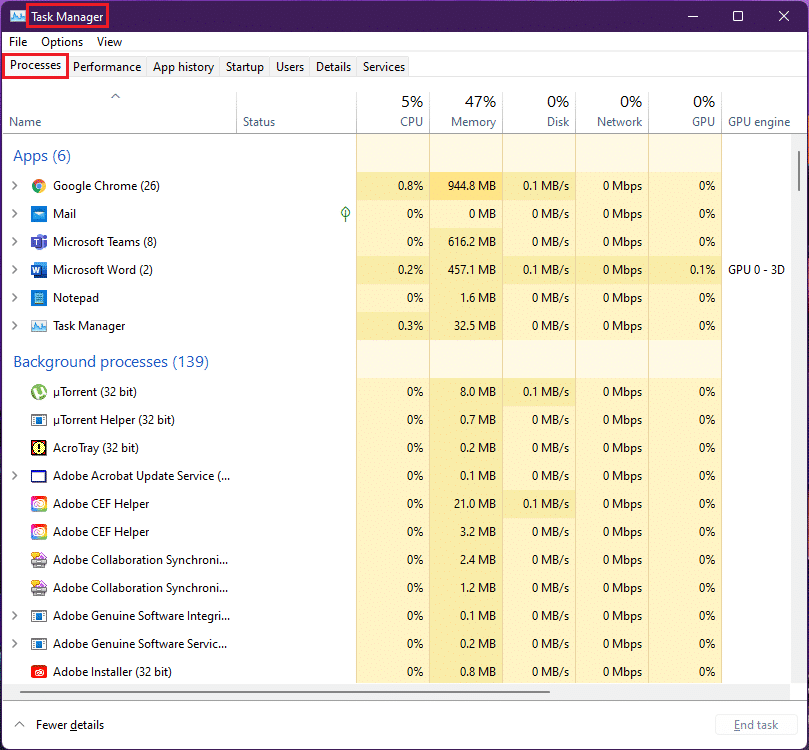
2. Select the unwanted process (e.g. uTorrent) and click on End task.
Note: You should not close any Windows service processes as they can cause errors in your system.
Excessive and high-end RAM consumption of games or software above the capacity of the GPU results in over speeding of the graphic card fans due to rise in temperatures and this overheating scenario in the cabinet can result in high wear and tear, therefore, by removing the unwanted background processes can fix this issue.
Also Read: Fix Critical Process Died Error in Windows 11
Method 4: Run Audio Troubleshooter
In case the above methods couldn’t fix the sound issues, troubleshooting the audio could fix the problems with the audio. To do this, follow these steps:
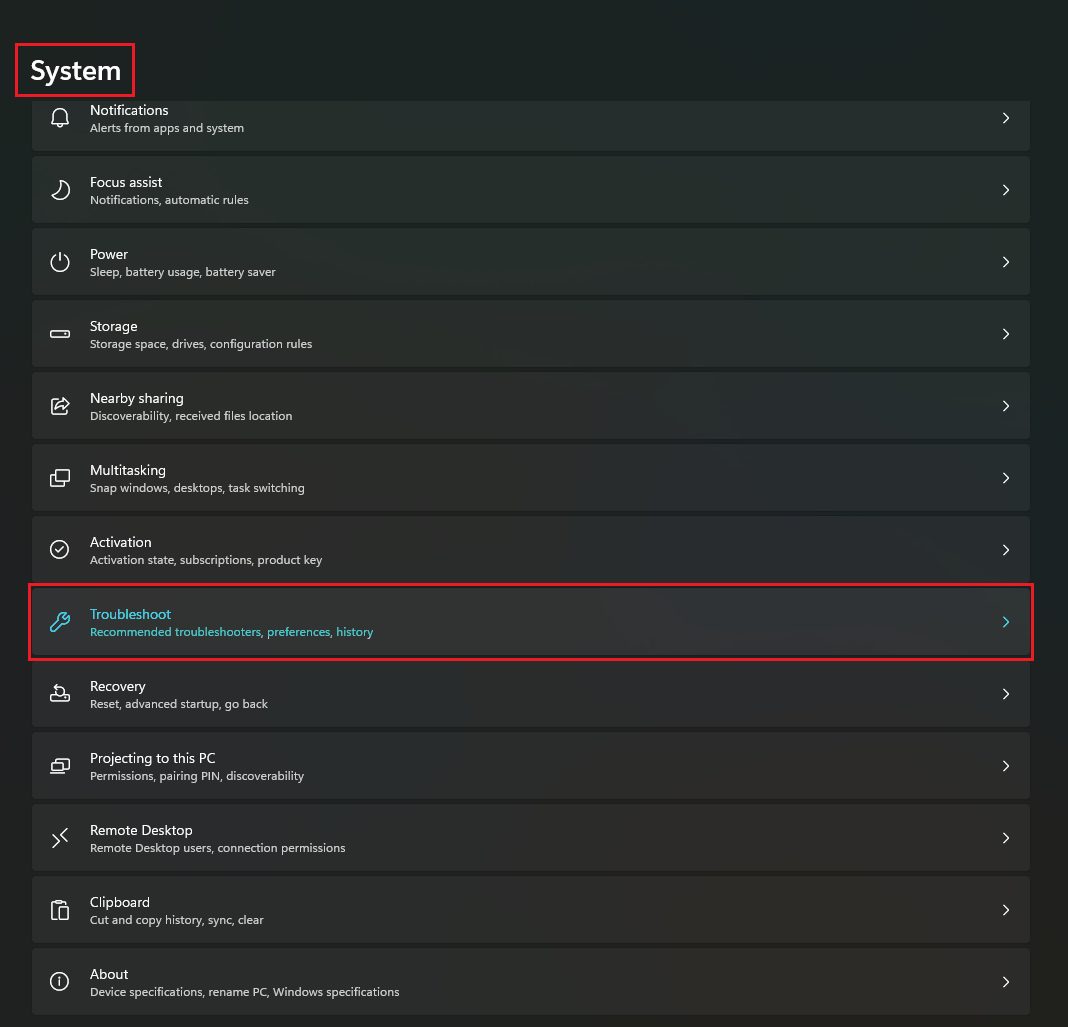
1. Open Windows Settings by hitting Windows + I keys simultaneously.
2. In the System Settings, scroll down and select the Troubleshoot option.
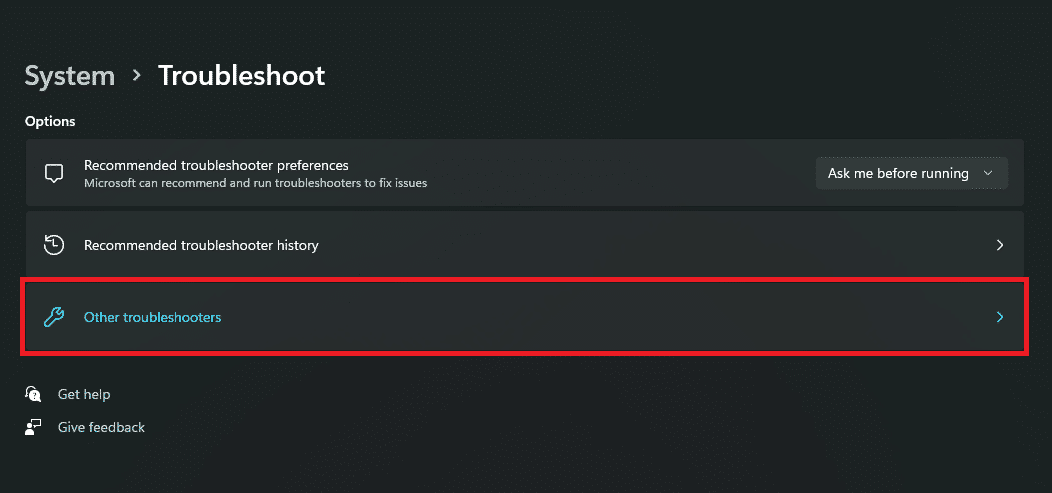
3. Click on the Other troubleshooters option.
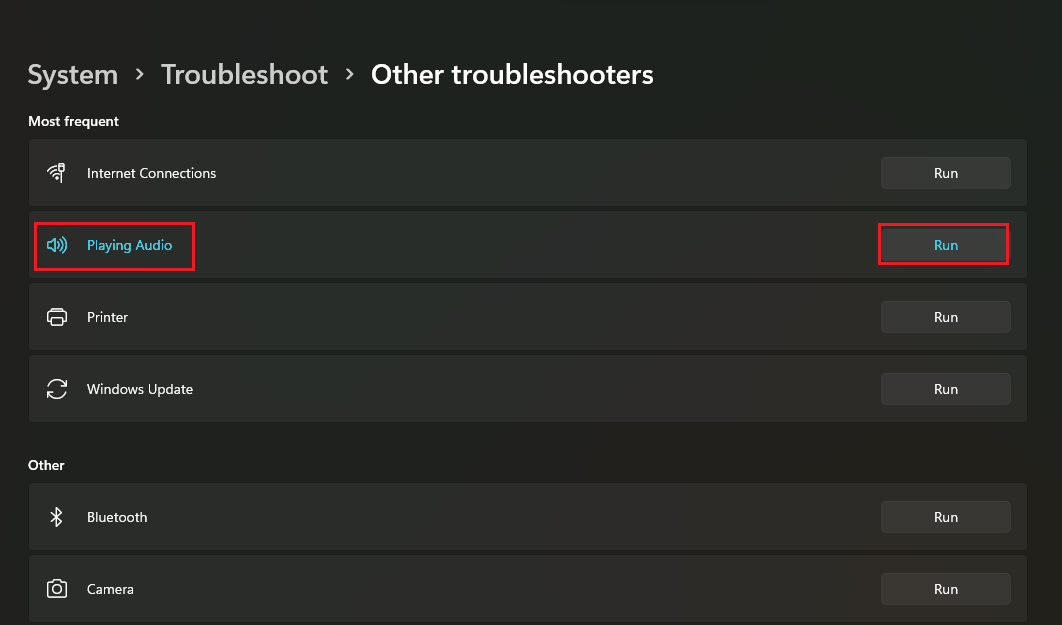
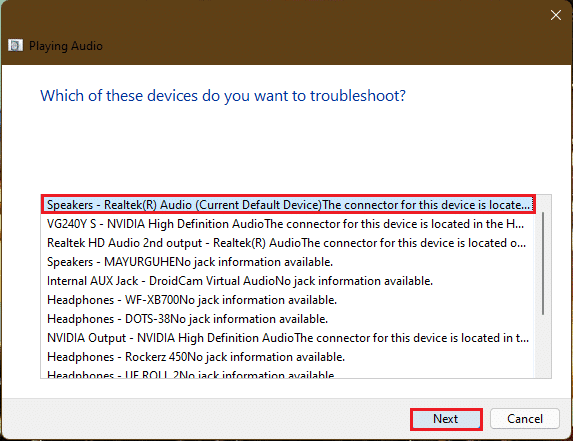
4. Locate the Playing Audio option and click on the Run button with respect to it.
5. Now, select the audio device which can be problematic and select the Next button.
6. Wait for the troubleshooter to detect the problems.
7. Apply the fix if there are any issues as instructed by the troubleshooter.
8. Finally, restart your PC.
Repeat these steps individually to fix all the audio devices you doubt in your system.
This would troubleshoot all the audio devices in your system. If this didn’t work, proceed to the next method.
Method 5: Uninstall Conflicting Apps in Safe Mode
This is the best fix to determine any faulty application or processes which is resulting in buzzing sounds and freezing issues in Windows 11. Firstly, you should boot into safe mode. Read our article on How to Boot Windows 11 in Safe Mode
After the system boots into safe mode follow the given steps to uninstall and check for conflicted apps.
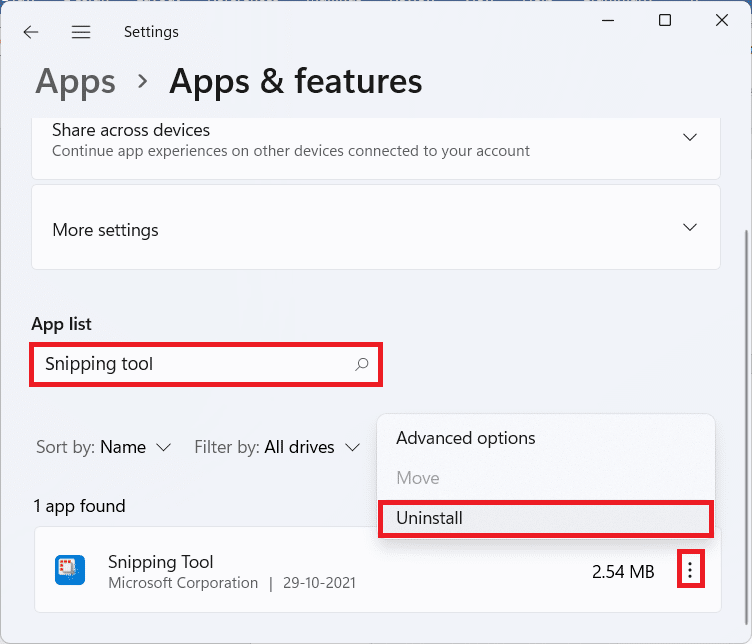
1. Click on the Search icon, type apps and features and click on Open.

2. Search for the conflicting apps (e.g. Snipping tool) from the search bar.
3. Then, click on the three-dotted icon and select Uninstall option, as depicted.
4. Again, click on Uninstall in the confirmation dialog box.

Now, check if the issue persists or not. If the issue is fixed, then the problem was with the particular app.
Also Read: Fix Low Microphone Volume in Windows 11
Method 6: Update or Reinstall Graphics Driver
Sometimes the GPU drivers are the ones requiring attention or needing a critical update that would fix PC freezes and buzzing sound in Windows 11.
Option 1: Update Driver
Follow the given steps to update your graphics drivers.
Note: These steps would be feasible for integrated graphics card installed on your PC.
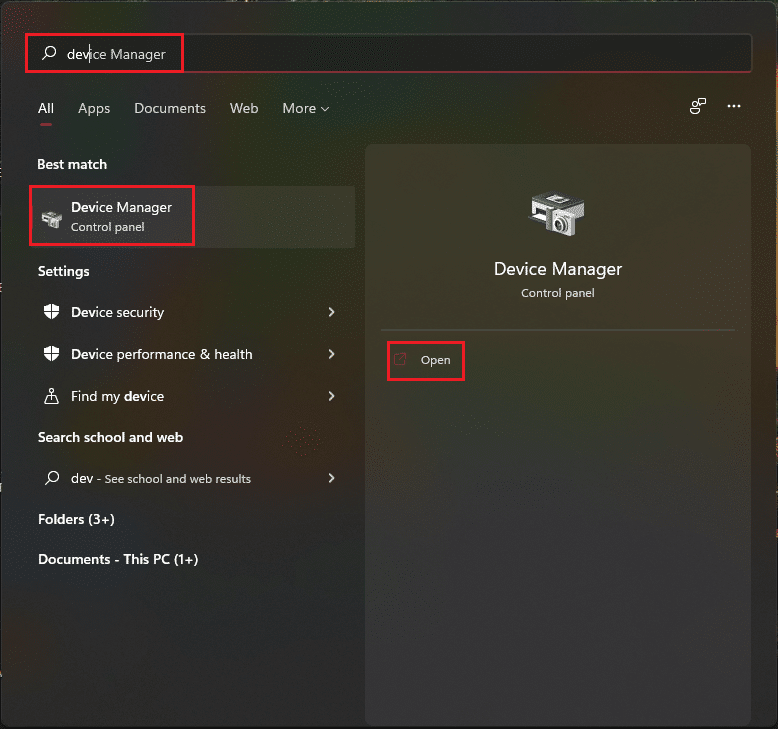
1. Click on the Search icon, type device manager, and click on Open.
2. Double-click on Display adapters to expand it.
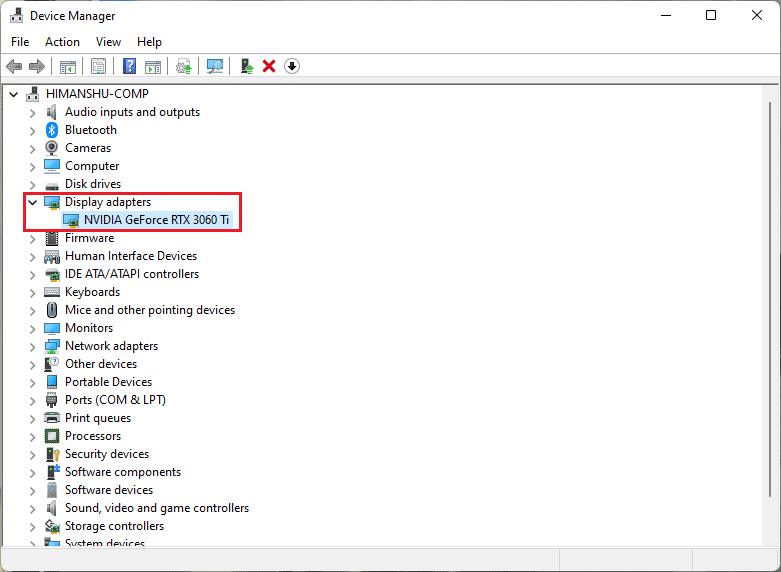
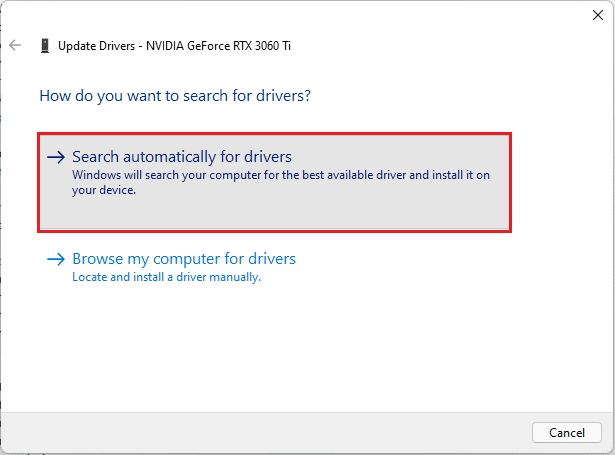
3. Right-click on your graphics driver (e.g. NVIDIA GeForce RTX 3060 Ti) and select the Update driver option.

4. Click on Search automatically for drivers to download and update driver automatically.
5A. If any updates are available, then Windows will download and install them.
5B. If your driver is updated then, you will receive the message The best drivers for your device are already installed. Then, close the update wizard.
Pro Tip: Update NVIDIA GeForce Experience
If you have an NVIDIA graphic card installed in your system. Then, you can update the graphics driver from the GeForce Experience app. Follow these steps to do so.
1. Click on the Search icon, type geforce experience, and click on Run as administrator.

2. Switch to the DRIVERS menu.

3. Here, click on CHECK FOR UPDATES to check for available updates.

4A. If there are any updates available then, click on DOWNLOAD to download and install them.

4B. If your driver is updated then, you’ll get the message stating You have the latest GeForce Game Ready Driver.
Also Read: What is NVIDIA Virtual Audio Device Wave Extensible?
Method 7: Update or Rollback Audio Driver
If your audio driver is not updated or has a corrupt update then, you will face audio buzzing in Windows 11. Follow these steps to update or roll back driver updates.
Option 1: Update Driver
Here are the steps to update your audio driver.
1. Launch Device Manager as shown in the above Method 6.
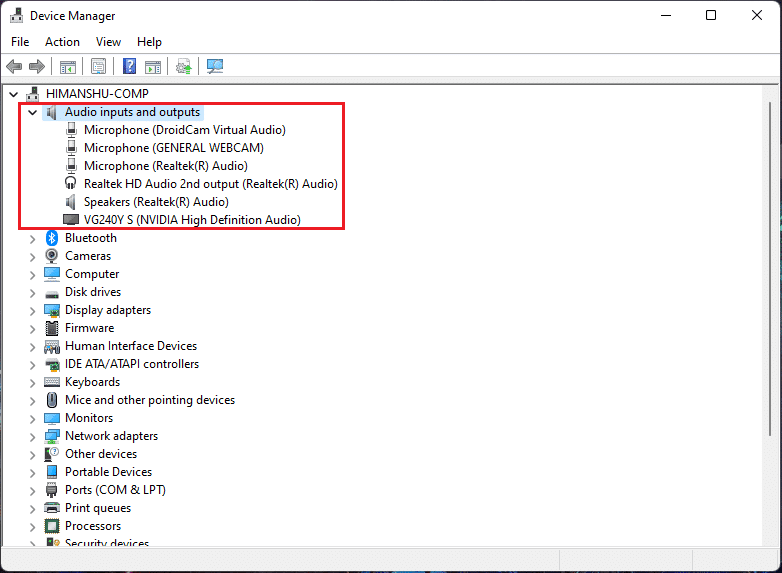
2. Double click on Audio inputs and outputs to expand and view the installed drivers.
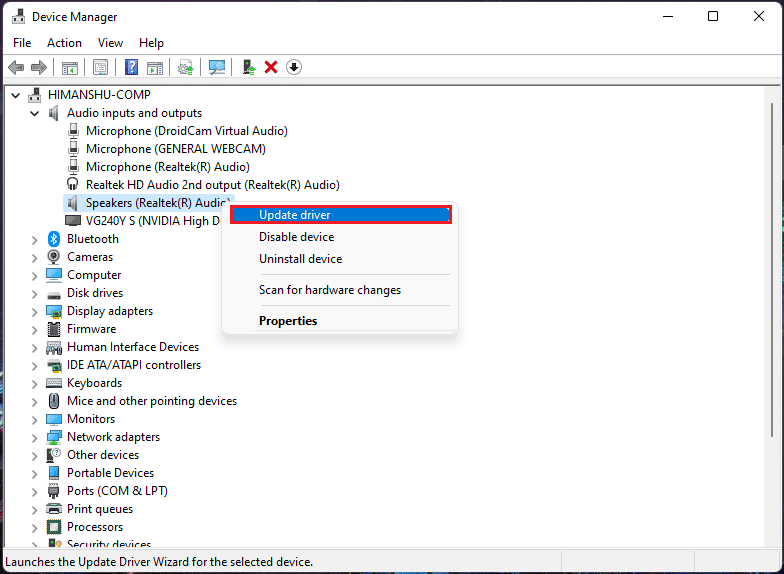
3. Right-click on your audio driver and select Update driver option.
Note: You can directly download latest drivers from Realtek Audio Driver Download page.
4. Download and install the drivers by clicking on Search automatically for drivers as shown in Method 6.
5. Now, update all audio device drivers by performing the above steps.
This should fix the buzzing issues if caused by audio outputs, if this isn’t the case, move to the next method.
Option 2: Rollback Driver Updates
Rolling back to a previous version of the audio driver should work if your driver update files get corrupt. Follow these steps to rollback driver updates.
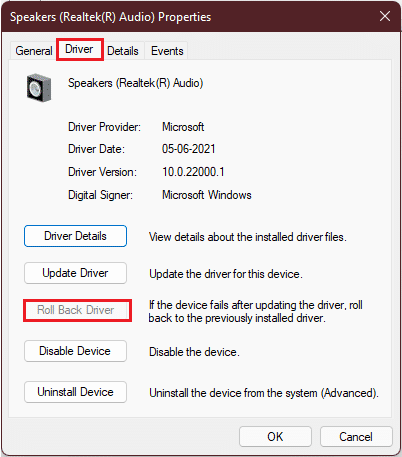
1. Go to Device Manager > Audio inputs and outputs as illustrated in the previous option.
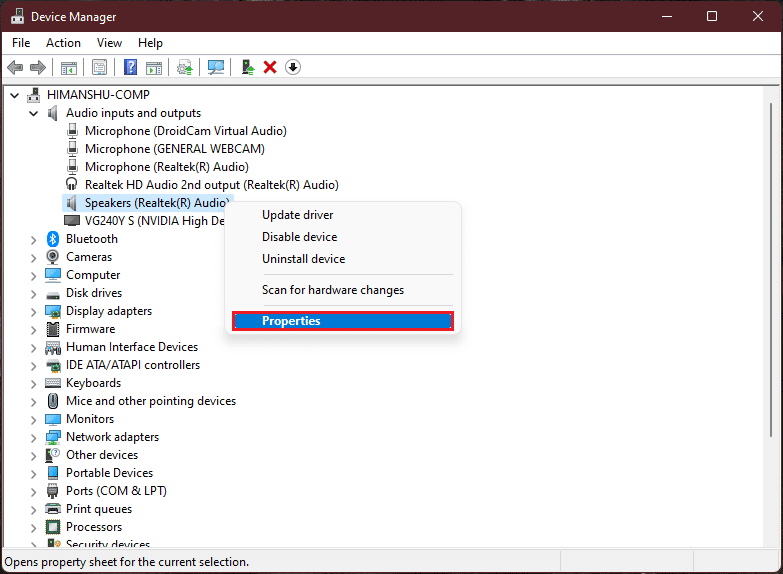
2. Right-click on your audio driver and select Properties.
3. Switch to the Driver tab and click on Roll Back Driver.
Note: If the Roll Back Driver button is greyed out, then you do not have any updates installed for the particular driver.
4. Select the reason from Why are you rolling back? section and click on Yes.
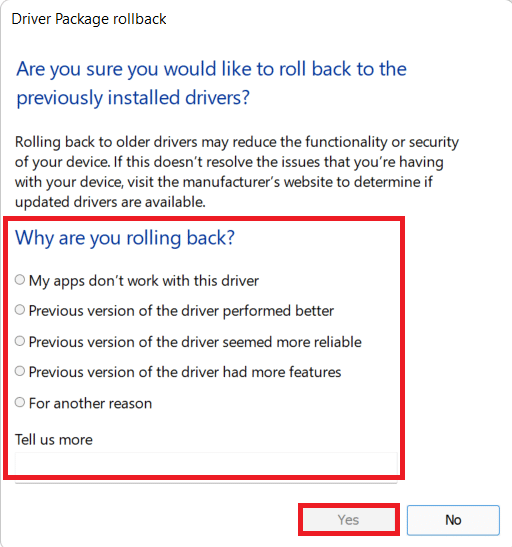
5. Finally, restart your PC.
6. Repeat the above steps for all the installed audio device drivers.
Also Read: How to Fix Windows 11 Update Stuck
Method 8: Reinstall Audio Driver
If updating the audio driver did not fix Audio buzzing on Windows 11 issue, then follow our detailed guide on How to reinstall audio driver on Windows 11 here.
Method 9: Run SFC, DISM & CHKDSK Tools
In case a system file is corrupted or broken or a Windows image file is affected, the SFC scan and DISM scan would be able to detect it and fix it. This may fix Audio buzzing on Windows 11. So, follow these steps to run CHKSDSK, SFC and DISM scans.
Step I: Run chkdsk Command
Firstly, you should scan your drive where Windows OS is installed as follows:
1. Press the Windows key and type Command Prompt, then click on Run as administrator, as shown.
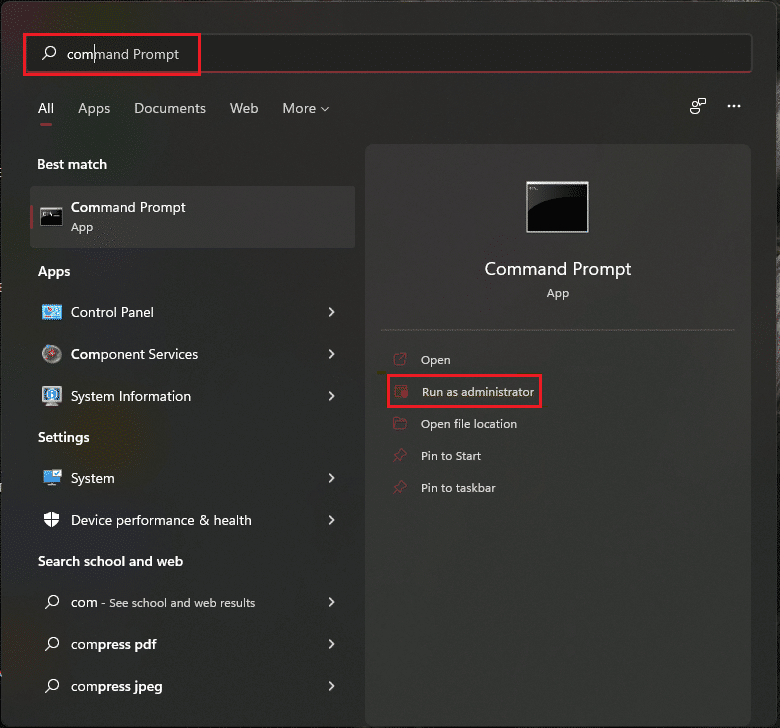
2. Click on Yes in the User Account Control prompt.
3. Type chkdsk X: /r and press the Enter key by replacing X with drive partition where Windows is installed, usually drive C.
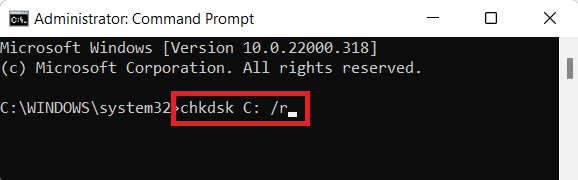
4. If you receive a message stating Cannot lock current drive, type Y and press the Enter key to run the chkdsk scan at the type of next boot.
5. Finally, restart your PC.
Step II: Run SFC Scan
Now, you can run System File Checker Scan by following the given steps:
1. Launch Command Prompt as administrator as shown before.
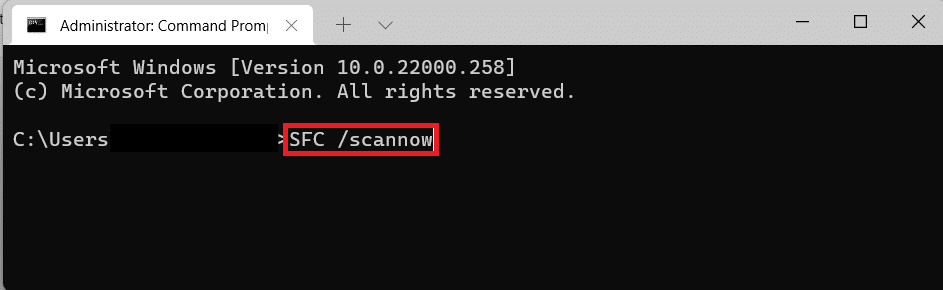
2. Type SFC /scannow and hit Enter, as depicted below.
3. Wait for the scan to be completed and restart your system.
Step III: Run DISM Scan
Finally, run the Deployment Image Servicing Management scan to repair corrupt system files as follows:
Note: Your computer must be connected to the internet to execute the DISM commands properly.
1. Open Elevated Command Prompt as earlier.
2. Type DISM /Online /cleanup-image /scanhealth & press Enter key.
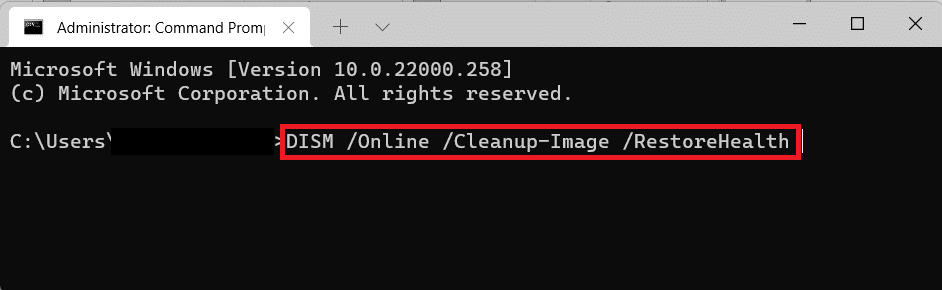
3. Then, execute DISM /Online /Cleanup-Image /RestoreHealth command as shown to begin repairs.
4. Finally, restart your Windows 11 PC.
Also Read: How to Turn Off Windows 11 Camera and Microphone Using Keyboard Shortcut
Method 10: Visit Authorized Service Center
If none of the above methods fix your issue, probably contacting an expert would be the right decision to monitor the system and fix your PC buzzing and freezing problem perfectly and precisely. Go to the nearest authorized service center of your device manufacturer.
Recommended:
We hope these methods did turn out fruitful to fix Audio buzzing in Windows 11. Do tell us which method helped you in the comment section below. Although, if you’re still stuck, feel free to reach out.