How to Fix hkcmd High CPU Usage

The hkcmd executable is essentially, a hotkey interpreter belonging to Intel. There is a common problem of hkcmd module consuming high CPU Usage in Windows. This slows down the system. The hkcmd module may start during Windows startup which also slows down the Windows booting process. If you are also facing the same problem and find it annoying, then do not worry anymore. Today, we will help you fix hkcmd high CPU usage issue. It will also guide you to disable hkcmd module during startup. So keep reading!
How to Fix hkcmd High CPU Usage
Some common issues you may face with the hkcmd.exe file are listed below:
- Your system may crash more frequently. Hence, all the unsaved work will be left all alone, leading to data loss. System crash degrades the overall efficiency of the computer and induces performance issues.
- The hkcmd.exe file always tries to interfere with the Microsoft server whenever you boot your system. This may sometimes prevent you from accessing the web browser.
- It consumes a lot of CPU resources and thus, leads to system lag as well.
Follow the solutions listed below to fix high CPU usage caused by hkcmd.
Method 1: End Task Using Task Manager
There may be plenty of applications that run in the background thereby affecting the performance of the system. Here’s how to fix hkcmd.exe high CPU usage by ending said task:
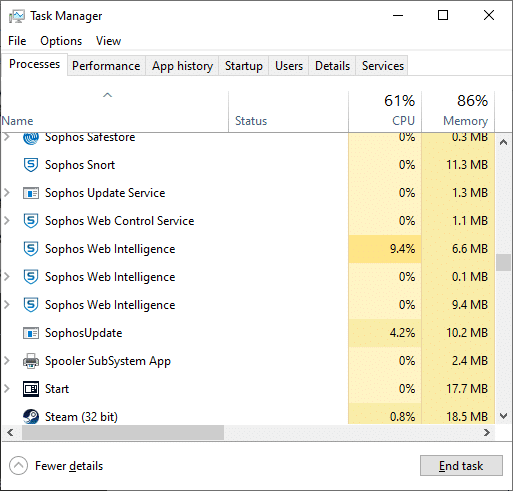
1. Launch Task Manager by pressing Ctrl + Shift + Esc keys together.
2. In the Processes tab, search and select hkcmd tasks.
3. Finally, select End Task and reboot your PC.
Method 2: Run Antivirus Scan
Windows Defender may not recognize the threat when a virus or malware uses hkcmd.exe files as camouflage. In this way, hackers may easily intrude into your system. Few malicious software, such as worms, bugs, bots, adware, etc., might also contribute to this problem. Since they intend to damage your system, steal private data, or spy on you, we need to get rid of these asap.
Pro Tip: Do not open a suspicious email or click on a link to avoid virus or malware attacks.
Several anti-malware programs can help you block or remove malicious software. They routinely scan and safeguard your system. Therefore, to avoid hkcmd.exe high CPU usage error, run an antivirus scan in your system as follows:
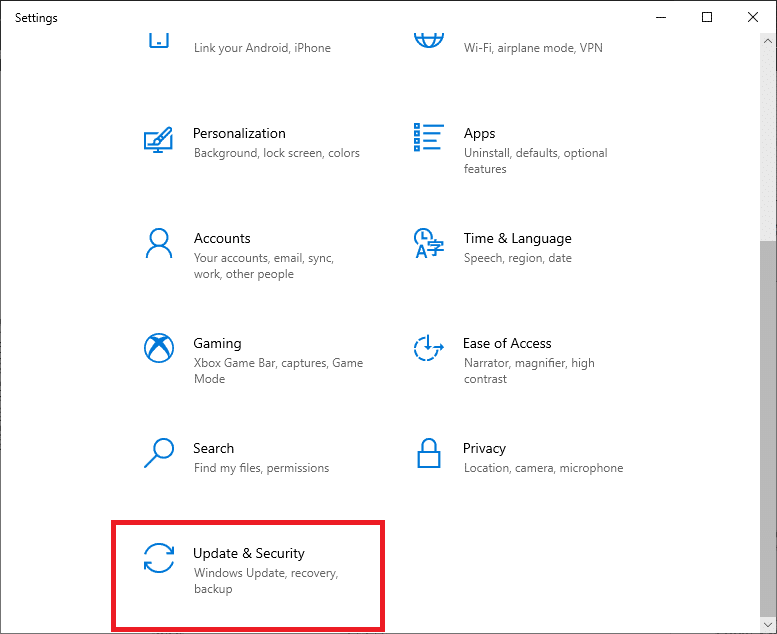
1. Press Windows + I keys together to open Windows Settings.
2. Here, click on Update & Security, as shown.
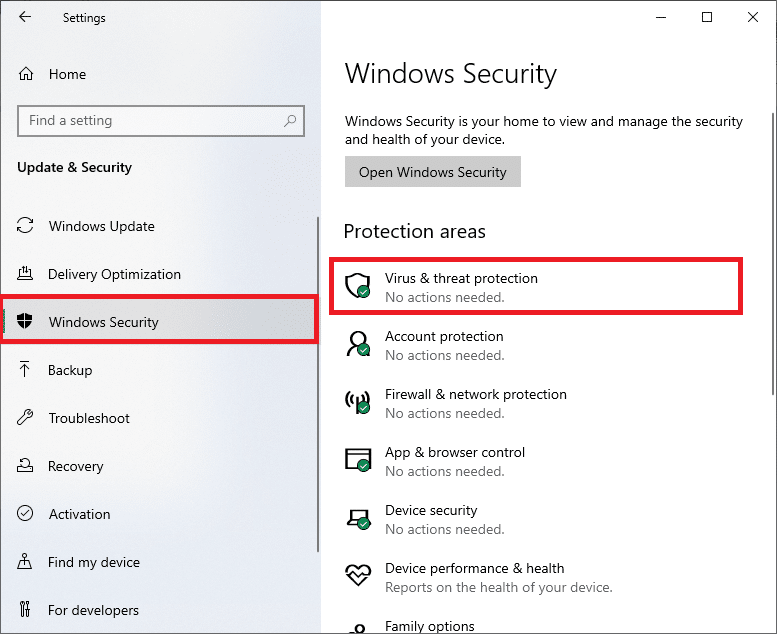
3. Click on Windows Security in the left pane.
4. Next, select the Virus & threat protection option under Protection areas.
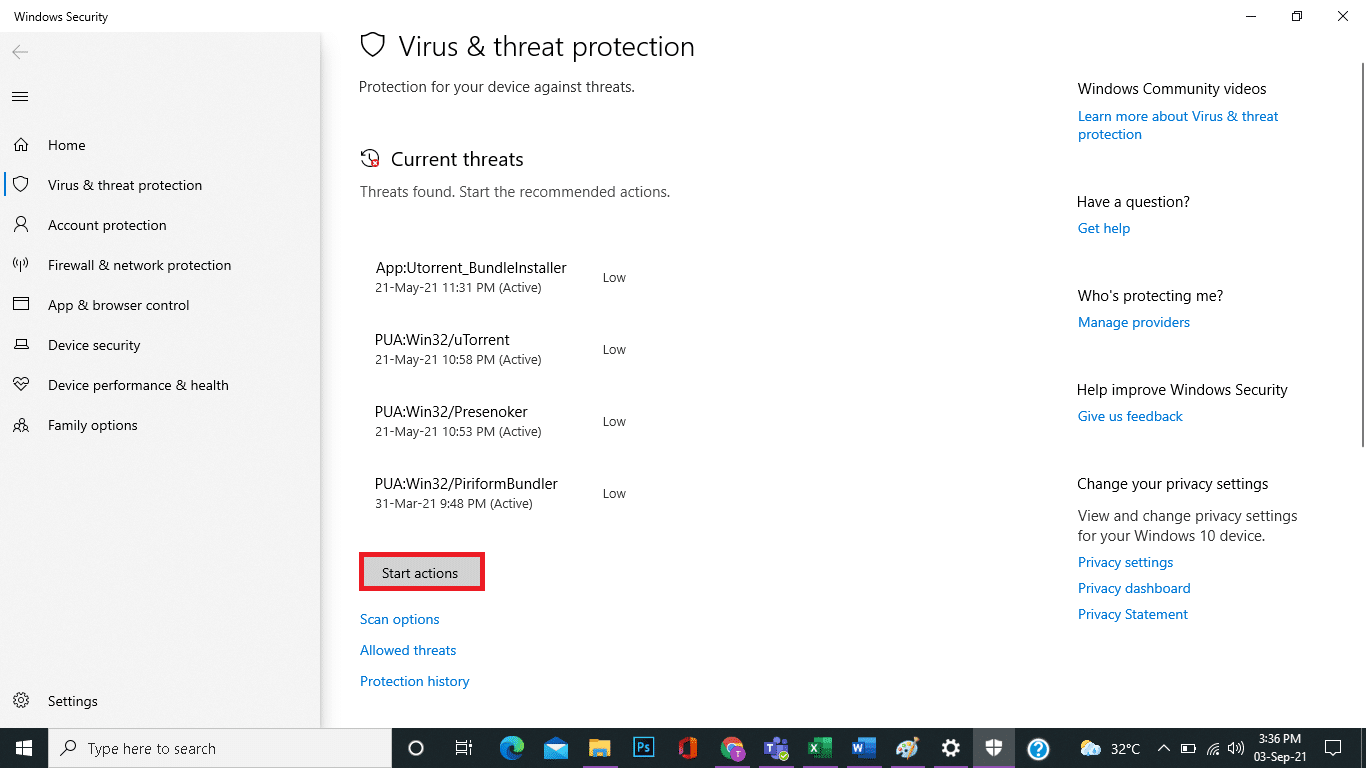
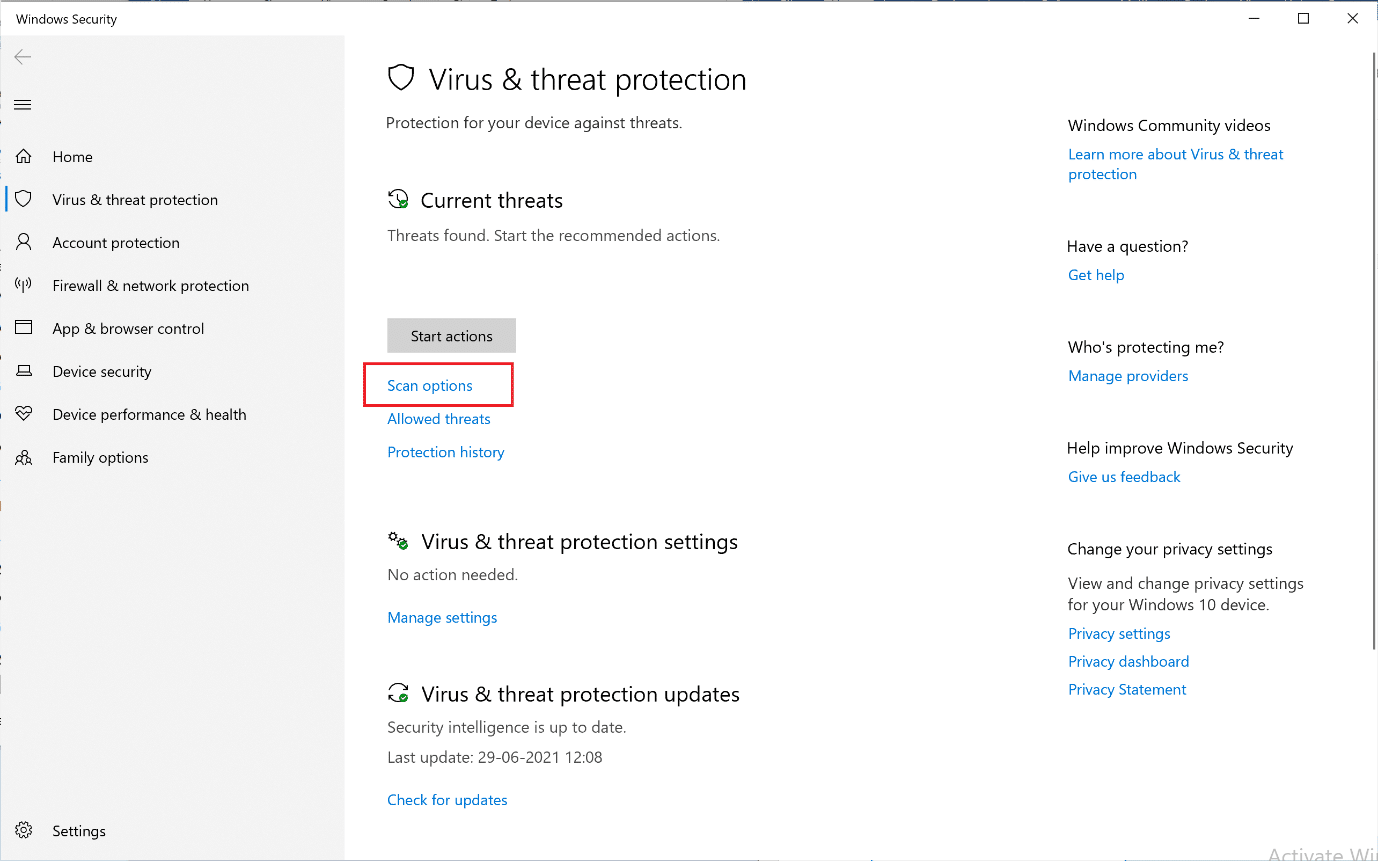
5A. All the threats will be enlisted here. Click on Start actions under Current threats to take actions against the threats.
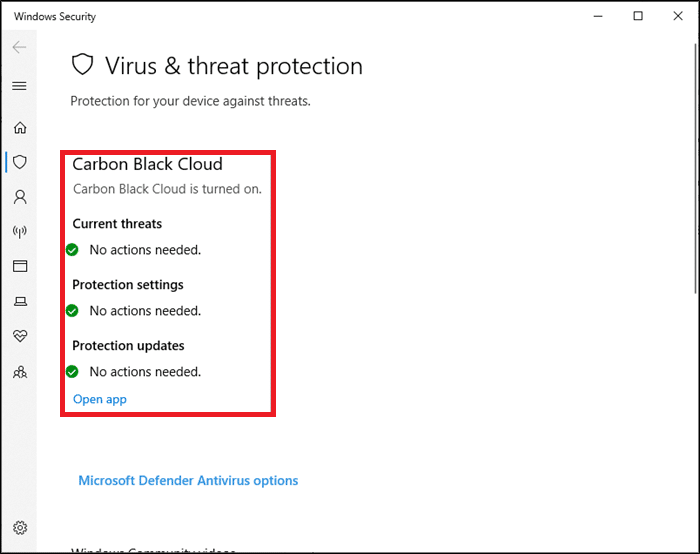
5B. If you do not have any threats in your system, the system will show the No actions needed alert as highlighted below.
6. Click on Scan options to view scanning options for your Windows PC.
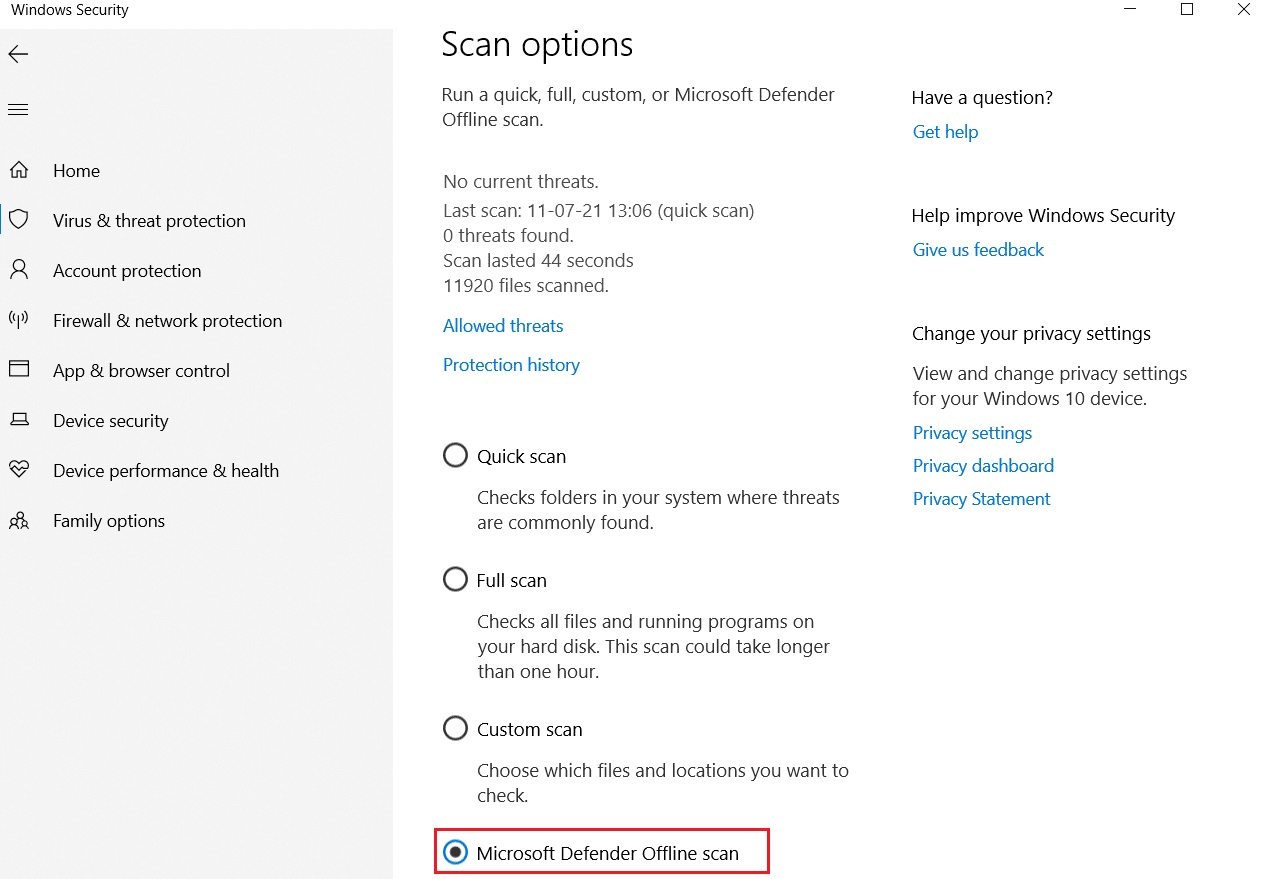
7. Run Windows Defender Offline Scan to check for hkcmd malware on startup.
Note: It is advised to run a Full scan for an in-depth checking preferably, during non-working hours.
Also Read: Kill Resource Intensive Processes with Windows Task Manager (GUIDE)
Method 3: Update Graphics Drivers
Try updating the drivers to the latest version to fix high CPU usage caused by hkcmd in Windows desktop/laptop.
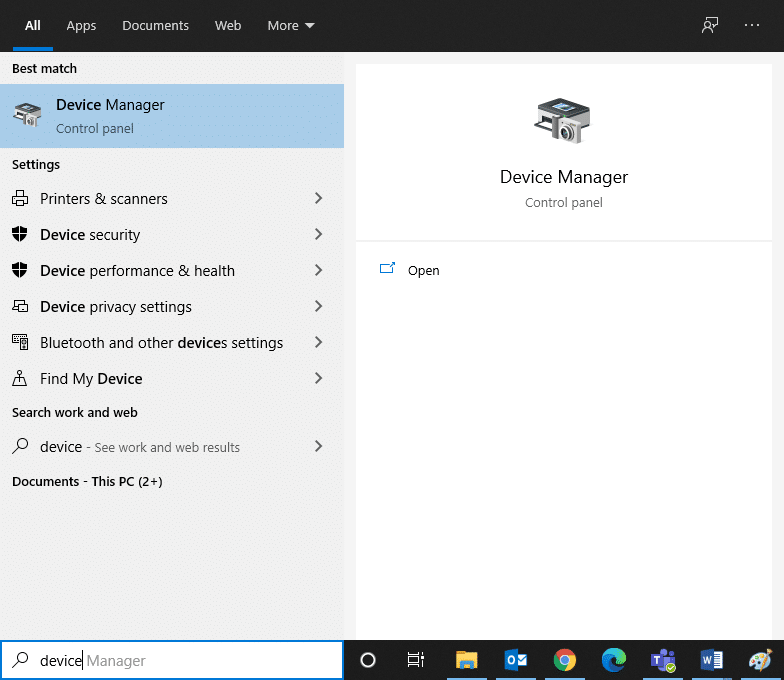
1. Press the Windows key, type device manager, and hit Enter.
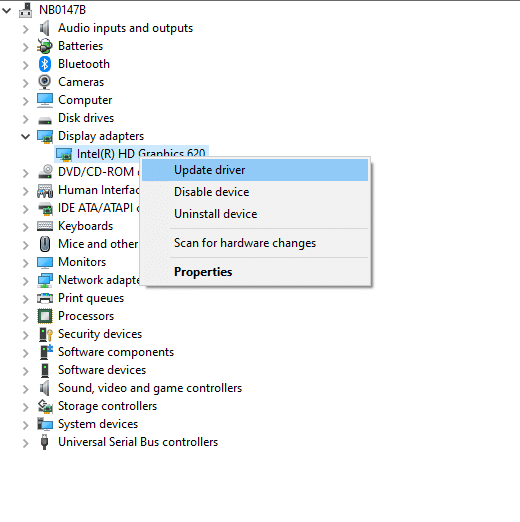
2. Scroll down to Display adapters and double click on it to expand it.
3. Now, right-click on the video card driver and click on Update driver, as depicted below.
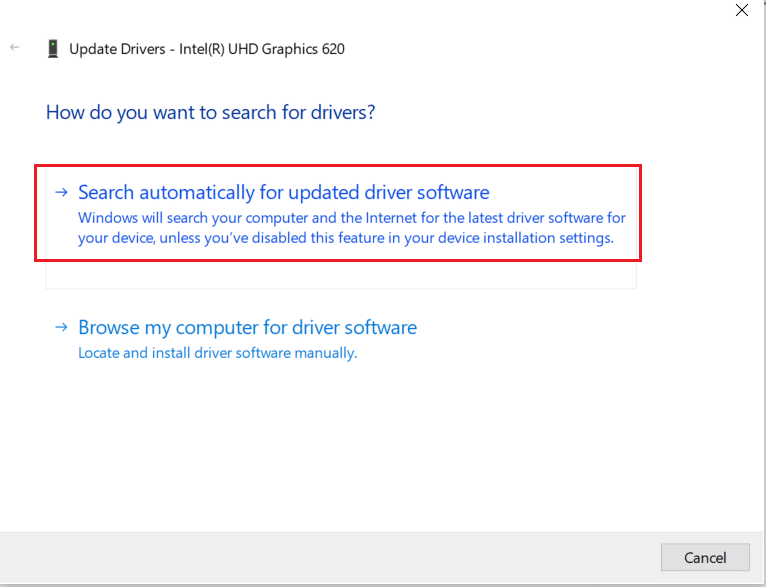
4. Click on Search automatically for updated driver software to update driver automatically.
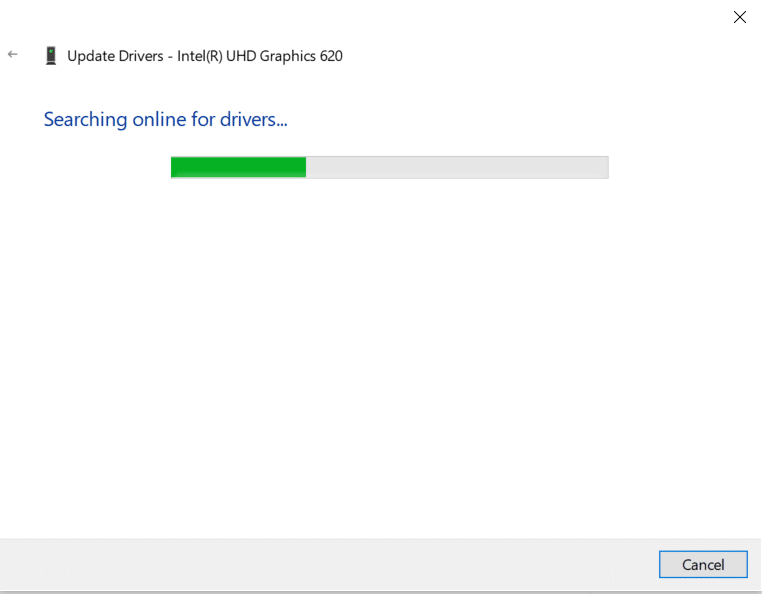
5. Windows will automatically scan for updated drivers and install them, as shown.
6. After installation is finished, Restart your PC.
Method 4: Reinstall Graphics Drivers
If updating drivers does not give you a fix, you can also uninstall your graphics card driver and install it again. In both cases, the net result will be the same.
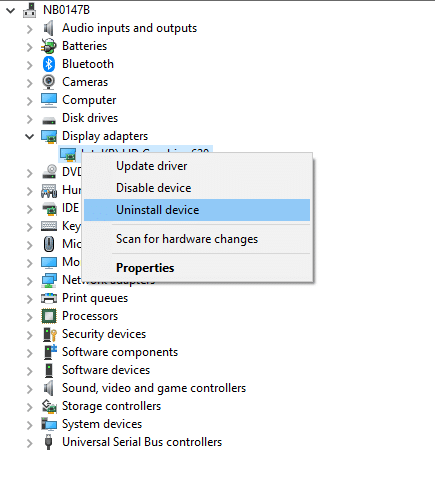
1. Go to Device Manager > Display Adapters as earlier.
2. Now, right-click on the driver and select Uninstall device.
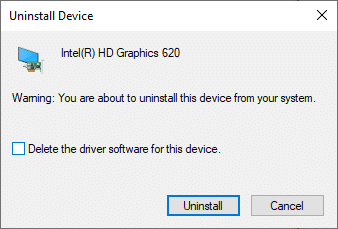
3. A warning prompt will be displayed on the screen. Check the box Delete the driver software for this device and click Uninstall.
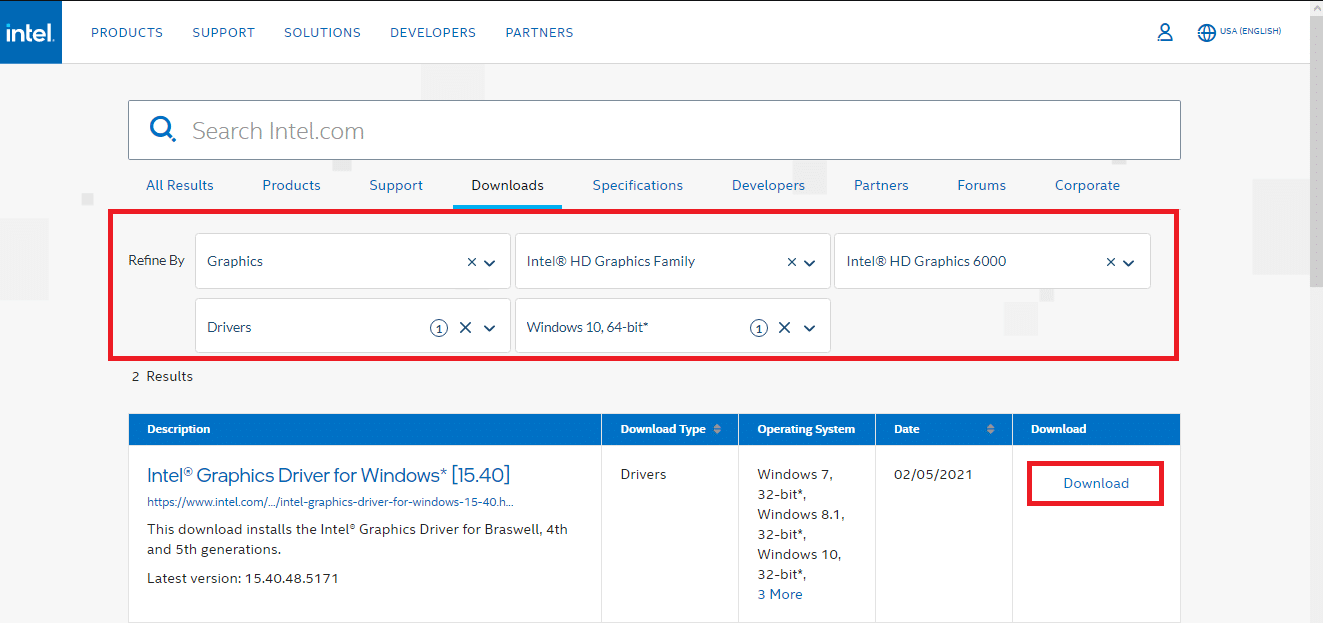
4 Visit the manufacture’s website to manually download the driver as per system specifications. For example, Intel, AMD, or NVIDIA.
5. Run the downloaded .exe file to install the drivers.
Check if this could fix hkcmd high CPU usage.
Also Read: 4 Ways to Update Graphics Drivers in Windows 10
Method 5: Clean up Temporary Files
When your system has corrupt hkcmd or temporary files, you will encounter hkcmd high CPU usage. You can resolve this error by clearing the temporary files in your system in the following two manners:
Method 5A: Manual Clean-up
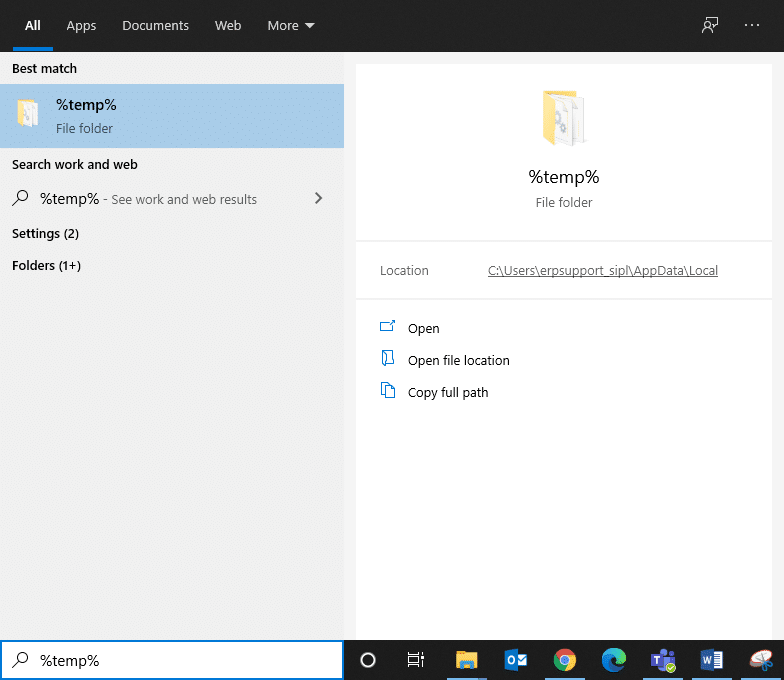
1. Press the Windows key and type %temp%.
2. Now, click on Open to open the Temporary files (.tmp) folder.
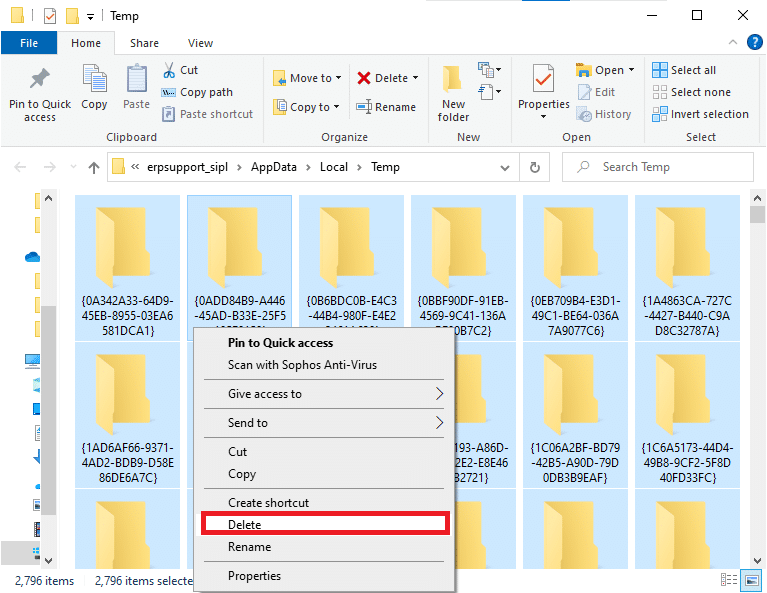
3. Now, select all the files by pressing Ctrl + A keys together.
4. Press Shift + Del keys together to permanently delete all the temporary files.
Method 5B: Systematic Clean-up
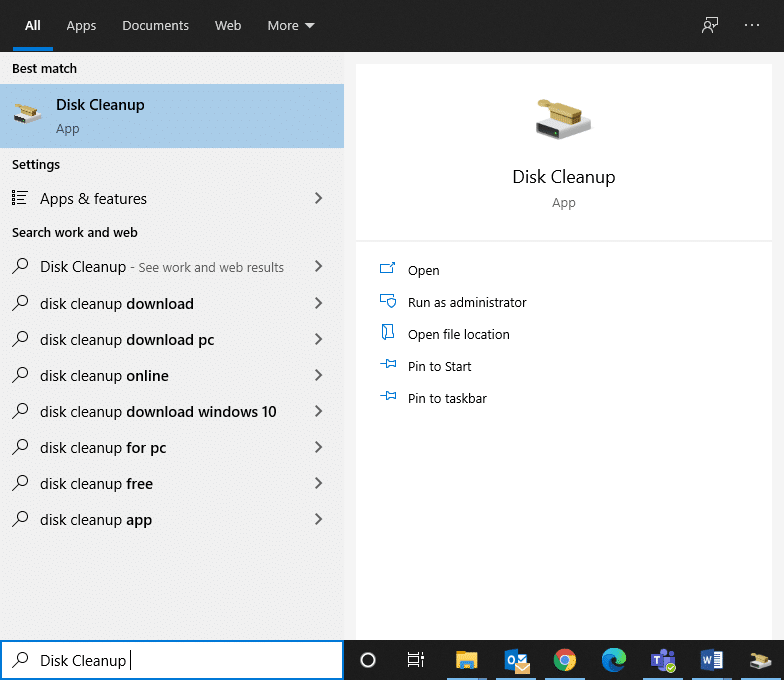
1. Hit the Windows key and type Disk Cleanup in the search bar. Open Disk Cleanup from search results, as shown.
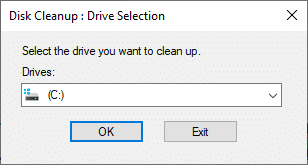
2. Now, select the drive you want to perform a clean-up for and click on OK.
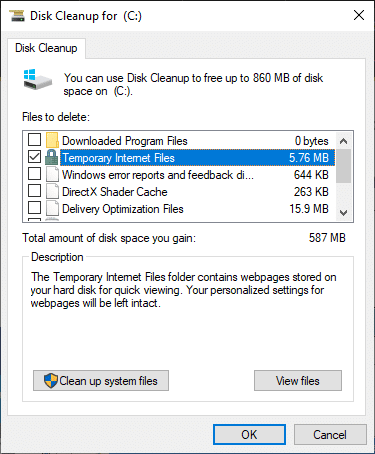
3. Here, check the box titled Temporary Internet Files and click on OK.
Method 6: Run SFC & DISM Scan
Windows 10 users can automatically scan and repair their system files by running System File Checker and Deployment Image Servicing & Management scans. This will help you fix hkcmd high CPU usage.
But, before proceeding, it is suggested that you boot your Windows in Safe boot.
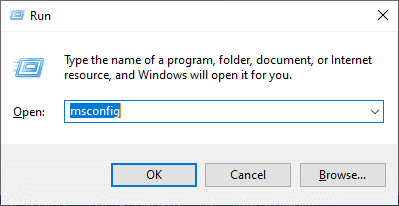
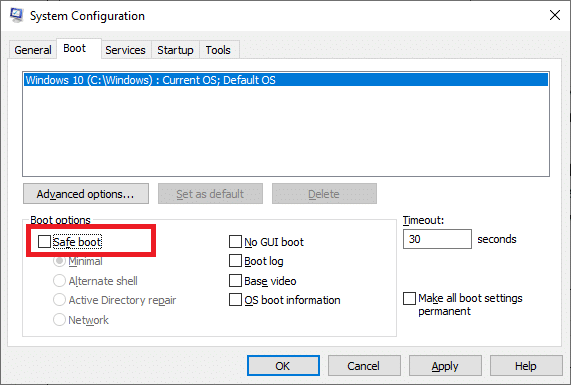
1. Press Windows Key + R, then type msconfig and hit Enter to open the System Configuration window.
2. Select the Boot tab, check the Safe boot box under Boot options and click on OK.
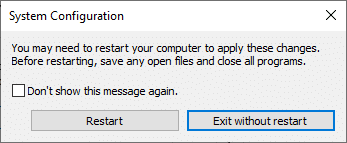
3. A prompt will pop up. Click on Restart and your system will be booted in safe mode.
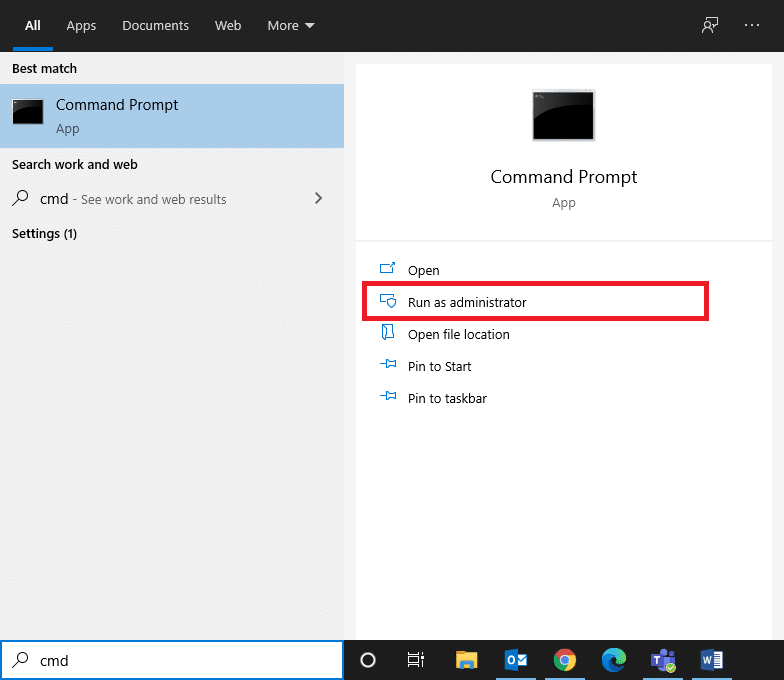
4. Now, search for cmd and click on Run as administrator, as shown. This will launch Command Prompt with administrative privileges.
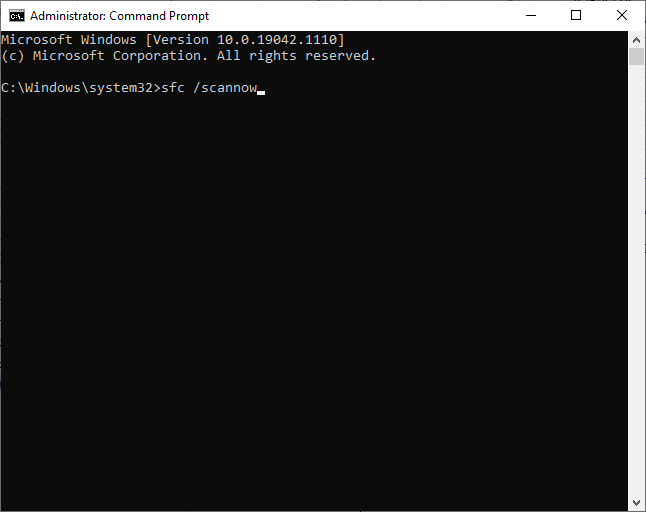
5. Enter the command: sfc /scannow and hit Enter. System File Checker will scan and repair all the programs automatically.
6. If this doesn’t work, execute the following commands one-by-one:
Dism /Online /Cleanup-Image /CheckHealth
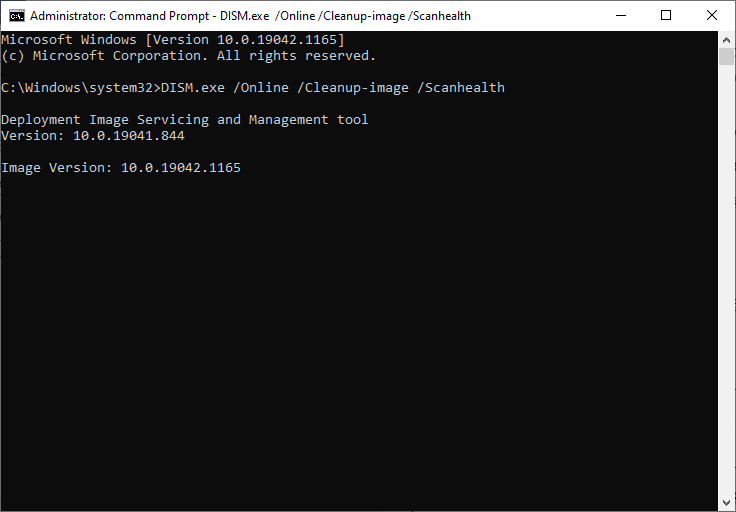
Dism /Online /Cleanup-Image /ScanHealth
Dism /Online /Cleanup-Image /RestoreHealth
Also Read: How to Repair Corrupt System Files in Windows 10
Method 7: Update Windows
If you did not obtain any fix by the above-mentioned methods, installing new updates will help you fix bugs in your system and fix hkcmd high CPU usage. Otherwise, the files in the system will not be compatible with the hkcmd files leading to the high CPU usage caused by hkcmd.
1. Navigate to Update & Security as instructed in Method 2.
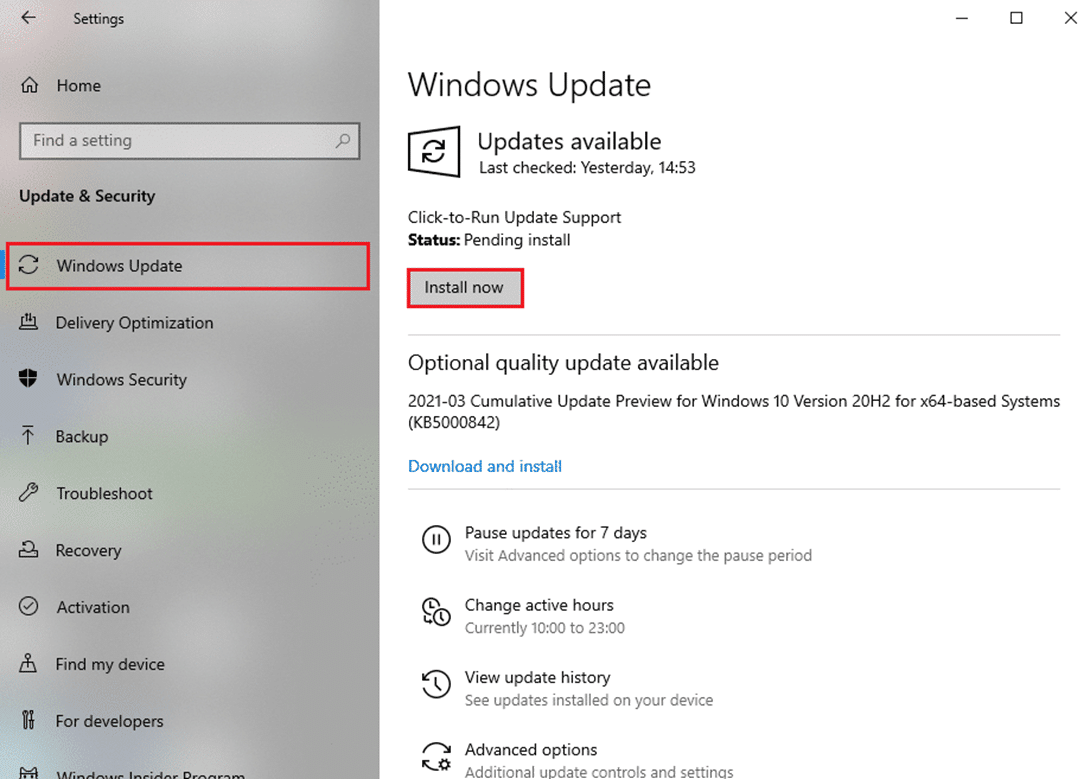
2. Now, select Check for Updates from the right panel.
3A. To download and install the latest Update available, click on Install now, as depicted.
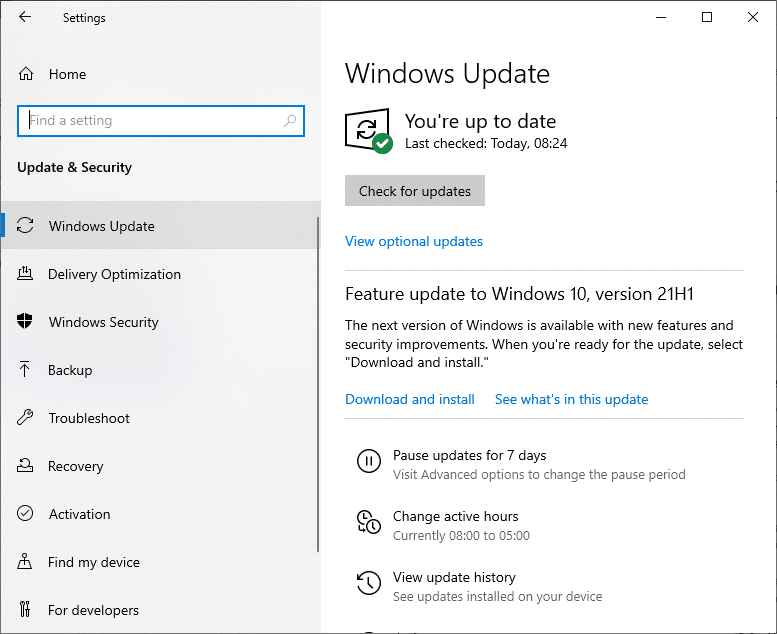
3B. If your system is already up-to-date, then it will show You’re up to date message.
4. Restart your PC and check if the issue is resolved now.
Disable hkcmd Module on Startup
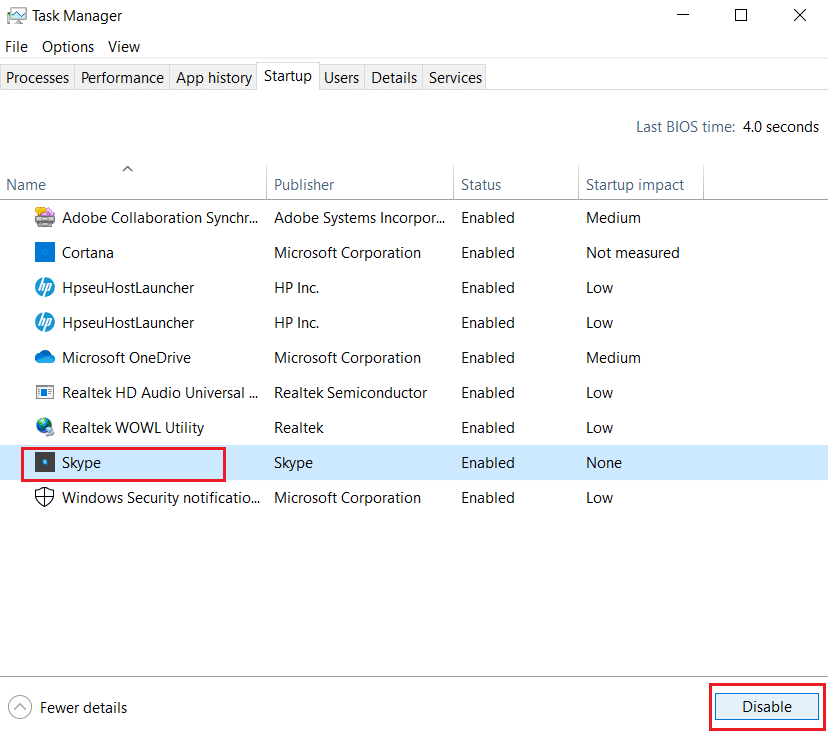
If you wish to disable hkcmd module on startup so that it doesn’t get loaded every time Windows OS boots, you can disable it from Task Manager as explained in this method. This will help high CPU usage caused by hkcmd.
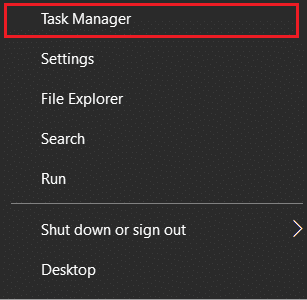
1. Right-click on the Windows icon and select Task Manager, as shown.
2. Switch to the Startup tab in Task Manager.
3. Here, select hkcmd task and click on Disable.
Note: We have disabled Skype for illustration purposes below.
Recommended:
We hope that this guide was helpful and you were able to fix hkcmd high CPU usage on Windows 10. Let us know which method worked for you the best. Also, if you have any queries/suggestions regarding this article, then feel free to drop them in the comments section.

