How to Fix Windows 11 Update Stuck
There are numerous positive elements to Windows as an operating system. One of them is the incoming stream of updates from the creator Microsoft. If your Windows 11 PC is connected to the internet, you will continue to get updates that will bring in new features, redesigned look, solutions for current bugs and malfunctions in the system, and stability improvements. Some users have expressed disappointment with receiving far too many updates. When you download an update on your Windows 11 PC, it usually displays progress by displaying a percentage. If the percentage counter is stuck, for example, if it has been showing 90% for the last two hours, it indicates that something is wrong. It means Windows is unable to download or install the update completely. Thus, we bring to you a helpful guide to help you fix Windows 11 update frozen stuck issue.

How to Fix Windows 11 Update Stuck or Frozen
Windows 11 is the latest version of the Windows NT operating system developed by Microsoft. As this operating system is fairly new, several updates are released by Microsoft developers. Windows 11 update stuck is a very common problem.
Reasons Why Windows Updates Get Frozen or Get Stuck
- Internet connectivity errors – Restart your PC and internet router before going through the solutions listed in this article
- Lack of memory space
- Disabled or corrupt Windows update services.
- Compatibility conflict with existing process or software
- Incomplete download of update files
Method 1: Run Windows Update Troubleshooter
Follow these steps to fix Windows 11 update frozen issue by running Windows Update Troubleshooter:
1. Press Windows + I keys together to open the Settings app.
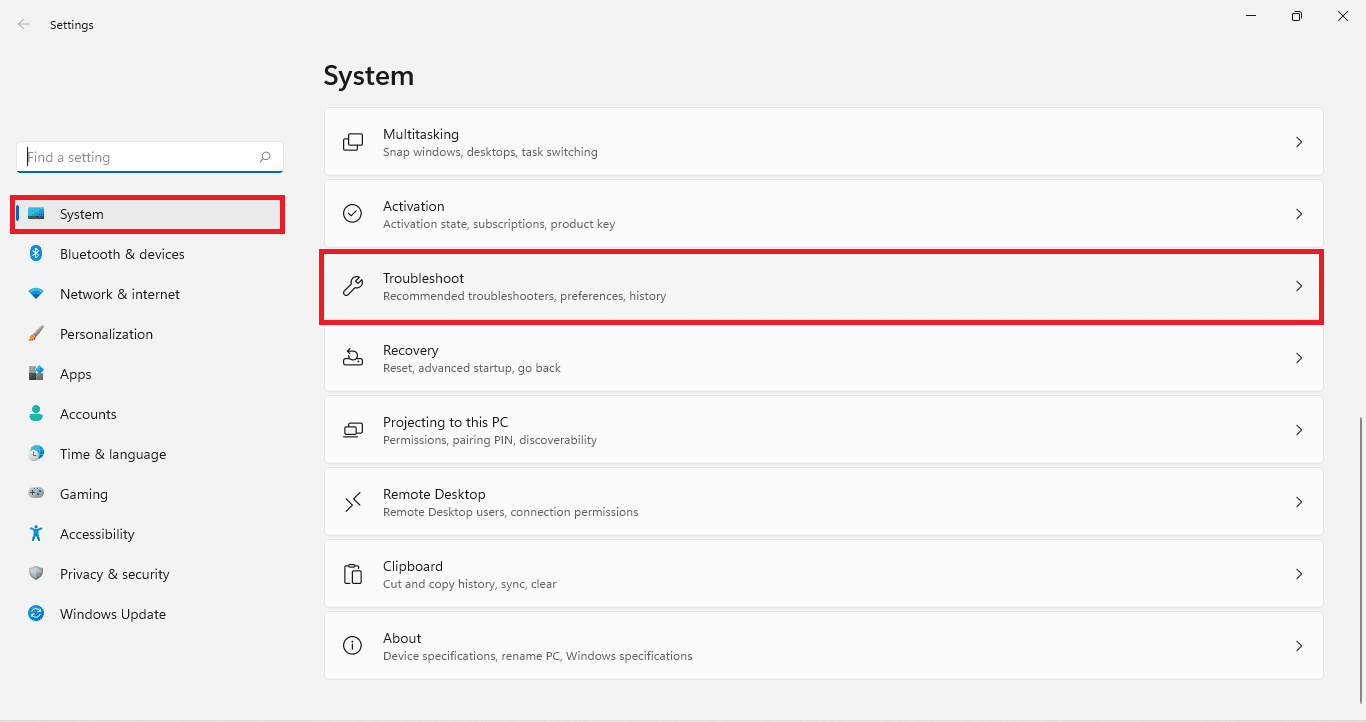
2. In the System tab, scroll down and click on Troubleshoot.
3. Click on Other troubleshooters under Options, as shown.
4. Click on Run corresponding to Windows Update.
Windows Update Troubleshooter will scan and fix problems, if any, automatically.
Method 2: Uninstall Conflicting Apps in Safe Mode
It is advisable to boot your Windows 11 PC into Safe Mode and then, uninstall conflict-causing apps, as explained below:
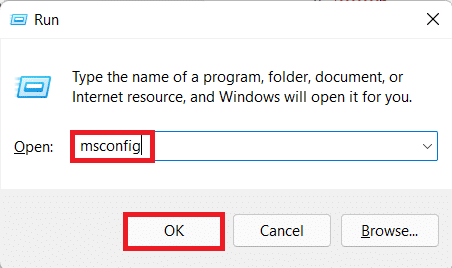
1. Press Windows + R keys together to open Run dialog box.
2. Type msconfig and click on OK, as shown.
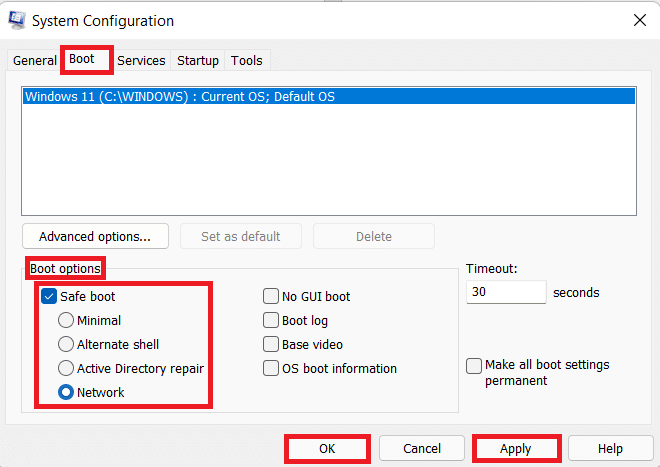
3. Click on the Boot tab in the System Configuration window.
4. Here, under Boot options, check the box marked Safe Boot.
5. Select the type of Safe boot i.e. Minimal, Alternate shell, Active Directory repair or Network from Boot options.
6. Click on Apply > OK to enable Safe Boot.
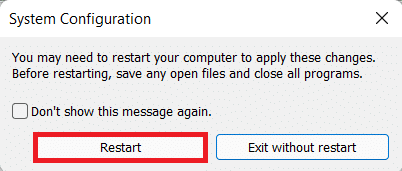
7. Click on Restart in the confirmation prompt that appears.
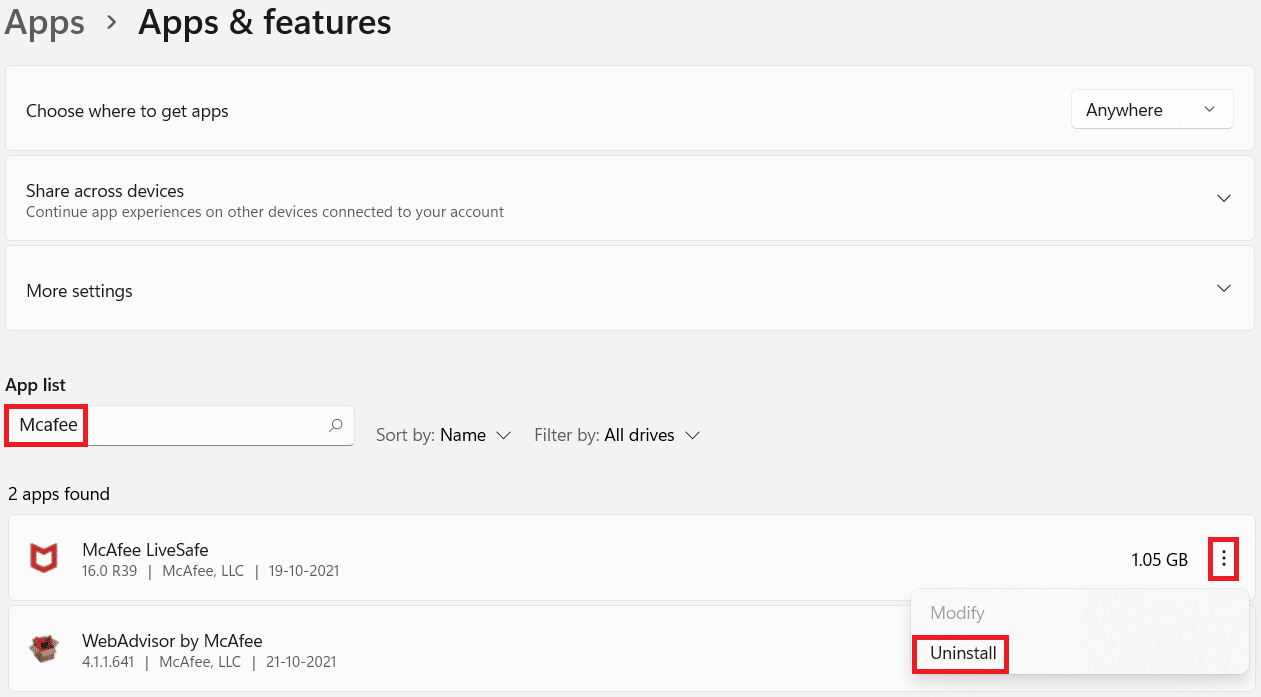
8. Press Windows + X keys together to open the Quick Link menu. Click Apps and features from the list.
9. Scroll through the list of installed apps and click on the three dotted icon for third-party programs installed on your system.
Note: We have shown McAfee Antivirus as an example here.
10. Then, click on Uninstall, as shown.
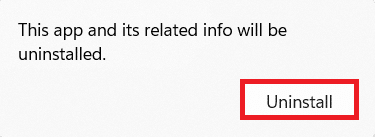
11. Click on Uninstall again in the confirmation dialog box.
12. Uncheck the box marked Safe Boot in System Configuration window by following steps 1-6.
Also Read: How to Download and Install Windows 11 Updates
Method 3: Enable Windows Update Services
Windows update service is crucial for running windows update download and installation. Here’s how to fix Windows 11 update stuck by enabling Windows Update Service:
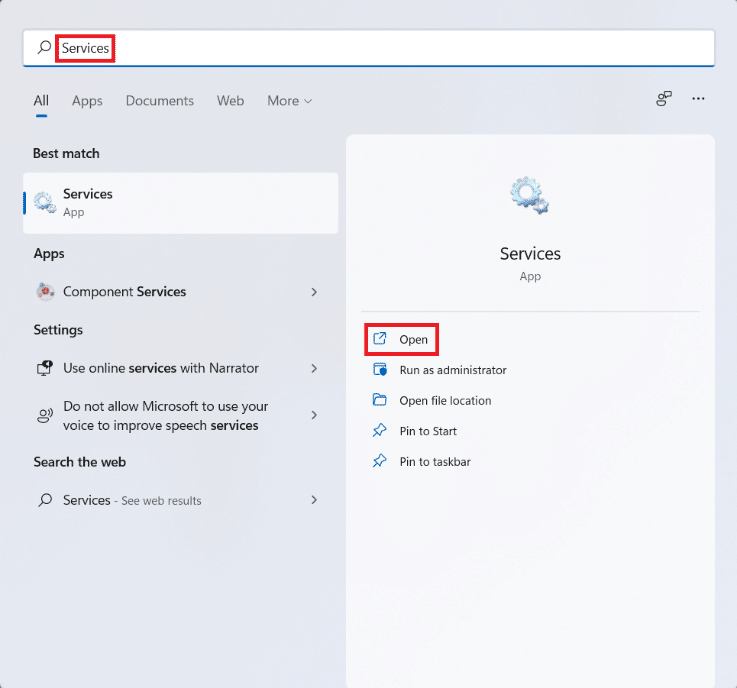
1. Click on the Search icon and type Services. Then, click on Open.
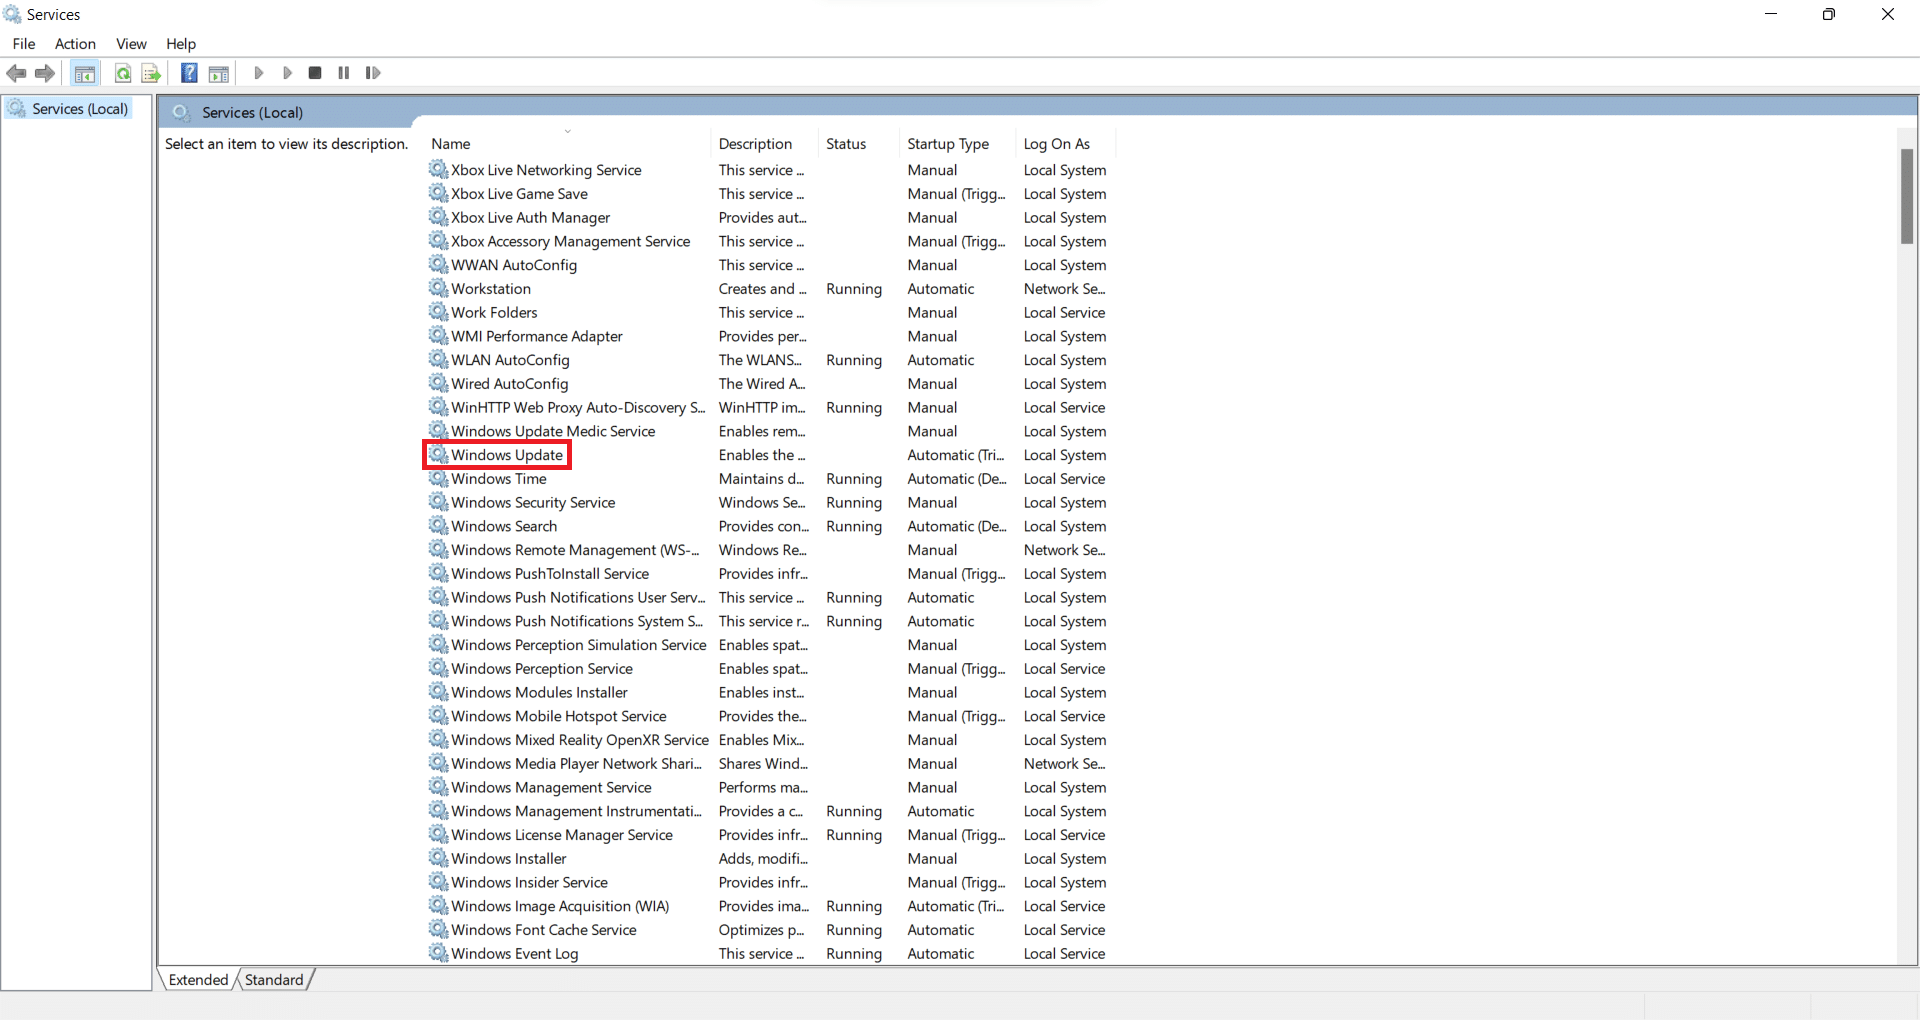
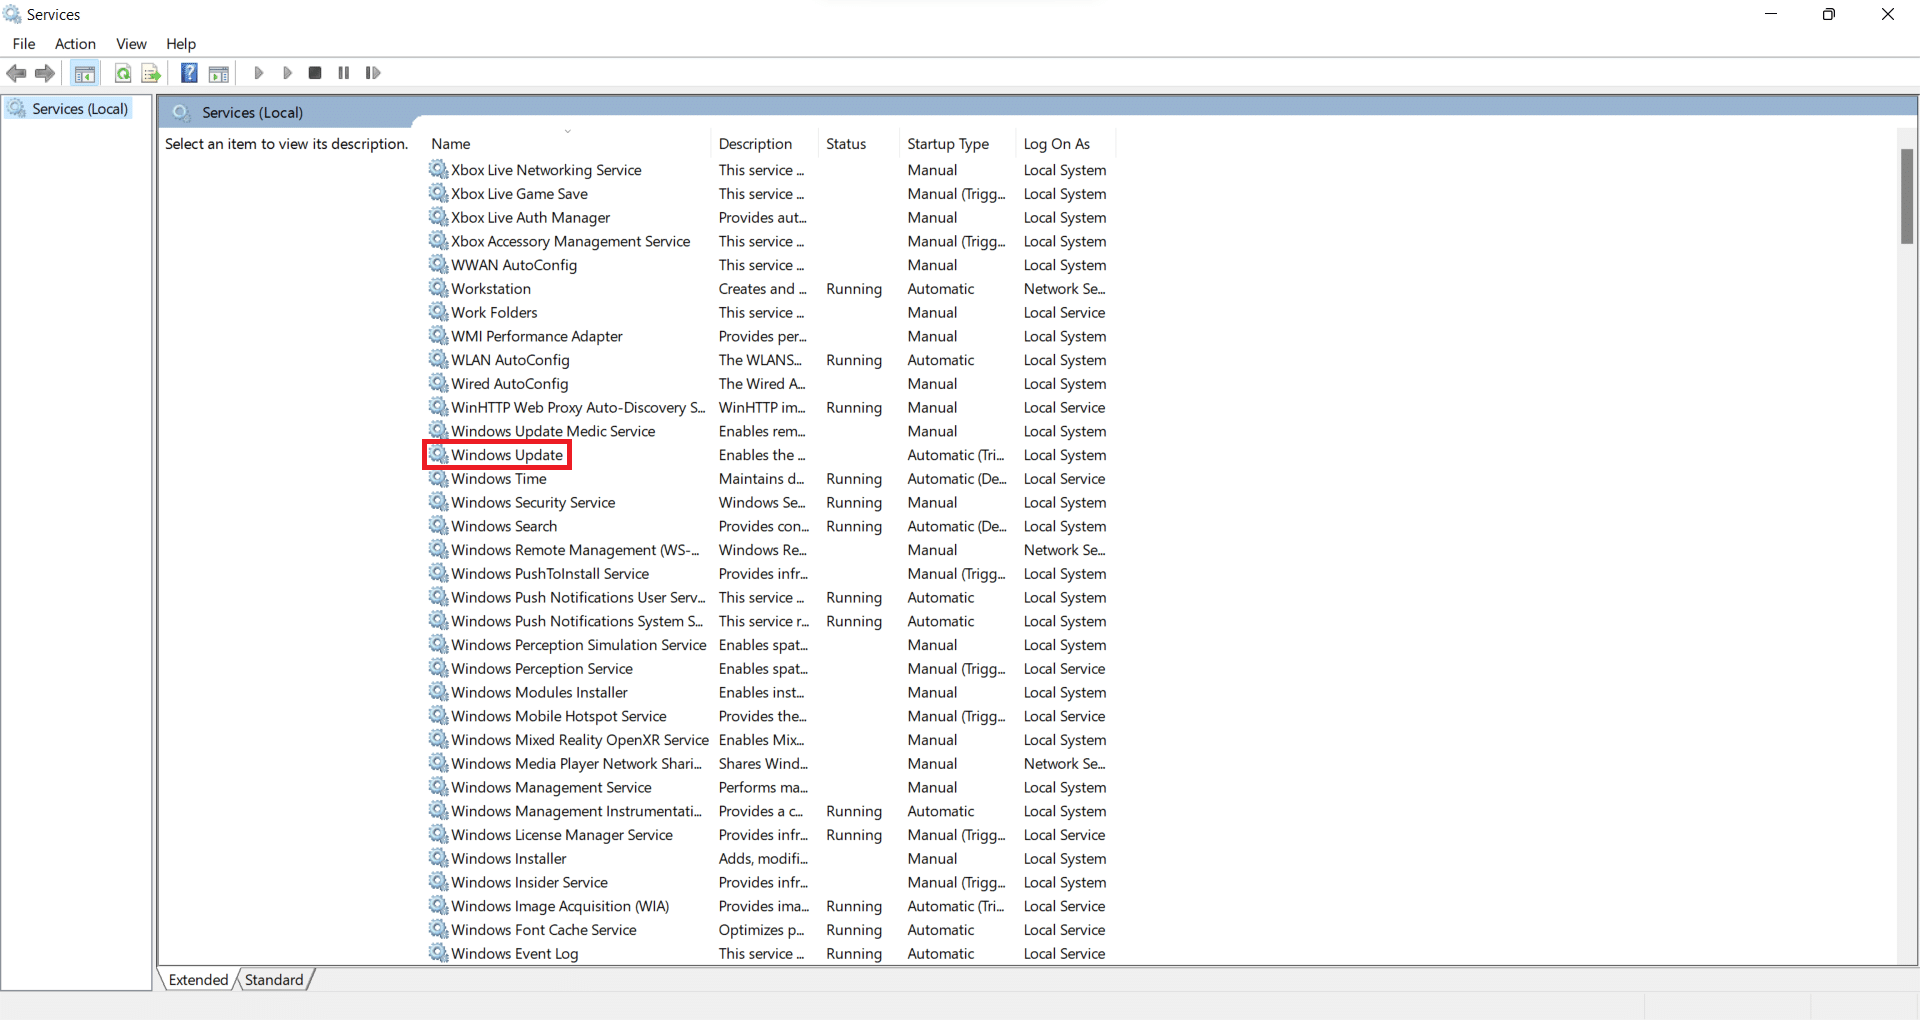
2. Scroll down the list of services and locate Windows Update in the list. Double-click on it.
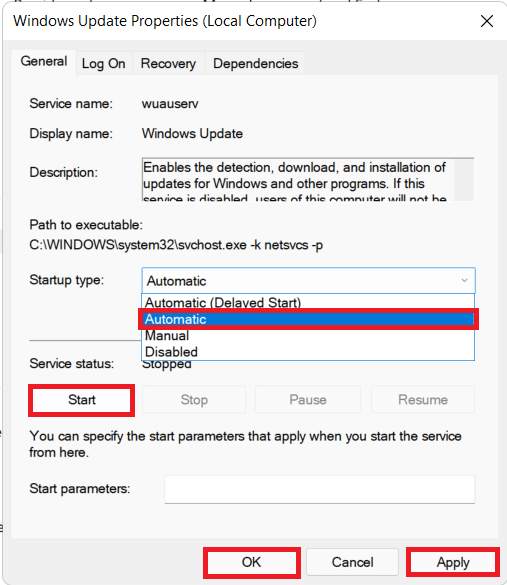
3. In the Windows Update Properties window, set up the Startup type to Automatic and click on Start under Service status.
4. Click on Apply > OK to save these changes and Restart your computer
Method 4: Delete Old Windows Update Files Manually
Clearing old Windows Update files will not only help clear out the storage space required for new downloads but also help fix Windows 11 update stuck issue. We will disable Windows update service first, then clear old update files and finally, restart it.
1. Launch Services window, as earlier.
2. Scroll down and double-click on Windows Update.
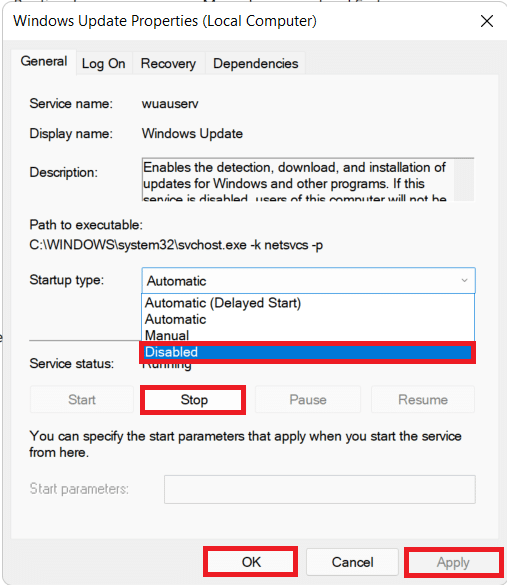
3. In the Windows Update Properties window, set up the Startup type to Disabled and click on Stop under Service status.
4. Click on Apply > OK as depicted. Restart your PC.
5. Press Windows + E keys together to open File Explorer.
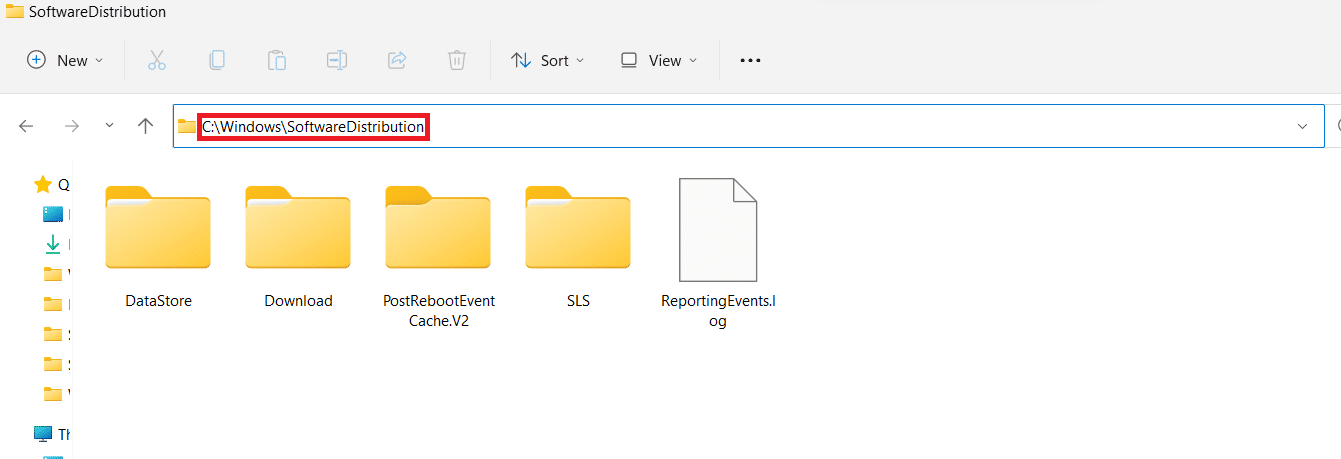
6. Type C:WindowsSoftwareDistribution in the Address bar and press the Enter key.
7. Here, press Ctrl + A keys together to select all files and folders. Then, press Shift + Delete keys together to delete these files.
8. Click on Yes in the Delete Multiple Items prompt to delete all files permanently.
9. Now, follow Method 3 to Enable Windows Update Service.
Also Read: Fix Windows 11 Update Error 0x800f0988
Method 5: Reset Windows 11 PC
If you still face the same problem while updating, read our guide on How to Fix Windows 11 Update Error Encountered issue here. If all else fails, there’s no choice but to reset your PC as discussed below:
1. Press Windows + I keys together to launch Windows Settings.
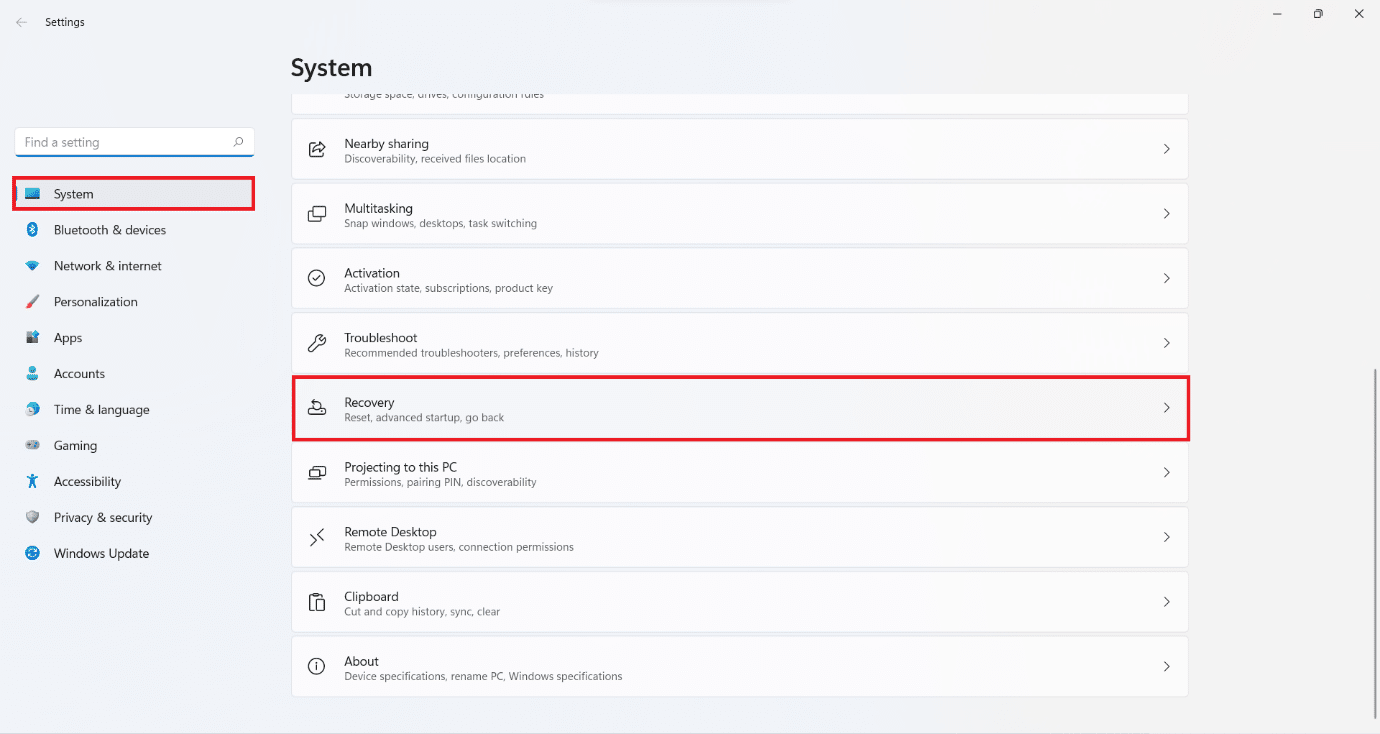
2. In the System tab, scroll down and click on Recovery, as shown.
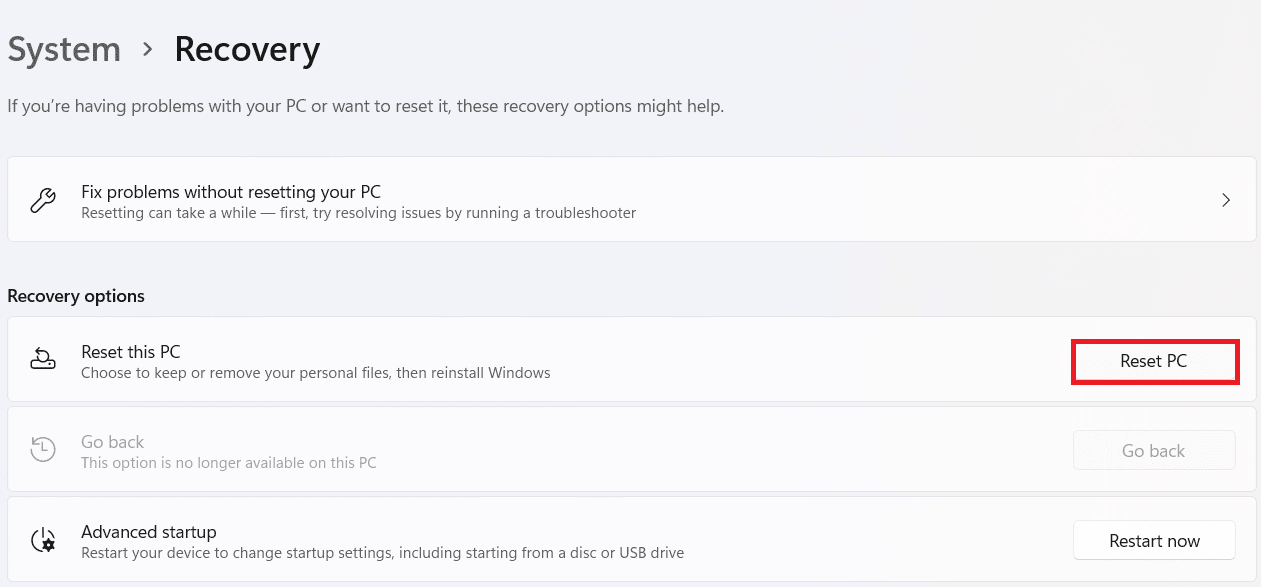
3. Under Recovery options, you will find the Reset PC button next to Reset this PC option. Click on it.
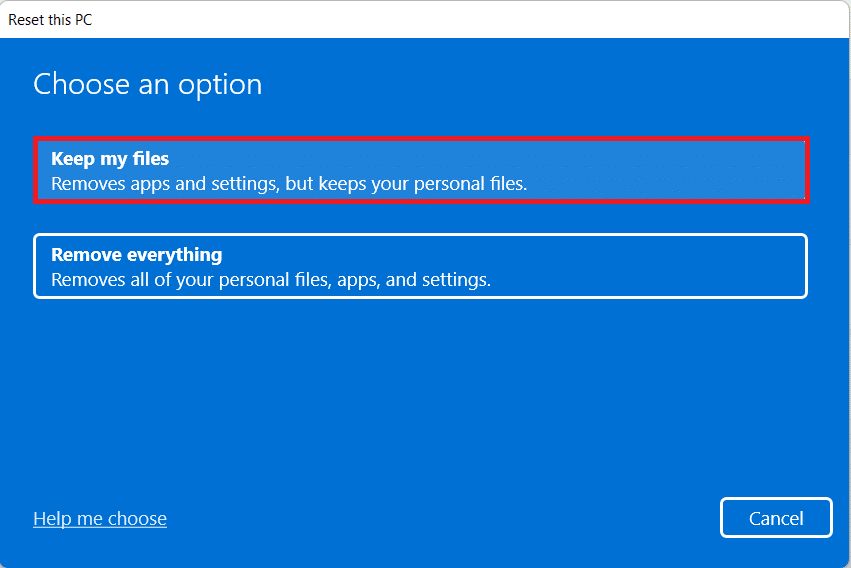
4. In the Reset this PC window, click on Keep my files.
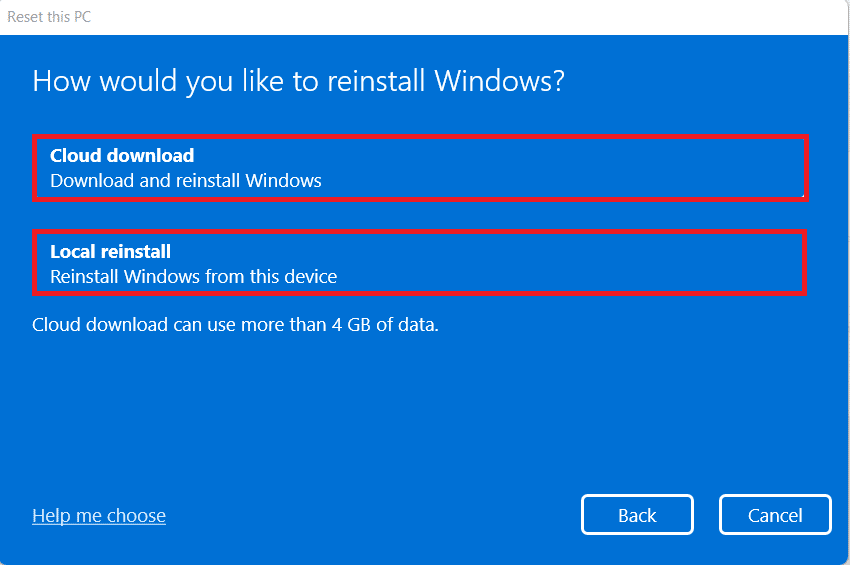
5. Choose one of these options from the How would you like to reinstall Windows screen:
- Cloud download
- Local reinstall
Note: Cloud download requires an active internet connection but is more reliable than Local reinstall.
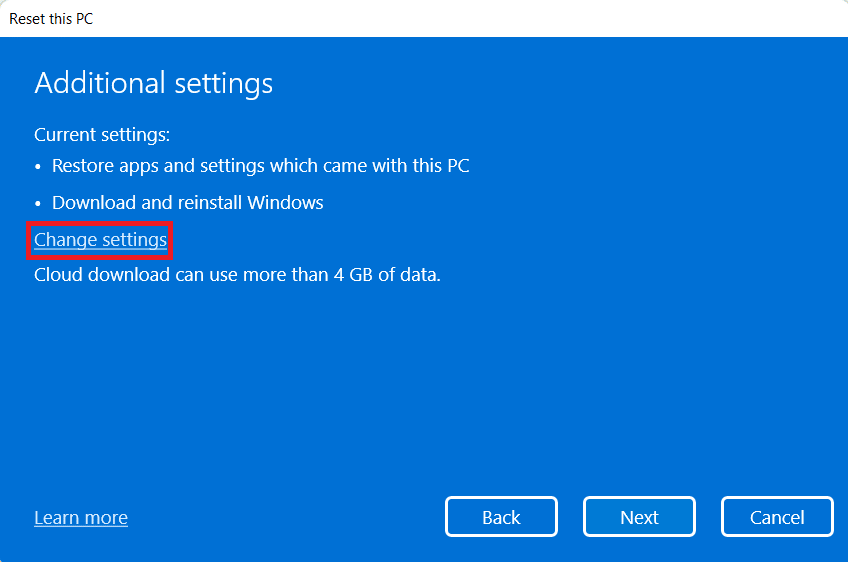
Note: On the Additional settings screen, click on Change settings to change previously made choices if you want. Then, click on Next.
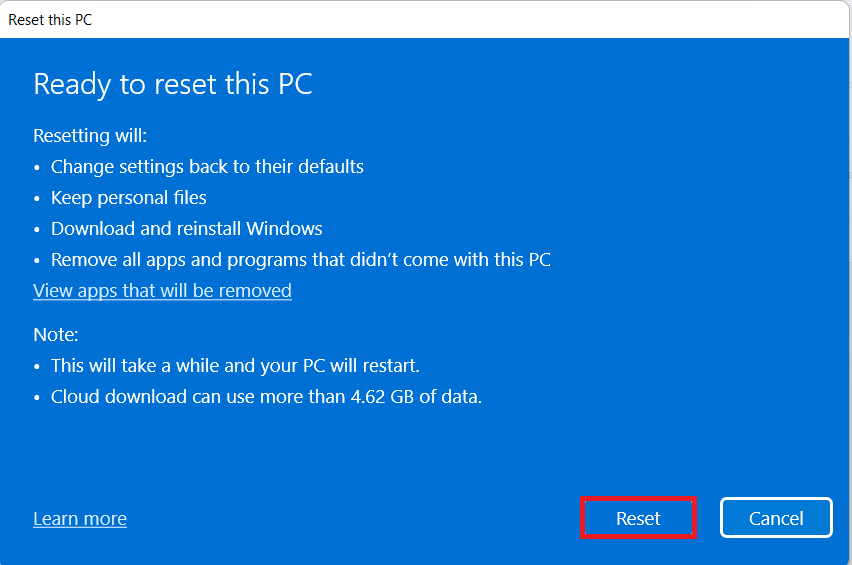
6. Finally, click on Reset, as depicted below.
During the Reset process, your computer may restart several times. This is normal behavior shown during this process and it may take hours to complete this process depending on the settings you choose and data that is stored on your device.
Recommended:
We hope you learned how to fix Windows 11 update stuck or frozen issue. You can send your suggestions and queries in the comment section below.
