How to save your bandwidth in windows 10

How to save your bandwidth in windows 10: Windows 10 introduces the Windows Update Delivery Optimization feature, wherein your computer may get updates from or send updates to neighboring computers or computers on your network. This is done with the help of peer-to-peer connections. Although this would mean that you get updates much faster, it would also leave you behind with bigger bandwidth bills.
How to save your bandwidth in windows 10
So let’s see how to Turn off Windows Update Delivery Optimization:
1.Click on Windows button and open Windows settings.
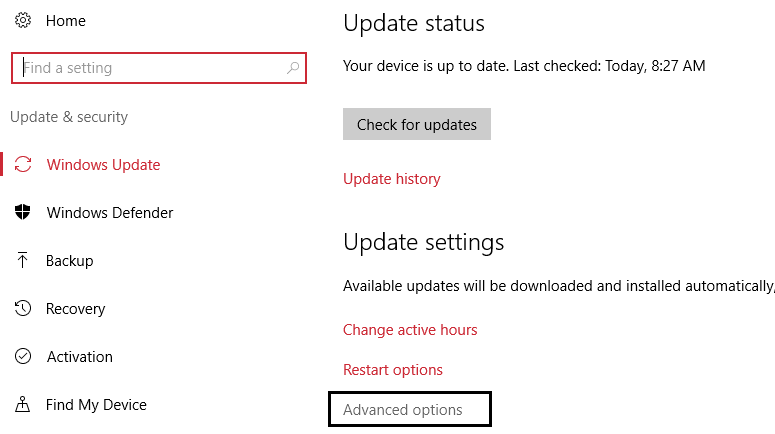
2.Click on Update and Security.
3.Under Windows Update, click Advanced Options on the right side of Window.
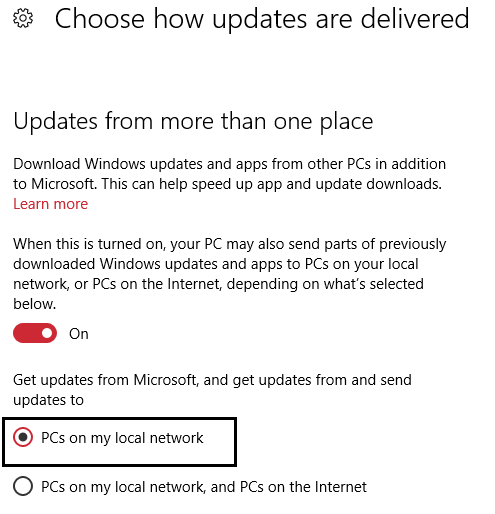
4.Click on the Choose how upgrades are delivered and then move the slider to Off position, to disable Windows Update Delivery Optimization or WUDO.
5.Move the slider to OFF so that your PC cannot download updates from anywhere other than Microsoft servers; if you think you can afford to download updates from PCs on your network, keep the slider in ON position and select PCs On My Local Network
- Off: This disables the data sharing feature entirely. You will only download updates as you used to be via the Microsoft servers.
- PCs on my local network: Well, this is the best option I will recommend because this option lets you share Microsoft’s updates to your home or work network. In other words, you only have to download the updates on one of your PC connected to your home Wifi and all the other PC connected to the same network will get the updates without using the internet. So this option technically saves your data rather than using it.
- PCs on my local network, and PCs on the Internet: This option is the worst because it will use your PC to upload Microsoft’s updates so that another user can download the updates faster and whats more it is selected by default. Well, Microsoft has very cleverly found a way to save their bandwidth because they ‘re getting some updates from your internet and that’s not good at all.
PCs on the Internet is selected by default and is used for Windows Update Delivery Optimization. You can choose this option if you wish to get updates faster and do not mind paying a bit of extra money on metered connections.
You Can Also Set Your Connection as Metered
If you want to save more data than you can set your wifi connection as a metered connection. Windows won’t upload updates on a metered connection but it won’t even automatically download Windows updates, so you have to download the updates manually.
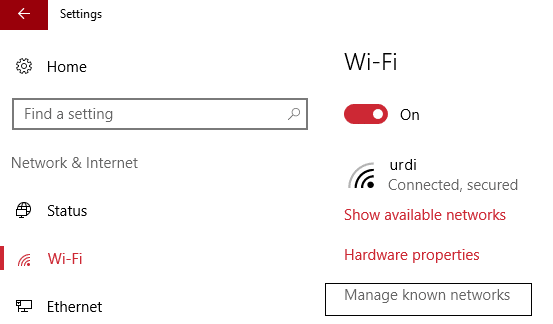
To set your current Wi-Fi network as a metered connection, Go to the Windows Settings and click on Network & Internet > Wi-Fi > Manage Known Networks.

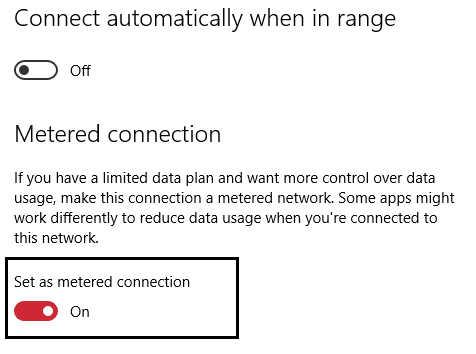
Select your Wi-Fi network and click Properties. Then under set as metered connection toggle the slider to On. The current Wi-Fi network will become a metered connection.

That’s it, you have successfully learned how to save your bandwidth in Windows 10 but if you still have queries regarding this post feel to ask them in the comment’s section.

