If you have more than one user account then each user gets their separate account but the amount of data which they can store doesn’t have any limitation, in such case the chances of users running out of storage are very high. Hence, Disk Quotas can be enabled where the administrator can easily allocate the amount of space each user can use on a specific NTFS Volume.

With Disk Quota enabled, you can avoid the possibility of one single user can filling up the hard drive without leaving any space for other users on the PC. The benefit of Disk Quota is that if any single user has already used their quota then the administrator can allocate some additional space on the drive to that particular user from another user who might not be using the additional space in their quota.
Administrators can also generate reports, and use the event monitor to track the quota uses & issues. Additionally, administrators can configure the system to log an event whenever the users are near their quota. Anyway, without wasting any time let’s see How to Set Disk Quota Limit and Warning Level in Windows 10 with the help of the below-listed tutorial.
How to Set Disk Quota Limit and Warning Level in Windows 10
Make sure to create a restore point just in case something goes wrong.
Method 1: Set Disk Quota Limit and Warning Level for News Users on Specific NTFS Drive in Drive Properties
1.To follow this method, first you need to Enable Disk Quota for the specific NTFS Drive for which you want to set disk quota limit
and warning level.
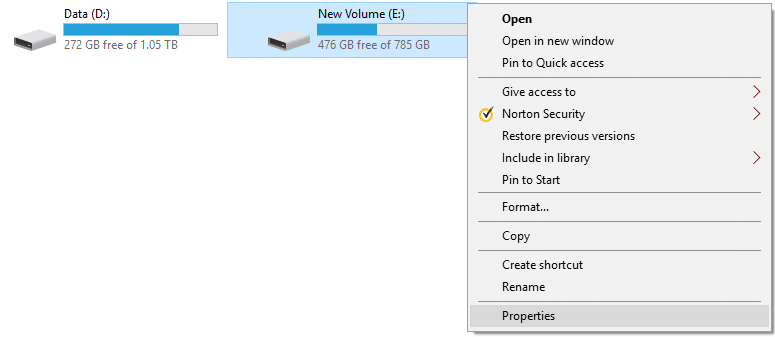
2.Press Windows Key + E to open File Explorer then from the left hand menu click on This PC.
3.Right-click on the specific NTFS drive for which you want to set disk quota limit for and select Properties.
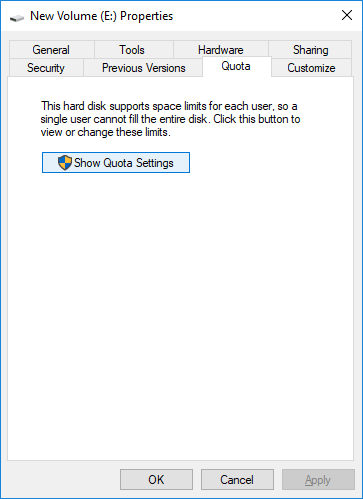
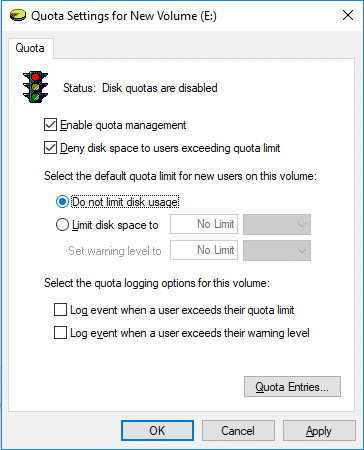
4.Switch to the Quota tab then click on “Show Quota Settings” button.
5.Make sure the following is already check-marked:
Enable quota management
Deny disk space to users exceeding quota limit
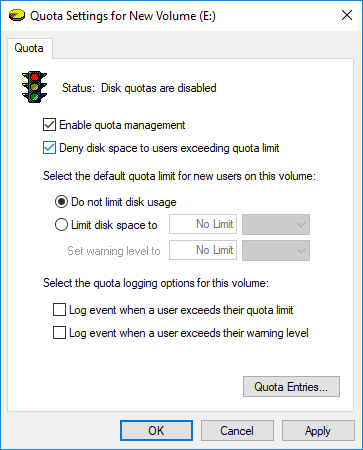
6.Now to set Disk Quota Limit, checkmark “Limit disk space to”.
7.Set the Quota limit and warning level to what you want on this drive and click OK.
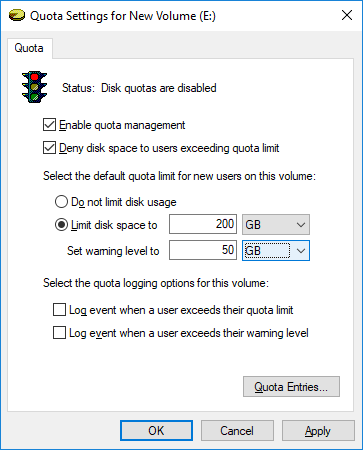
Note: For example, you can set the Quota limit to 200 GB and warning level to 100 or 150 GB.
8.If you wish to not set any disk quota limit then simply checkmark “Do not limit disk usage” and click OK.
9.Close everything then restart your PC to save changes.
Method 2: Set Disk Quota Limit and Warning Level in Windows 10 for Specific Users in Drive Properties
1.To follow this method, first you need to Enable Disk Quota for the specific NTFS Drive.
2.Press Windows Key + E to open File Explorer then from the left-hand menu click on This PC.
3.Right-click on the specific NTFS drive for which you want to set disk quota limit for and select Properties.
4.Switch to the Quota tab then click on “Show Quota Settings” button.
5.Make sure the following is already check-marked:
Enable quota management
Deny disk space to users exceeding quota limit
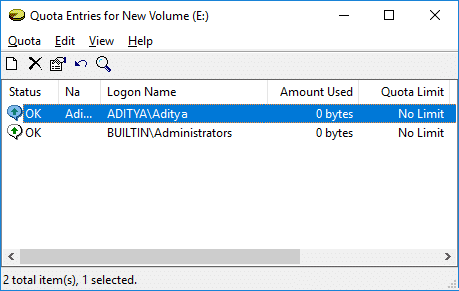
6.Now click on “Quota Entries” button at the bottom.
7.Now to set disk quota limit and warning level for a specific user, double-click on the user under the Quota Entries window.
8.Now checkmark “Limit disk space to” then set the quota limit and warning level to what you want on this drive and click OK.
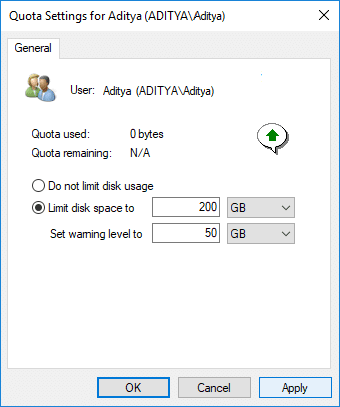
Note: For example, you can set the Quota limit to 200 GB and warning level to 100 or 150 GB. If you do not wish to set quota limit then simply checkmark “Do not limit disk usage” and click OK.
9.Click Apply followed by OK.
10.Close everything then reboot your PC.
This is How to Set Disk Quota Limit and Warning Level in Windows 10 but if you are using Windows 10 Pro, Education, or Enterprise Edition then you don’t need to follow this long method, instead, you can use Group Policy Editor to easily change these settings.
Method 3: Set Default Disk Quota Limit and Warning Level for News Users on All NTFS Drives in Local Group Policy Editor
Note: This method won’t work for Windows 10 Home Edition, this method is only for Windows 10 Pro, Education, and Enterprise Edition.
1.Press Windows Key + R then type gpedit.msc and hit Enter.

2.Navigate to the following path:
Computer ConfigurationAdministrative TemplatesSystemDisk Quotas
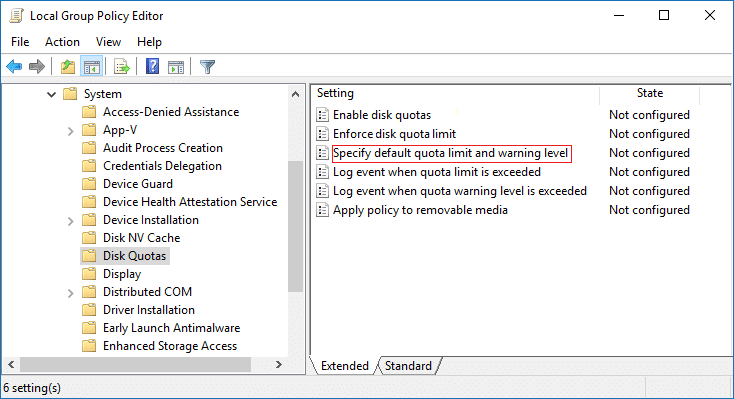
3.Make sure to select Disk Quotas then in right window pane double-click on “Specify default quota limit and warning level” policy.
4.Make sure to checkmark “Enabled” then under Options set the default quota limit and default warning level value.
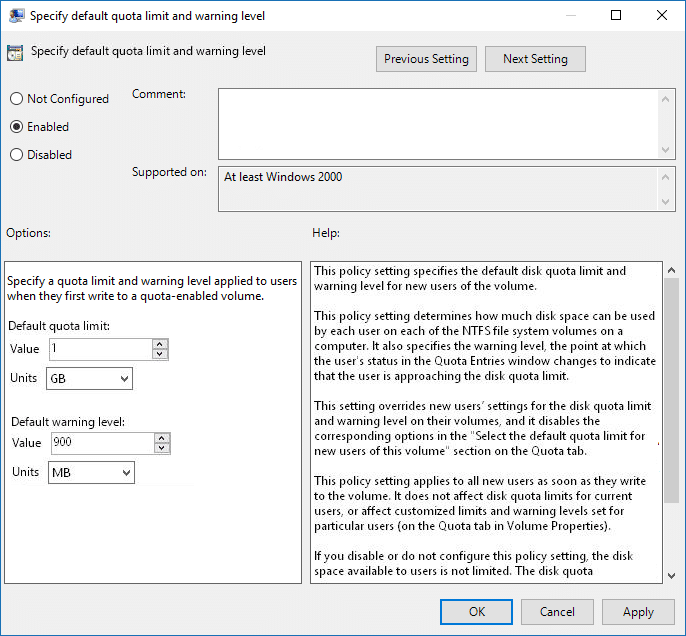
Note: If you don’t wish to set the disk quota limit then simply checkmark Not Configured or Disabled.
5.Click Apply followed by OK.
Method 4: Set Default Disk Quota Limit and Warning Level for News Users on All NTFS Drives in Registry Editor
1.Press Windows key + R then type regedit and hit Enter.

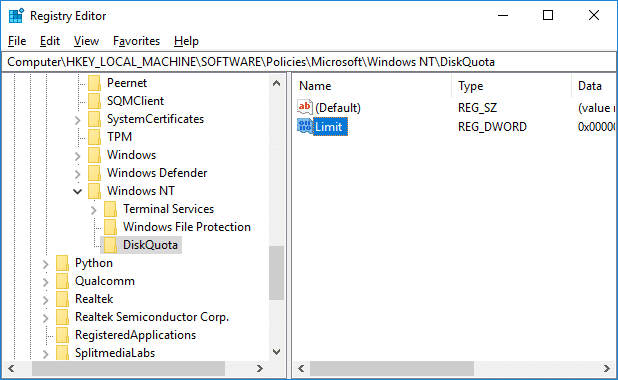
2.Navigate to the following registry key:
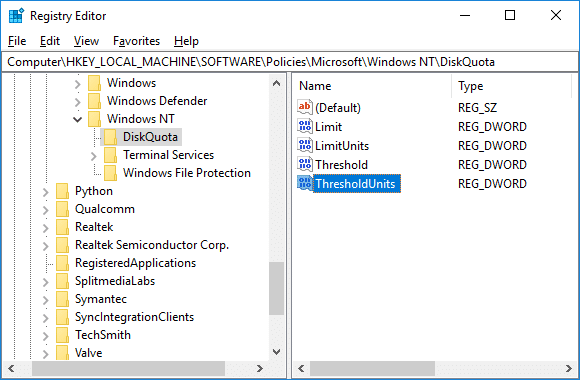
HKEY_LOCAL_MACHINESOFTWAREPoliciesMicrosoftWindows NTDiskQuota
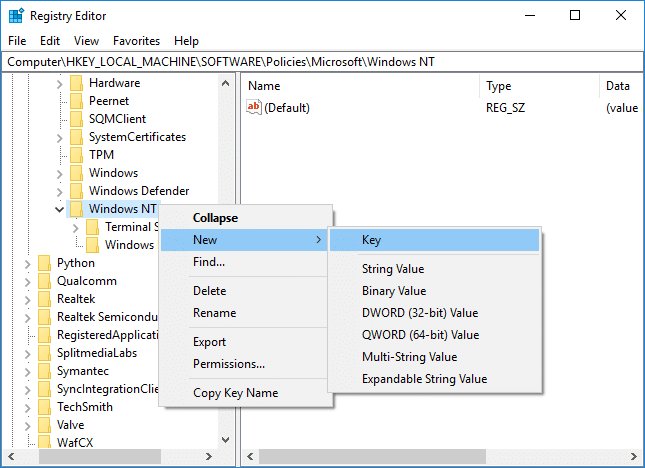
Note: If you can’t find DiskQuota then right-click on Windows NT then select New > Key and then name this key as DiskQuota.
3.Right-click on DiskQuota then select New > DWORD (32-bit) Value then name this DWORD as Limit and hit Enter.
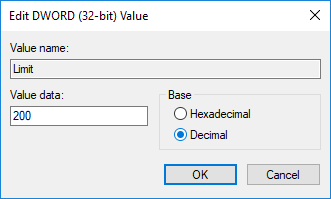
4.Now double-click on Limit DWORD then select Decimal under Base and change it’s value to how many KB, MB, GB, TB, or EB you want to set for a default quota limit and click OK.
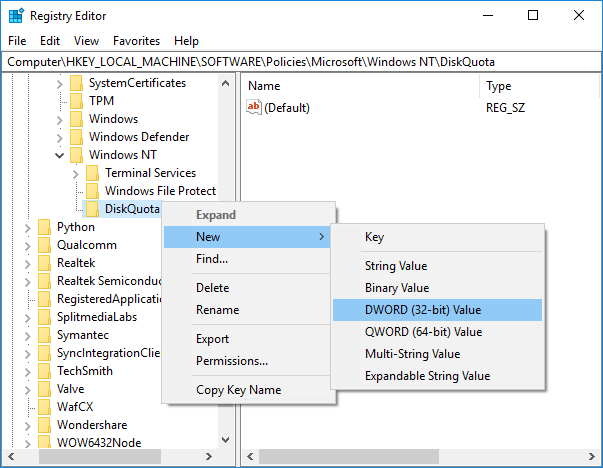
5.Again right-click on DiskQuota then select New > DWORD (32-bit) Value then name this DWORD as LimitUnits and hit Enter.
6.Double-click on LimitUnits DWORD then select Decimal under Base and change it’s value from the below table to have a default quota limit you set in above steps as KB, MB, GB, TB, PB, or EB, and click OK.

| Value | Unit |
| 1 | Kilobyte (KB) |
| 2 | Megabyte (MB) |
| 3 | Gigabyte (GB) |
| 4 | Terabyte (TB) |
| 5 | Petabytes (PB) |
| 6 | Exabytes (EB) |
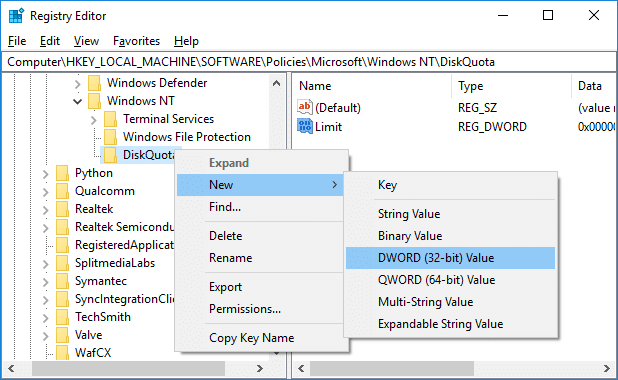
7.Right-click on DiskQuota then select New > DWORD (32-bit) Value then name this DWORD as Threshold and hit Enter.
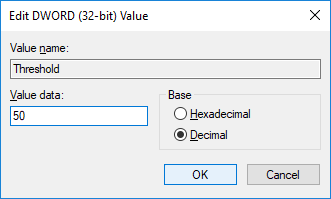
8.Double-click on Threshold DWORD then select Decimal under Base and change it’s value to how many KB, MB, GB, TB, or EB you want to set for a default warning level and click OK.
9.Again right-click on DiskQuota then select New > DWORD (32-bit) Value then name this DWORD as ThresholdUnits and hit Enter.
10.Double-click on ThresholdUnits DWORD then select Decimal under Base and change it’s value from the below table to have the default warning level you set in above steps as KB, MB, GB, TB, PB, or EB, and click OK.
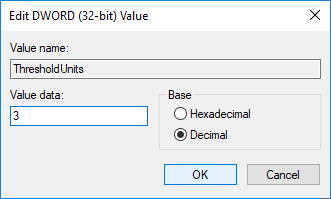
| Value | Unit |
| 1 | Kilobyte (KB) |
| 2 | Megabyte (MB) |
| 3 | Gigabyte (GB) |
| 4 | Terabyte (TB) |
| 5 | Petabytes (PB) |
| 6 | Exabytes (EB) |
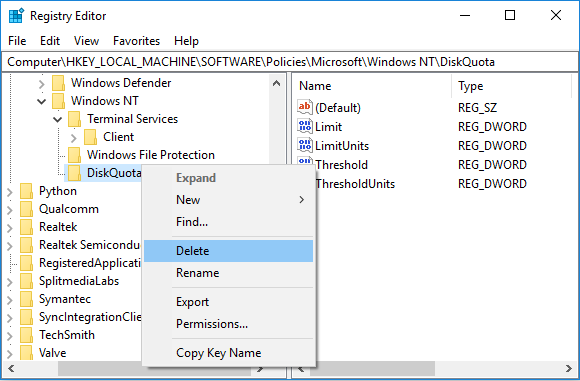
11.In future, if you need to Undo Default Disk Quota Limit and Warning Level for New Users on All NTFS Drives then simply right-click on DiskQuota registry key and select Delete.
12.Press Windows Key + X then select Command Prompt (Admin) and type the following command:
gpupdate /force
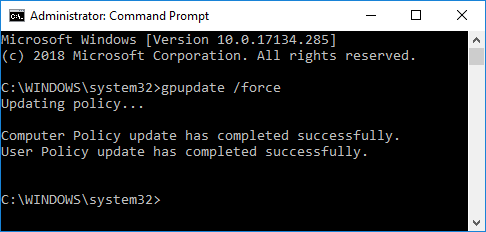
12.Once finished, you can reboot your PC to save changes.
Recommended:
That’s it you have successfully learned How to Set Disk Quota Limit and Warning Level in Windows 10 but if you still have any questions regarding this tutorial then feel free to ask them in the comment’s section.