How to Setup 3 Monitors on a Laptop
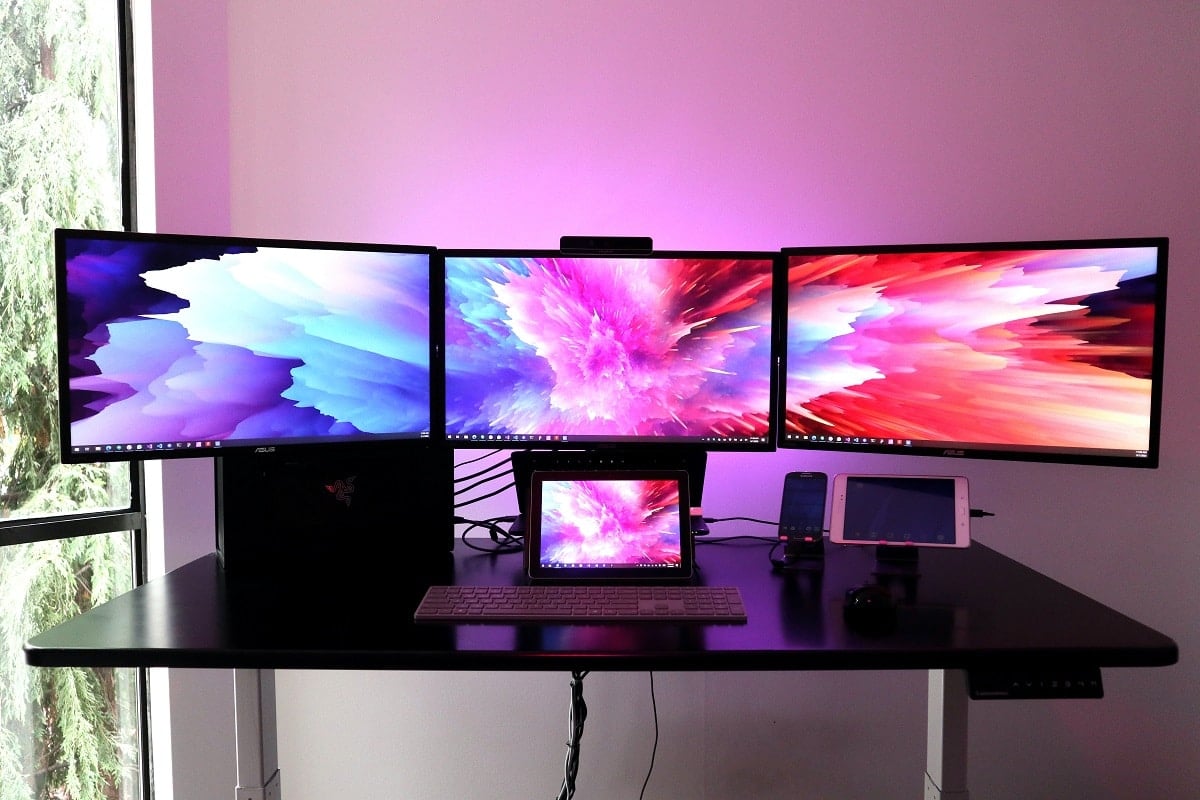
Do you want to improve your gaming or multitasking experience on Windows with a triple-monitor setup? If yes, then you have arrived at the correct location! It is sometimes, just not feasible to multitask on a single screen. Luckily, Windows 10 supports multiple displays. When you need to examine a lot of data at once, juggle between spreadsheets or, write articles while conducting research, and so on, having three monitors proves to be quite useful. If you are wondering how to set up multiple monitors with laptop, then do not worry! Follow this step-by-step guide which will teach you exactly how to setup 3 monitors on a laptop in Windows 10. That too, without using any third-party applications.
How to Set Up 3 Monitors on a Windows 10 Laptop
Depending on the number of ports on your system, you may attach a number of monitors to it. Because monitors are plug-and-play, the operating system will have no trouble detecting them. It can greatly boost productivity as well. A multi-monitor system will prove to be beneficial only when it is configured correctly. Hence, we suggest that you implement the steps detailed below to do the same.
Pro Tip: While you may alter settings per monitor, it is better to utilize the same brand and model of monitors with the same setup, wherever feasible. Otherwise, you could have difficulties, and Windows 10 might have difficulty scaling & customizing various components.
Step 1: Connect Ports & Cables Correctly
1. Before installing multiple displays on your device, ensure all connections, including power and video signals through VGA, DVI, HDMI, or Display Ports & cables, are linked to the monitors and the laptop.
Note: If you are not sure about the said connections, cross-check the brand and model of the monitor with the manufacturer website, for instance, Intel here.
2. Use the ports of graphics card or motherboard to connect numerous displays. However, you will need to purchase an additional graphics card, if your graphics card does not support three monitors.
Note: Even if there are multiple ports, it does not mean you can use them all, at once. To verify this, enter the model number of your graphics card in manufacturer website and check for it.
3. If your display supports DisplayPort multi-streaming, you can connect several monitors with DisplayPort cables.
Note: In this situation, make sure that your computer has adequate space and slots.
Step 2: Configure Multiple Monitors
While you may connect a monitor to any available video port on the graphics card, it is possible to connect them in the wrong sequence. They will still operate, but you could have trouble using the mouse or launching programs until you reorganize them properly. Here’s how to setup and configure 3 monitors on a laptop:
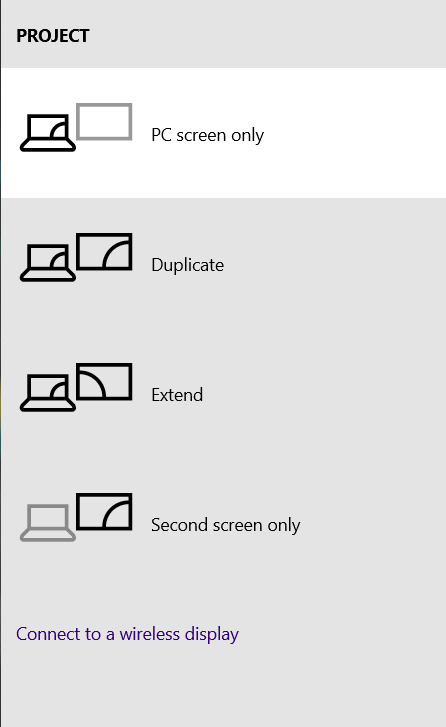
1. Press Windows + P keys simultaneously to open the Display Project menu.
2. Select a new Display mode from the given list:
- PC screen only – It just uses the primary monitor.
- Duplicate -Windows will show the identical image on all monitors.
- Extend – Multiple monitors work together to create a larger desktop.
- Second screen only – The only monitor that will be used is the second one.
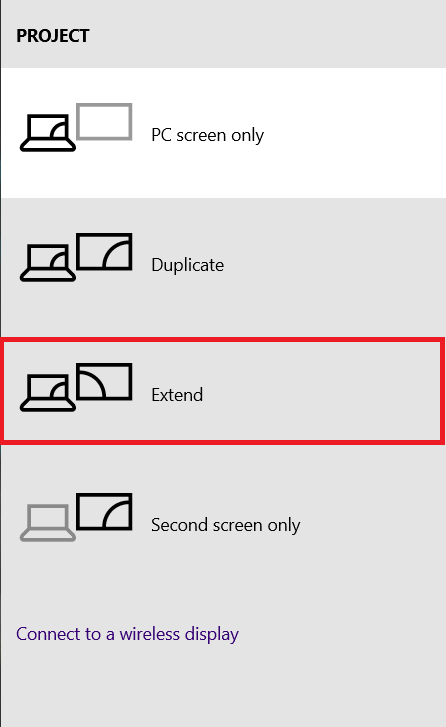
3. Choose Extend option, as highlighted below, and set up your displays on Windows 10.
Also Read: How to Fix Computer Monitor Display Problems
Step 3: Rearrange Monitors in Display Settings
Follow the given steps to arrange how these monitors should function:
1. Press Windows + I keys together to open Windows Settings.
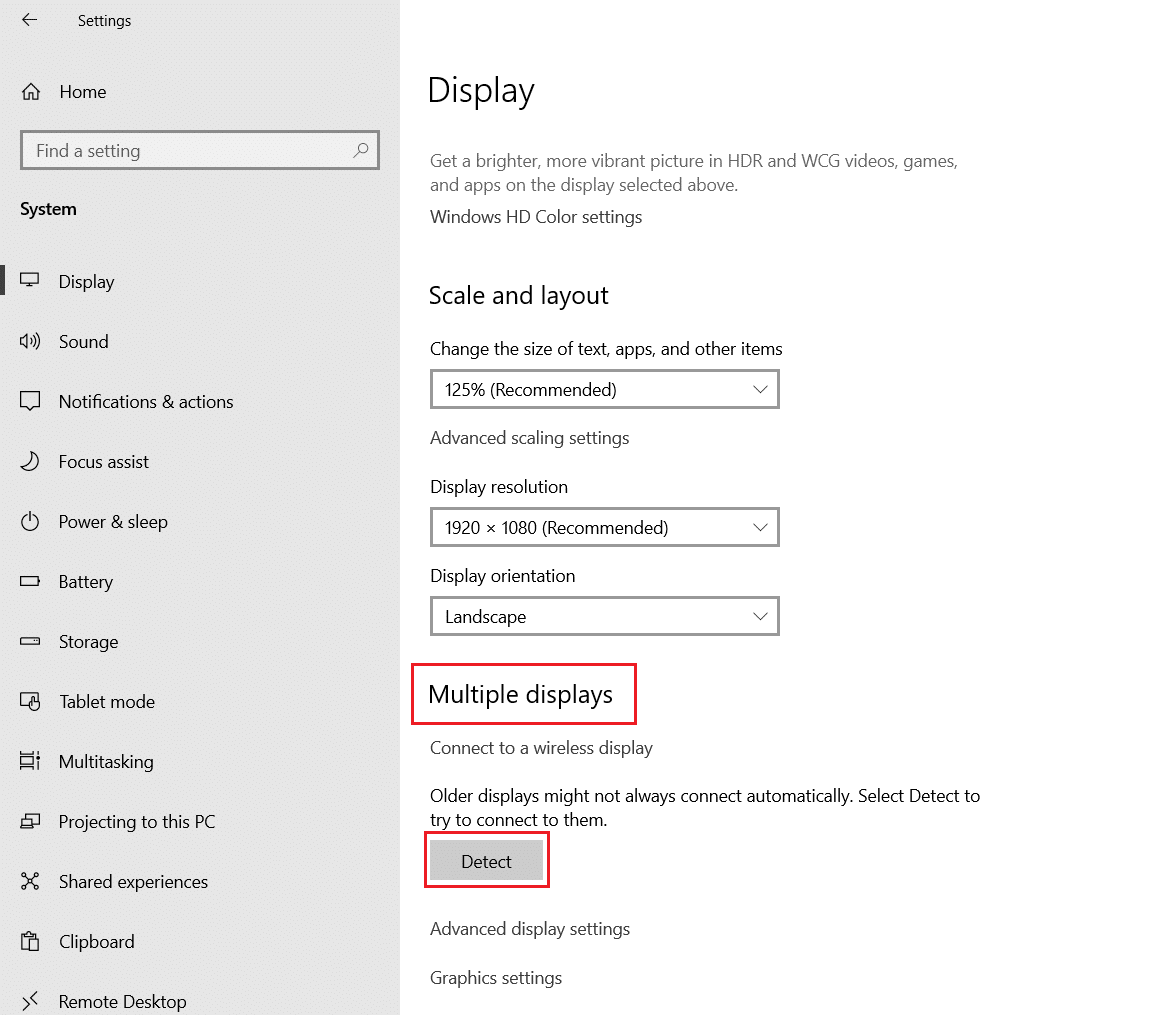
2. Here, select System Settings, as shown.
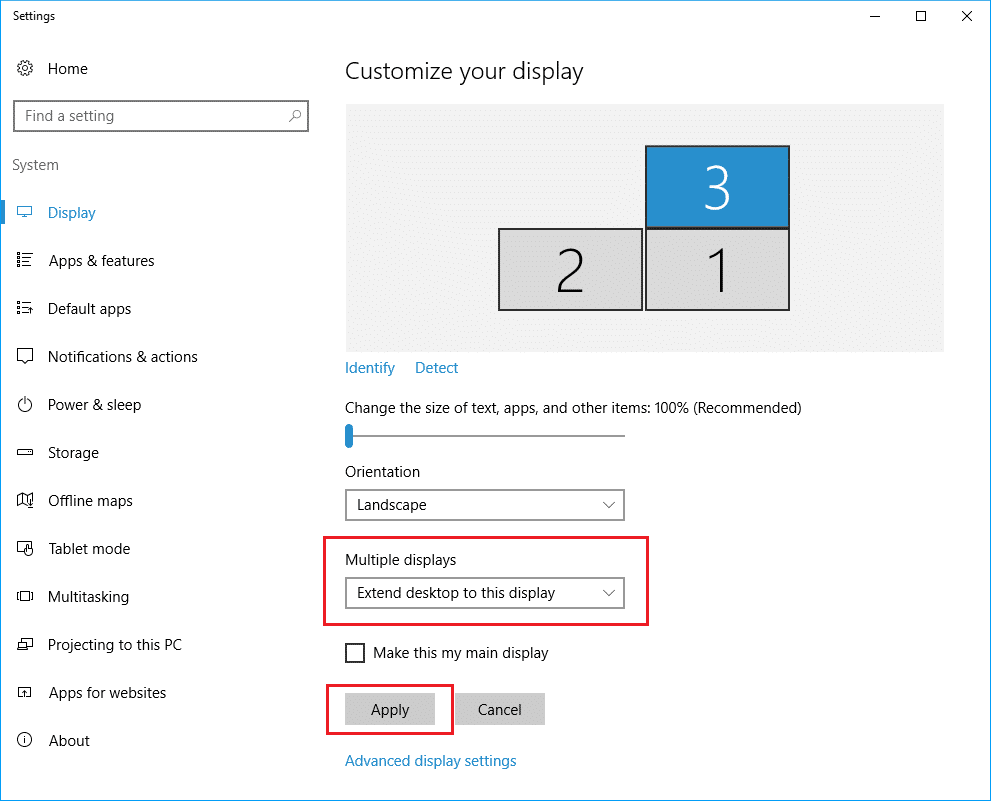
3. If there is no option to Customize your display then, click on Detect button under the Multiple displays section to detect other monitors.
Note: If one of the monitors does not appear, make sure it is powered up and connected properly before pressing the Detect button.
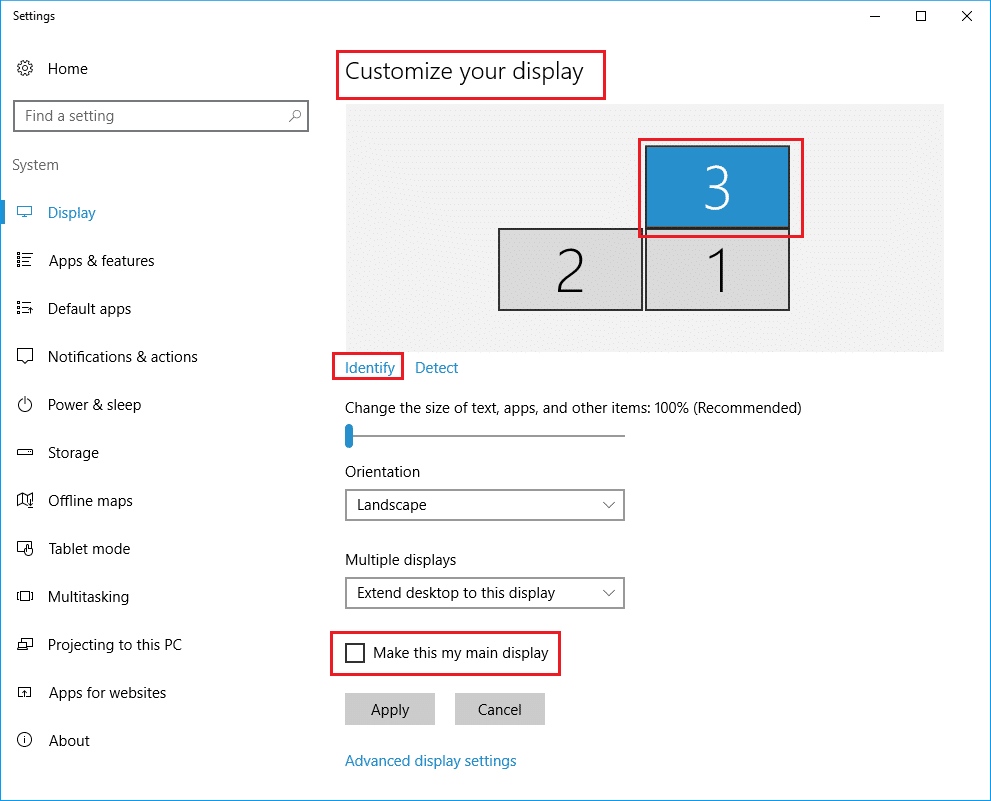
4. Rearrange the displays on your desktop, drag and drop the rectangle boxes under Customize your desktop section.
Note: You can use the Identify button to figure out which monitor to pick. Then, check the box marked Make this my main display to make one of the connected monitors your primary display screen.
5. Click Apply to save these changes.
Now, Windows 10 will preserve the physical arrangement allowing you to work across several displays and run programs. This is how to set up multiple monitors with laptop. Next, we shall learn how to customize the various displays.
Step 4: Customize Taskbar & Desktop Wallpaper
Windows 10 does an excellent job of identifying and establishing the best settings when connecting one or more monitors to a single PC. However, depending on your needs, you may need to modify your taskbar, desktop, and wallpaper. Read below to do so.
Step 4A: Personalize Taskbar for Each Monitor
1. Go to Desktop by pressing Windows + D keys simultaneously.
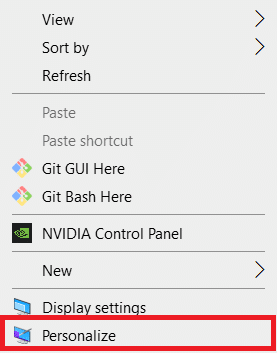
2. Then, right-click on any empty space on the Desktop and click on Personalize, as shown.
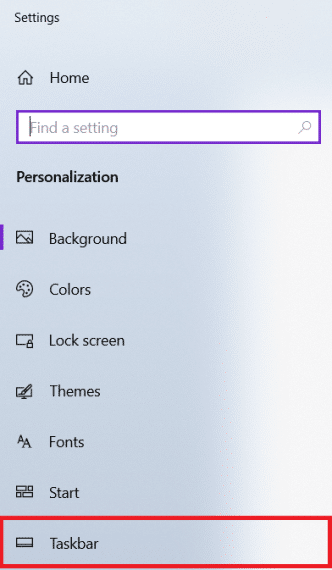
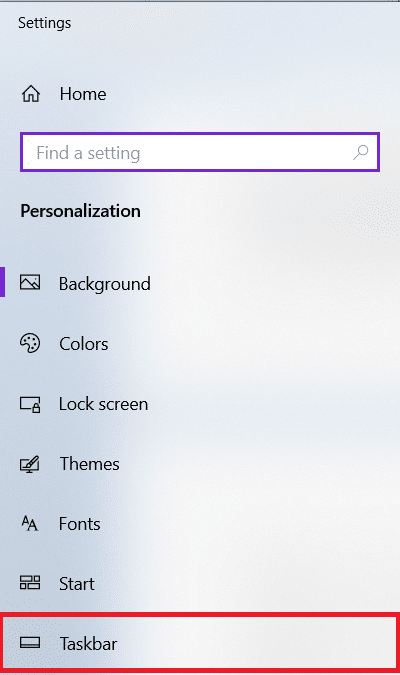
3. Here, select Taskbar in the left pane.
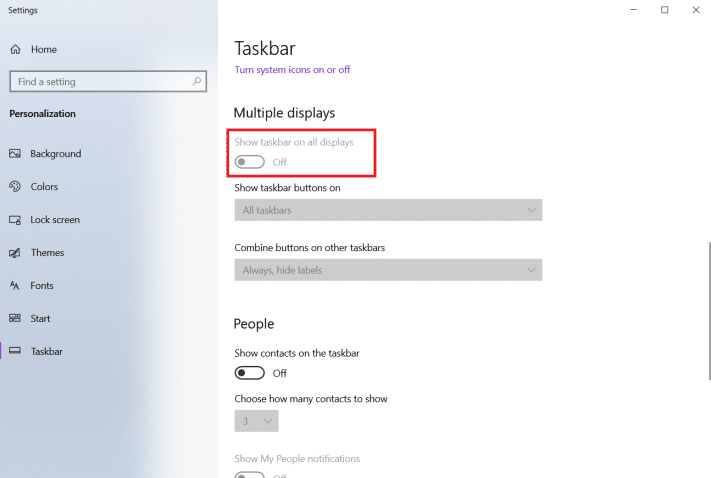
4. Under Multiple displays section, and toggle On the Show taskbar on all displays option.
Step 4B: Customize Wallpaper for Each Monitor
1. Navigate to Desktop > Personalize, as earlier.
2. Click on Background from the left pane and choose Slideshow under Background drop-down menu.
3. Click on Browse under Choose albums for your slideshows.
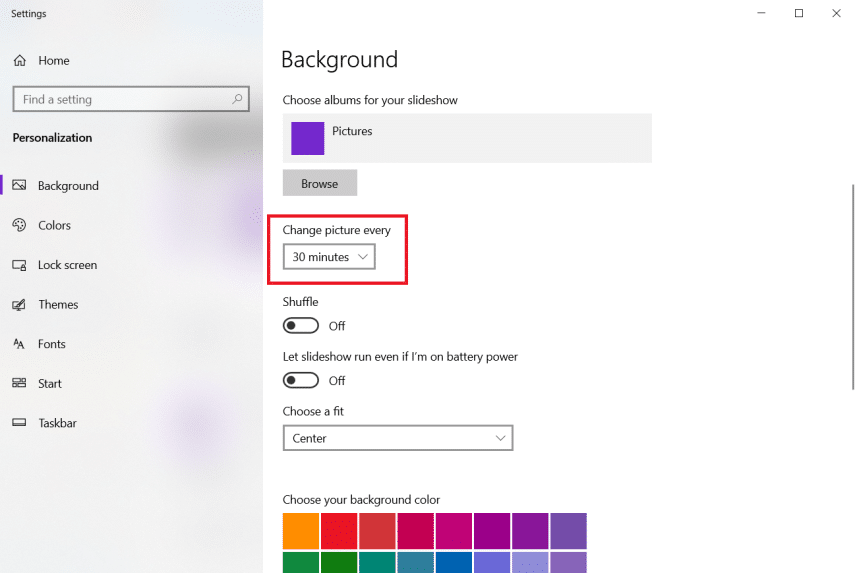
4. Set the Change picture every option to the time period after which a new image is to be displayed from the selected album. For example, 30 minutes.
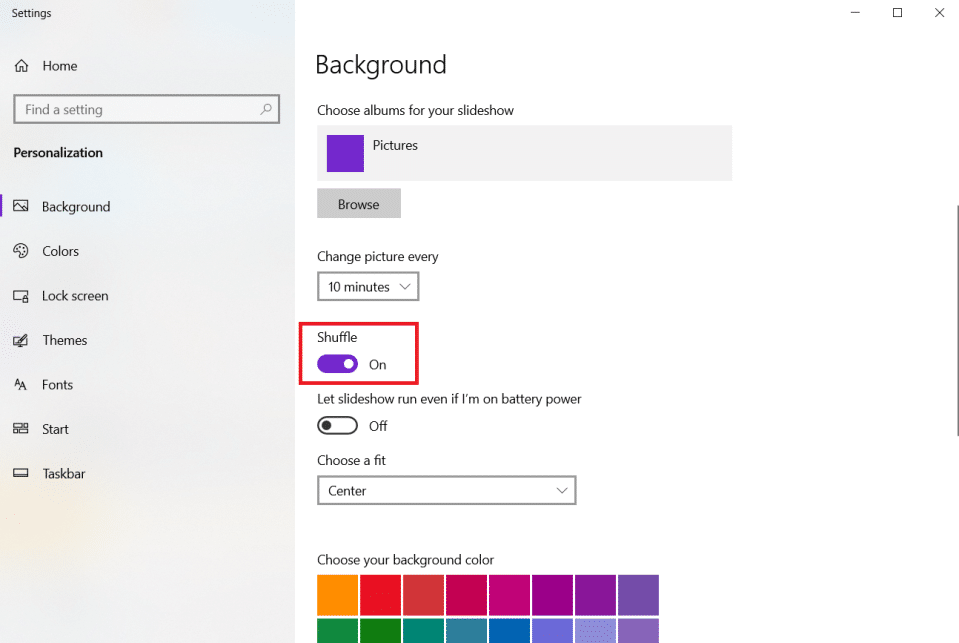
5. Toggle On Shuffle option, as depicted below.
6. Under Choose a fit, Choose Fill.
This is how to setup 3 monitors on a laptop & customize taskbar as well as wallpaper.
Also Read: How to Calibrate your Monitor Display Color in Windows 10
Step 5: Adjust Display Scale & Layout
Despite the fact that Windows 10 configures the most optimal settings, you may need to adjust scale, resolution, and orientation for each monitor.
Step 5A: Set System Scale
1. Launch Settings > System as mentioned in Step 3.
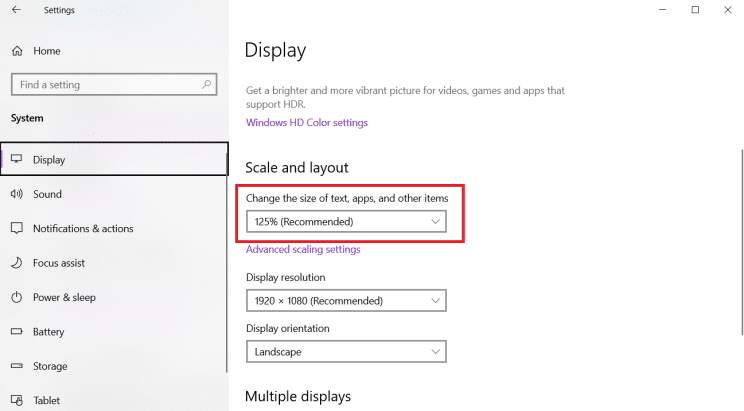
2. Select the appropriate Scale option from Change the size of text, apps, and other items drop-down menu.
3. Repeat the above steps to adjust the scale settings on the additional displays as well.
Step 5B: Custom Scaling
1. Select the Display monitor and go to Settings > System as shown in Step 3.
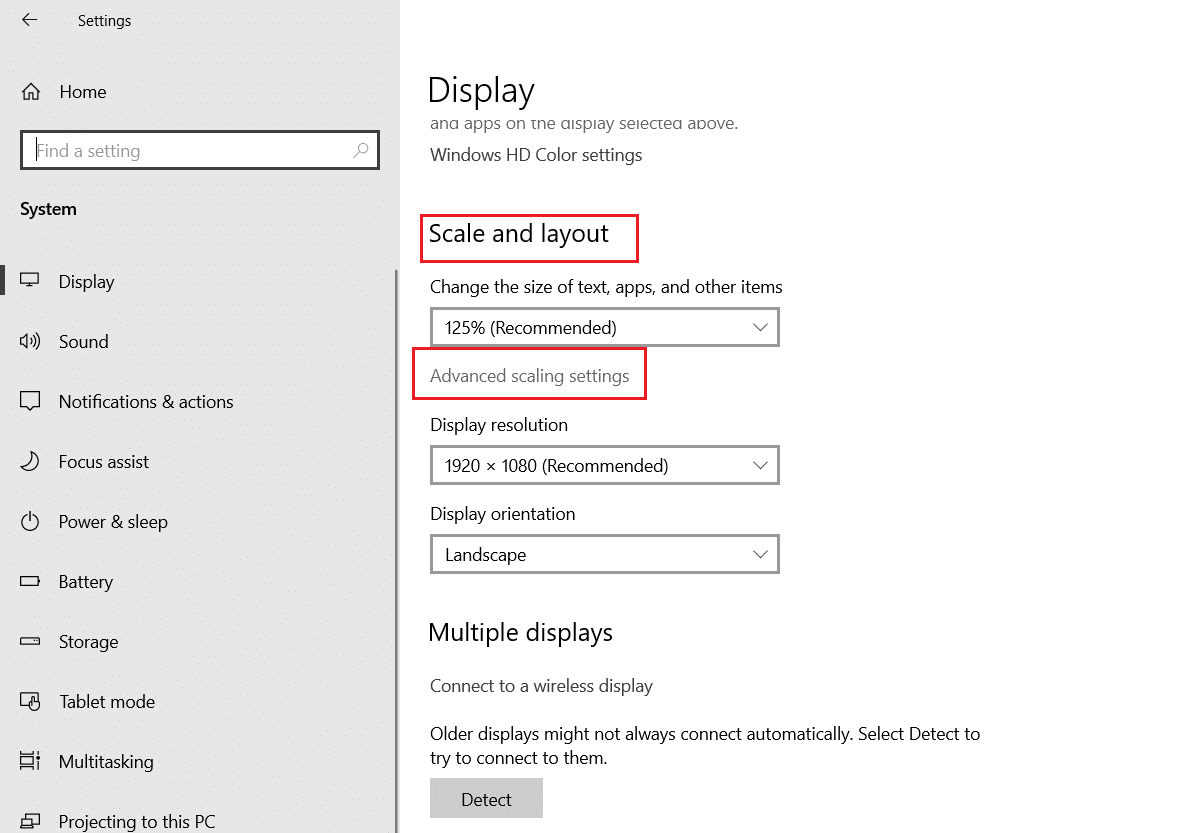
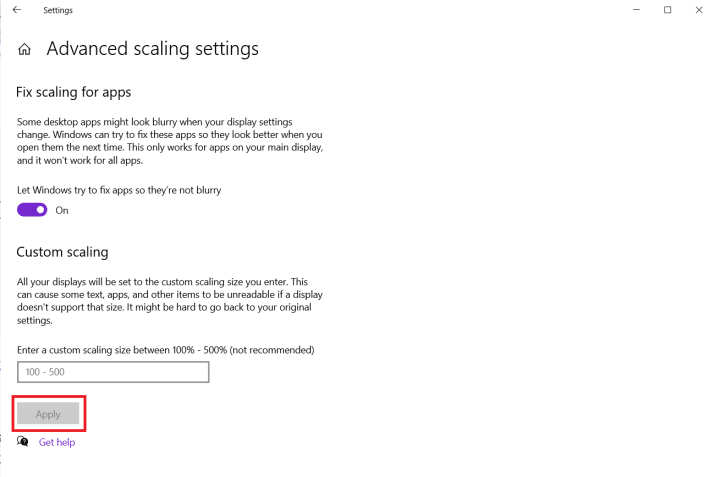
2. Select Advanced scaling settings from the Scale and layout section.
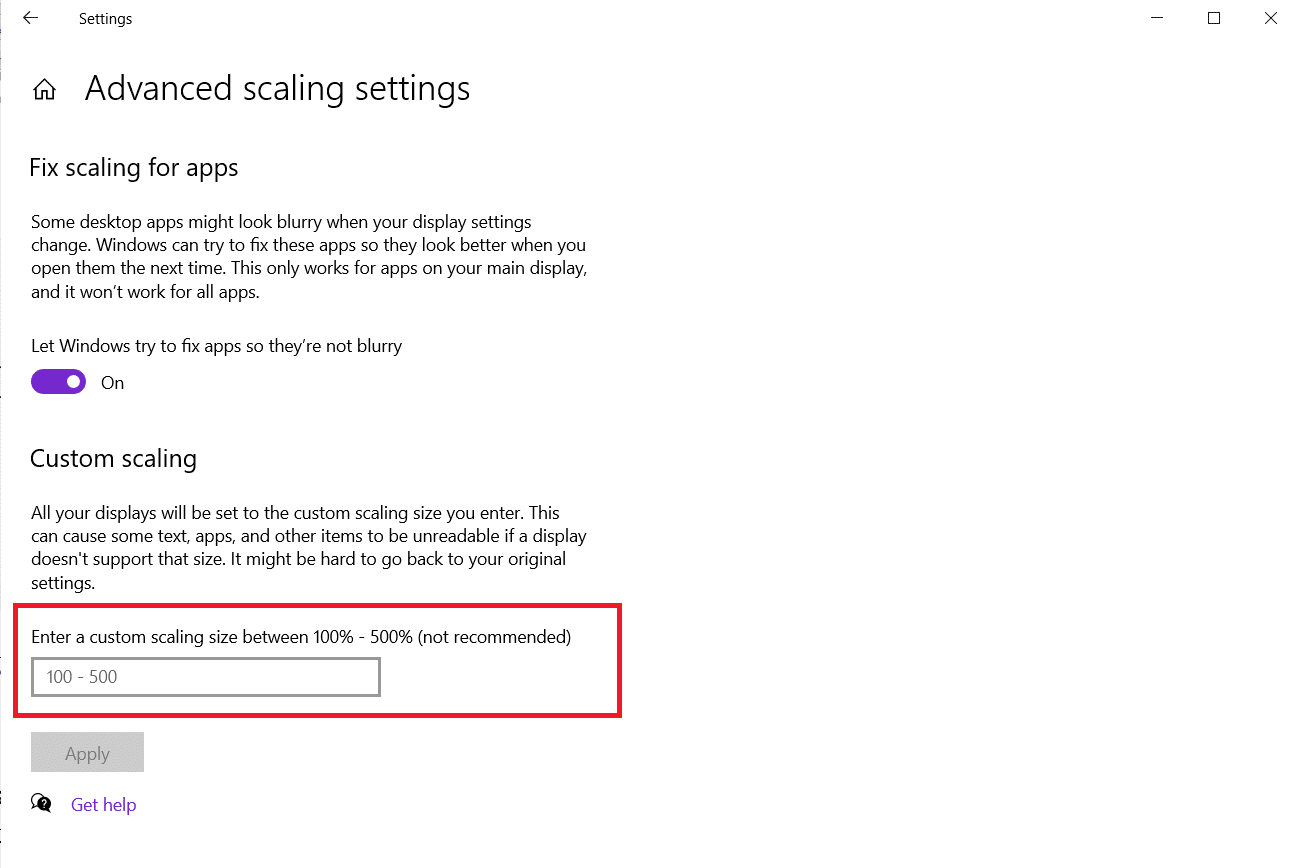
3. Set the scaling size between 100%- 500% in the Custom scaling section shown highlighted.
4. Click on Apply to apply the said changes.
5. Sign out of your account and back in to test the updated settings after you have completed the above steps.
6. If the new scaling configuration doesn’t seem right, repeat the process with a different number until you discover one that works for you.
Step 5C: Set Correct Resolution
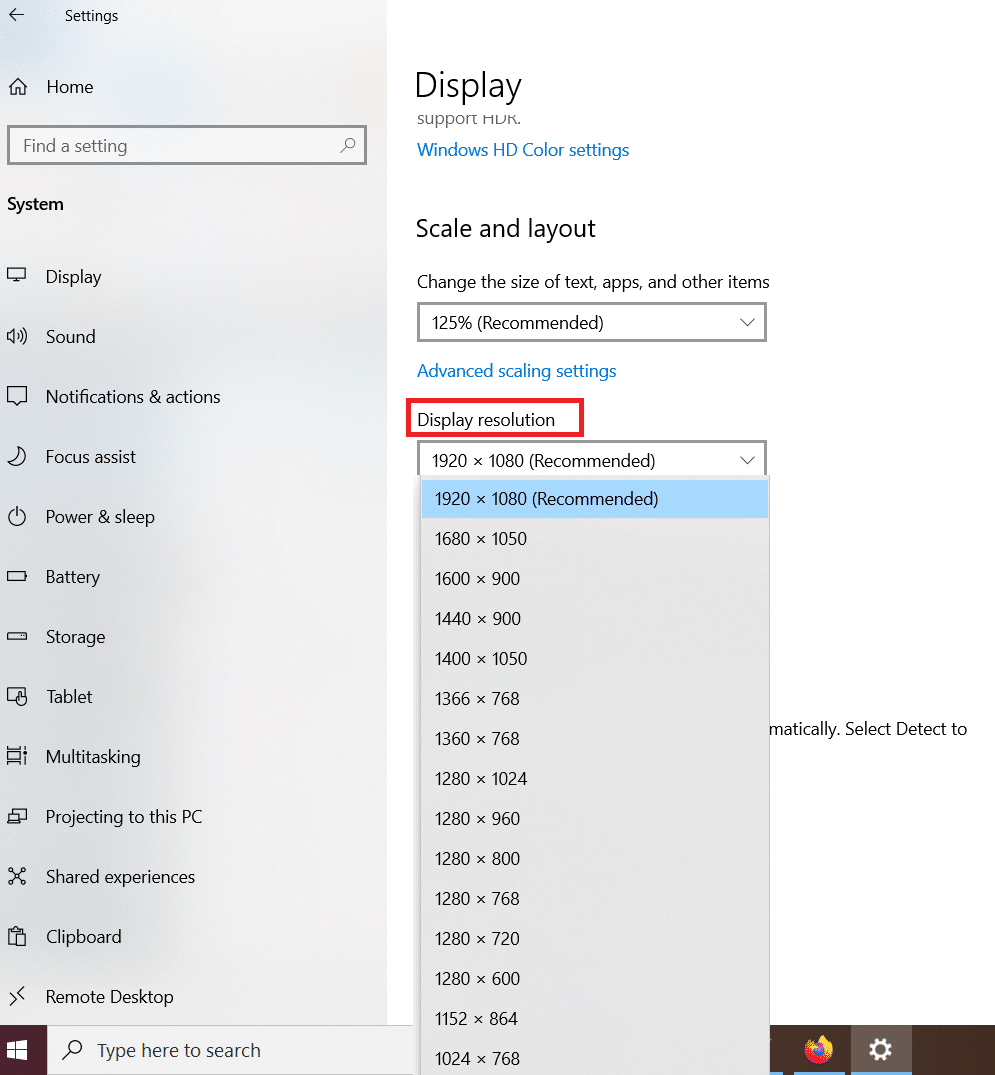
Normally, Windows 10 will establish the suggested pixel resolution automatically, when attaching a new monitor. But, you may adjust it manually by following these steps:
1. Select the Display screen you wish to change and navigate to Settings > System as illustrated in Method 3.
2. Use the Display resolution drop-down menu in the Scale and layout section to choose the right pixel resolution.
3. Repeat the above steps to adjust the resolution on the remaining displays.
Step 5D: Set Correct Orientation
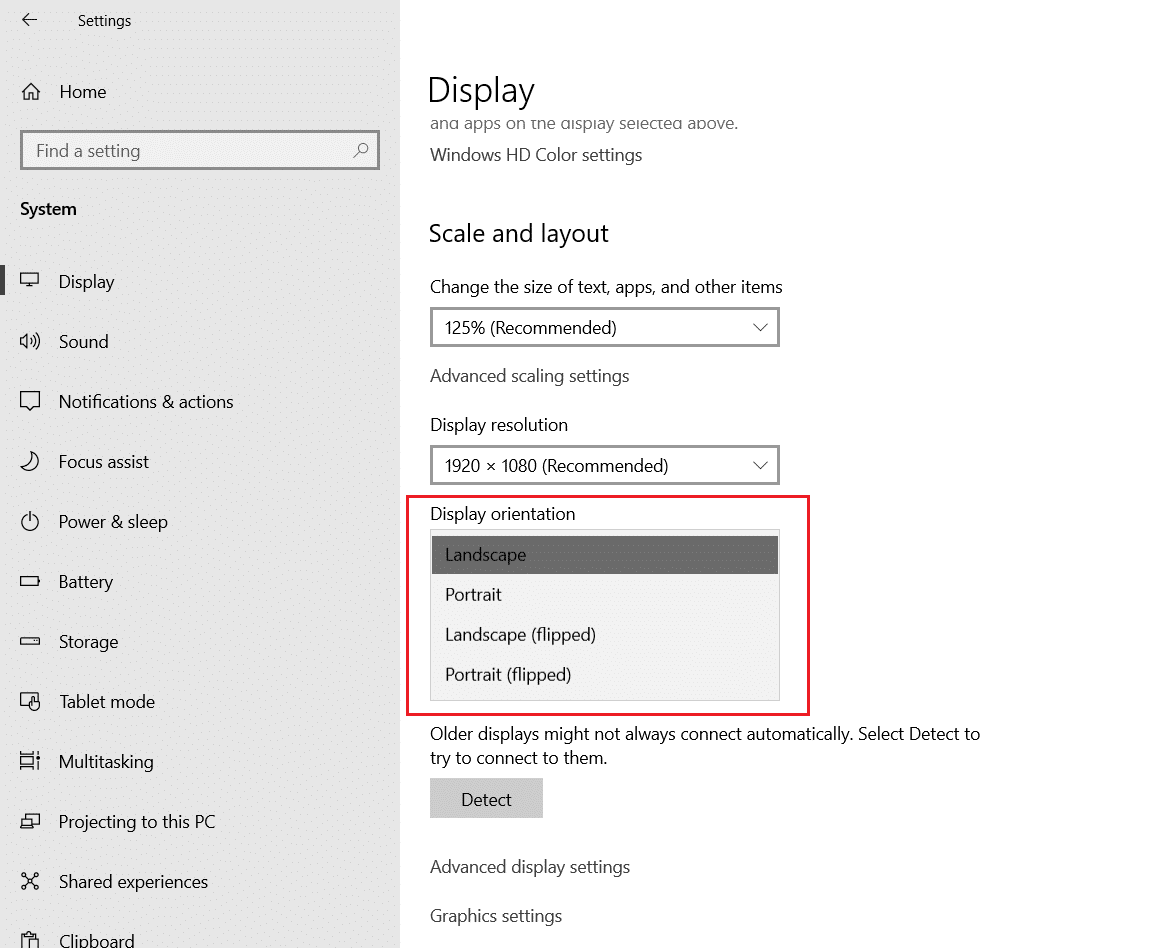
1. Select the Display & navigate to Settings > System as earlier.
2. Select the mode from the Display orientation drop-down menu under Scale and layout section.
When you have finished all of the steps, the display will change to the orientation you chose viz Landscape, Portrait, Landscape (flipped), or Portrait (flipped).
Step 6: Select Multiple Displays Viewing Mode
You may select the viewing mode for your displays. If you utilize a second monitor, you may choose to:
- either stretch the main screen to accommodate the additional display
- or mirror both displays, which is a wonderful option for presentations.
You may even, deactivate the main display and utilize the second monitor as your primary if you are using a laptop with an external monitor. Follow the given steps on how to set up multiple monitors with laptop and set viewing mode:
1. Navigate to Settings > System as shown below.
2. Choose the desired Display monitor under Display section.
3. Then, use the drop-down option under Multiple displays to select the appropriate viewing mode:
- Duplicate desktop – The identical desktop is displayed on both displays.
- Extend – The primary desktop is expanded on the secondary display.
- Disconnect this display –Switch off the monitor you have selected.
4. Repeat the above-mentioned steps to adjust the display mode on the remaining displays too.
Also Read: How to Connect two or more Computers to one Monitor
Step 7: Manage Advanced Display Settings
Although changing your advanced display settings is not always a good idea because not all monitors might be equal in size, you may need to do it to enhance color accuracy and eliminate screen flickering as explained in this section.
Step 7A: Set Custom Color Profile
1. Launch System Settings by following steps 1-2 of Method 3.
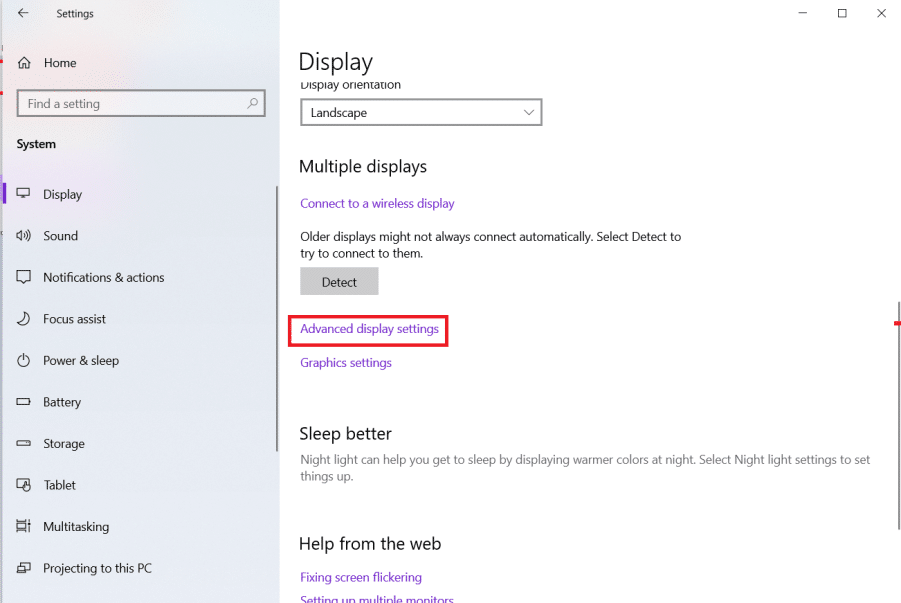
2. Here, click on Advanced display settings.
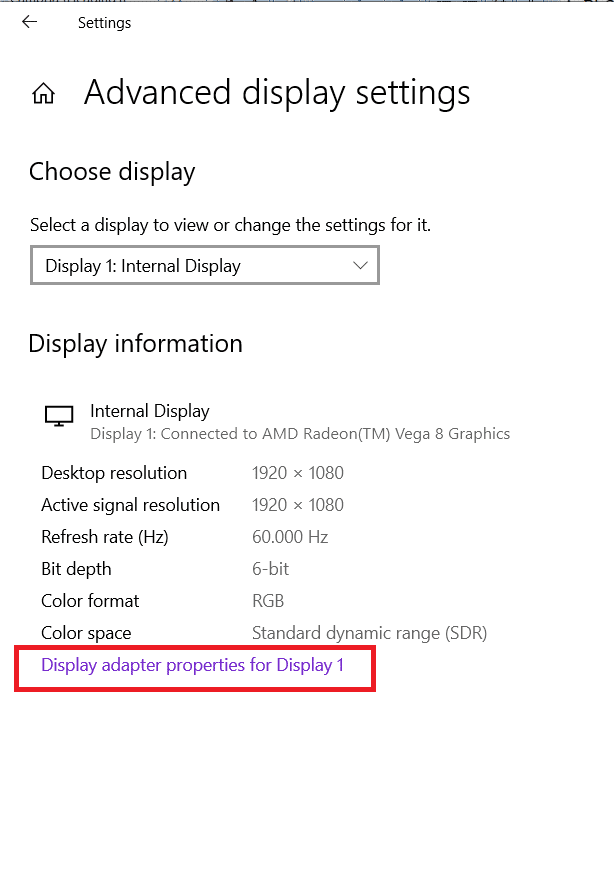
3. Click the Display adapter properties for Display 1.
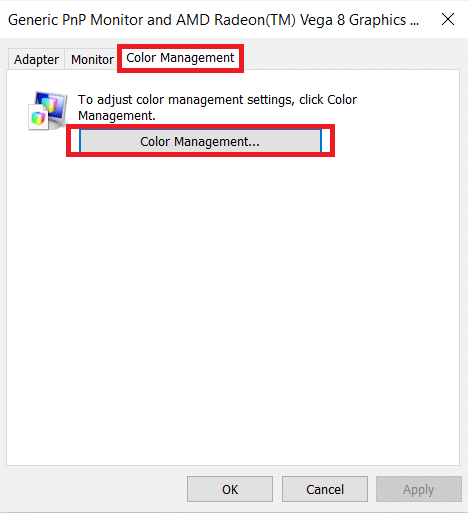
4. Click on Color Management… button under Color Management tab, as depicted below.
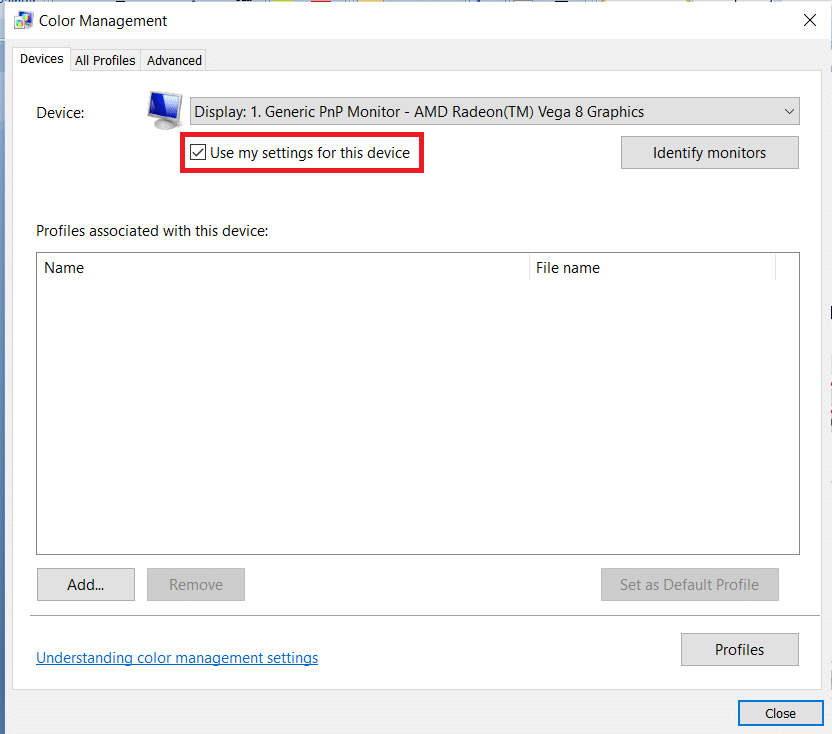
5. Under Devices tab, select your Display from the Device drop-down list.
6. Check the box titled Use my settings for this device.
7. Click Add… button, as shown.
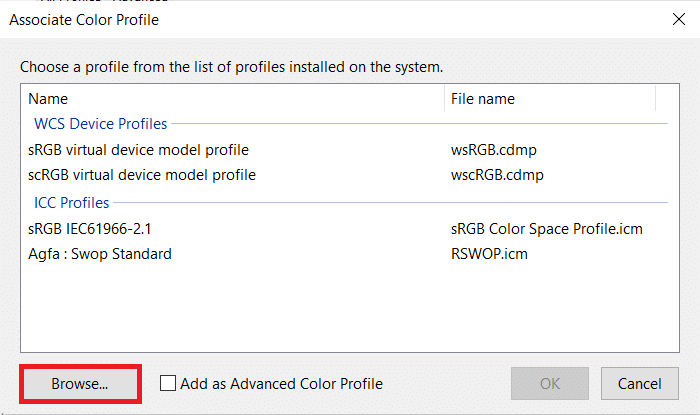
8. Click the Browse..button on the Associate Color Profile screen to find the new color profile.
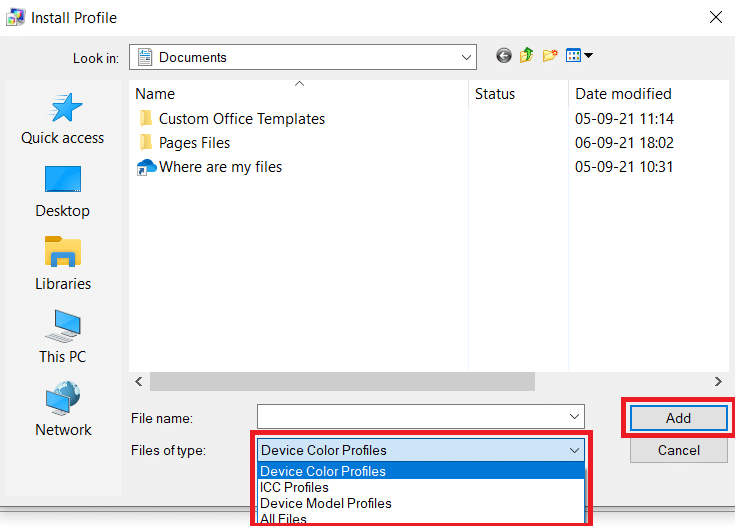
9. Navigate to the directory where ICC Profile, Device Color Profile, or Device Model Profile is stored. then, click on Add, shown highlighted below.
10. Click on OK then, Close to exit all screens.
11. Repeat steps 6– 11 to create a custom profile for additional monitors too.
Step 8: Change Screen Refresh Rate
To run a computer, a refresh rate of 59Hz or 60Hz would suffice. If you are experiencing screen flickering or using displays that allow a higher refresh rate, changing these settings would provide a better and smoother viewing experience, especially for gamers. Here is how to setup 3 monitors on a laptop with different refresh rates:
1. Go to Settings > System > Advanced display settings > Display Adapter Properties for display 1 as shown in Step 7A.
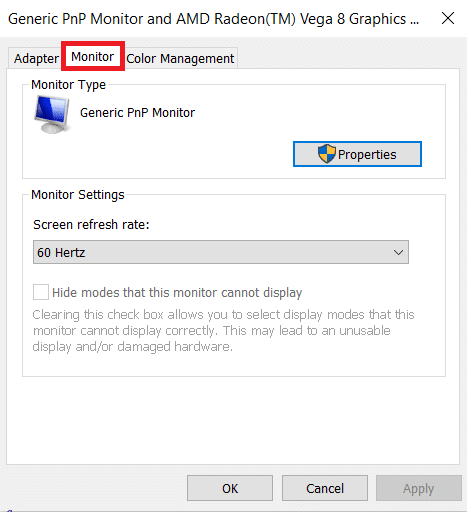
2. This time, switch to the Monitor tab.
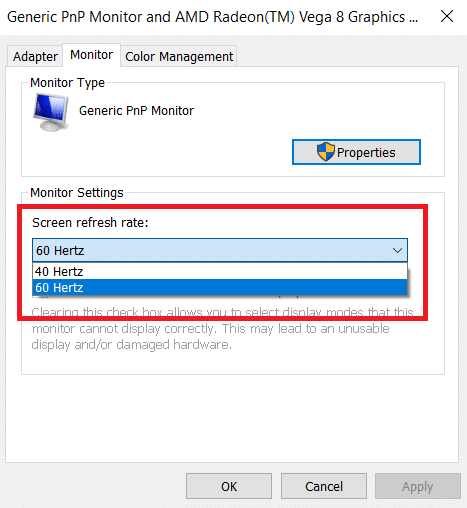
3. Use the drop-down menu under Monitor Settings to select the desired screen refresh rate.
4. Click on Apply > OK to save the changes.
5. Implement the same steps to adjust the refresh rate on the remaining displays, if needed.
Also Read: How to Change the Primary & Secondary Monitor on Windows
Step 9: Show Taskbar Across Multiple Displays
Now that your know how to set up multiple monitors with laptop; Then it is worth noting that on a multi-monitor system, the Taskbar will appear only on the primary display, by default. Fortunately, you can modify settings to display it across all screens. Here’s how to setup 3 monitors on a laptop with a Taskbar displayed on each:
1. Go to Desktop > Personalize as depicted.
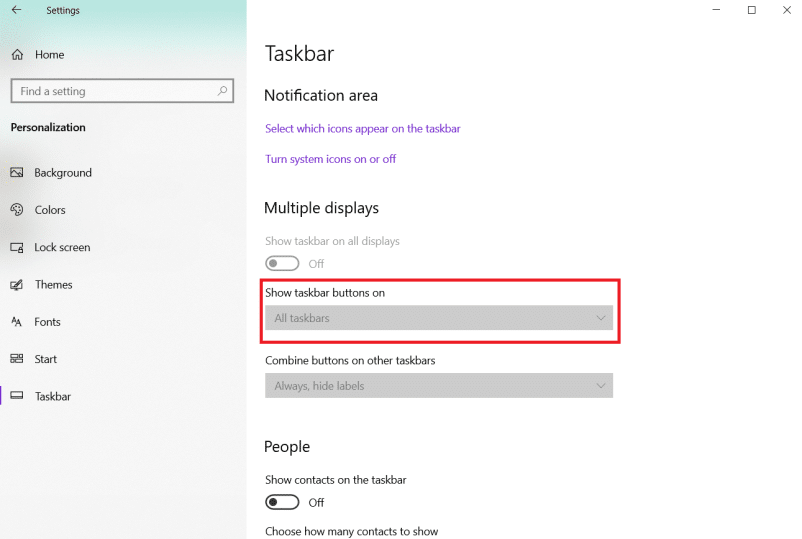
2. Select Taskbar from the left pane.
3. Turn on the Show taskbar on all displays toggle switch under Multiple displays section.
4. Use the Show taskbar buttons on drop-down box to choose where the buttons for running programs should show in the Taskbar. The listed options will be:
- All taskbars
- Main taskbar and taskbar where the window is open.
- Taskbar where the window is open.
This is how to set up multiple monitors with laptop with a Taskbar displayed on each. You can also customize the taskbar by pinning additional programs or keeping it as simple as possible.
Recommended:
We hope you found this article useful and learned how to setup 3 monitors on a Windows 10 laptop. Please let us know if you were able to customize multiple monitors with your laptop or desktop. And, feel free to leave any questions or recommendations in the comment box below.
