How to Turn Outlook Email Read Receipt On Off
Suppose you sent an important mail to someone and are now anxiously waiting for their reply. The anxiety levels will go off the roof if there isn’t any indication if the mail has even been opened or not. Outlook helps you to get rid of this problem quite easily. It offers an option of Read Receipt, through which the sender receives an automatic reply once the mail has been opened. You can enable or disable Outlook email read receipt option either for a single mail or for all the mails you send. This concise guide will teach you how to turn Outlook Email Read Receipt On or Off.
How to Turn Outlook Email Read Receipt On or Off
Note: The methods have been tested by our team on Outlook 2016.
How to Request a Read Receipt in Microsoft Outlook
Option 1: For A Single Mail
Here’s how to turn on Outlook email read receipt for a single mail before sending it:
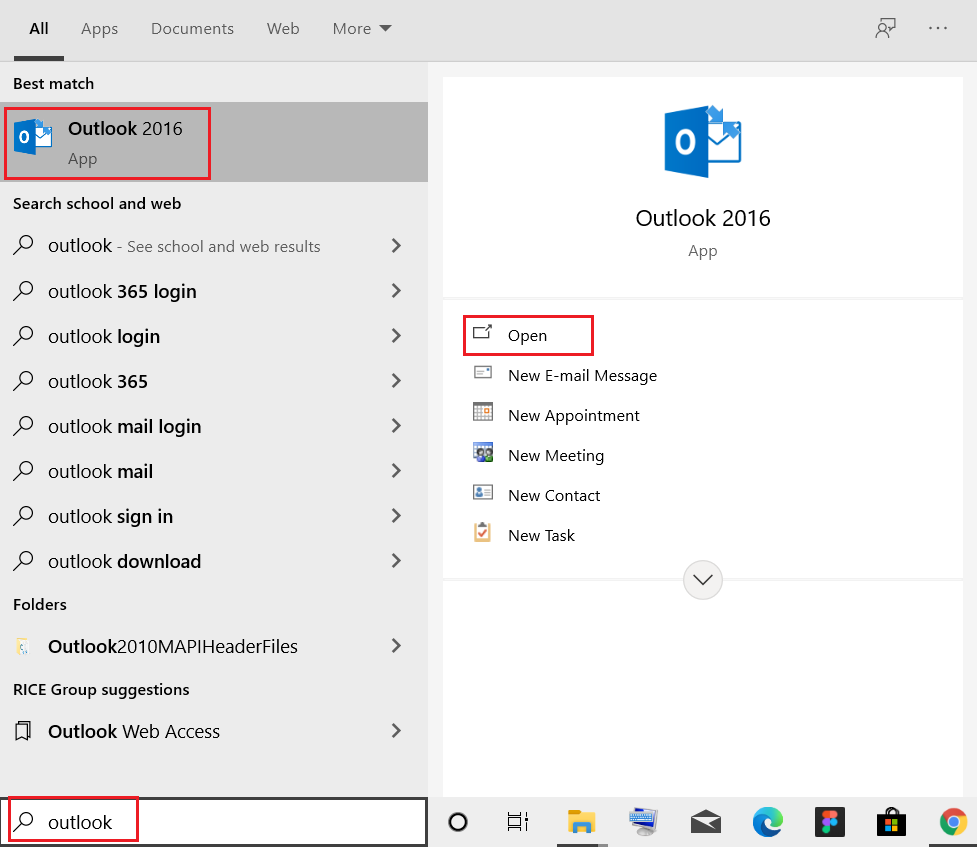
1. Open Outlook from the Windows search bar, as illustrated below.
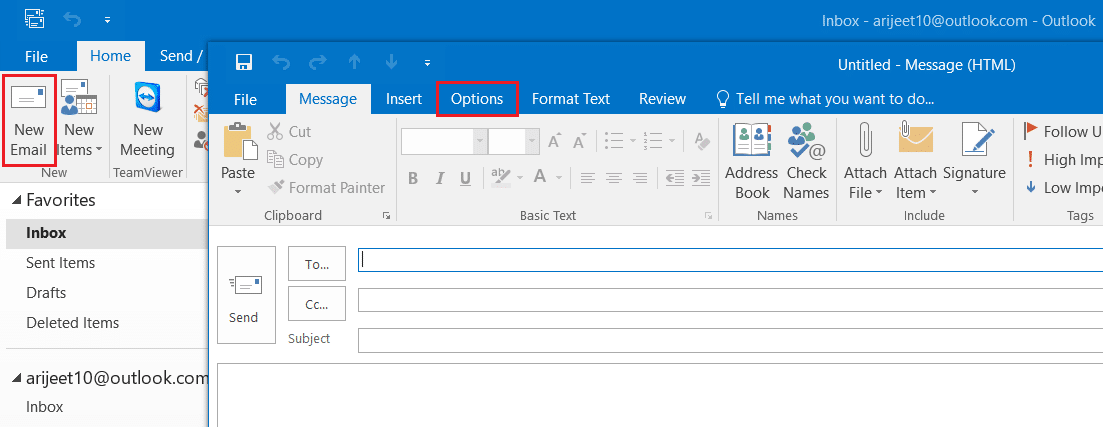
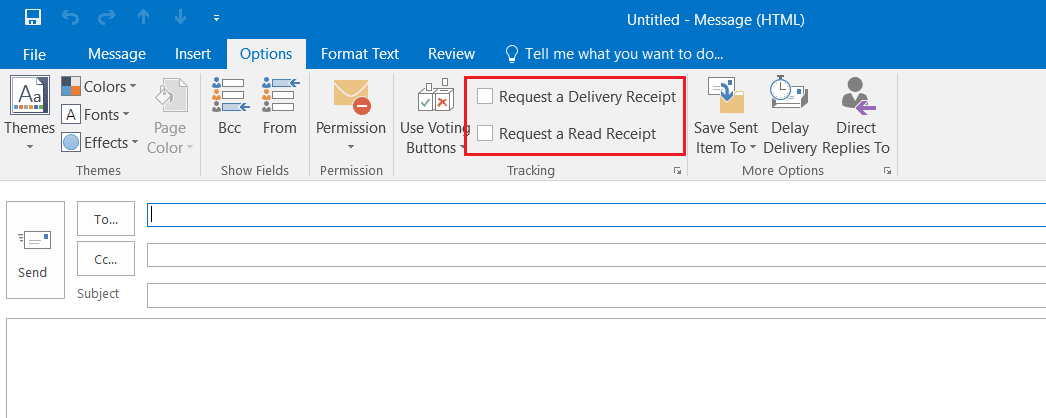
2. Click on New Email and switch to the Options tab in the new Untitled message window.
3. Here, check the box marked Request a Read Receipt, shown highlighted.
4. Now, Send your mail to the recipient. Once the recipient opens your mail, you will get a reply mail along with the date and time at which the mail has been opened.
Also Read: Why Does My Email Say Queued?
Option 2: For Every Email
Outlook email read receipt option for single mail is useful to send and acknowledge receipt for high-priority emails. But, there may be times where the user needs to track the mail more regularly to monitor the progress of a project. In such cases, use this procedure to turn on or enable email read receipts in Outlook for all mails you send.
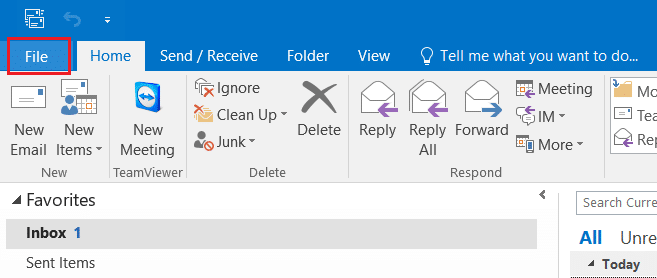
1. Launch Outlook as earlier and click on the File tab, as shown.
2. Then, click on Options.
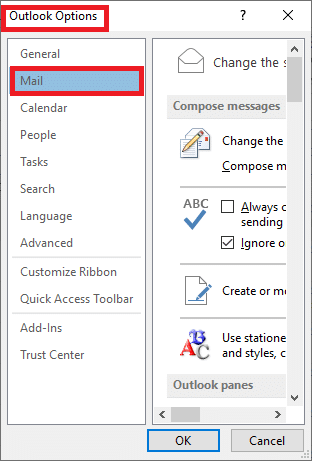
3. The Outlook Options window will appear. Here, click on Mail.
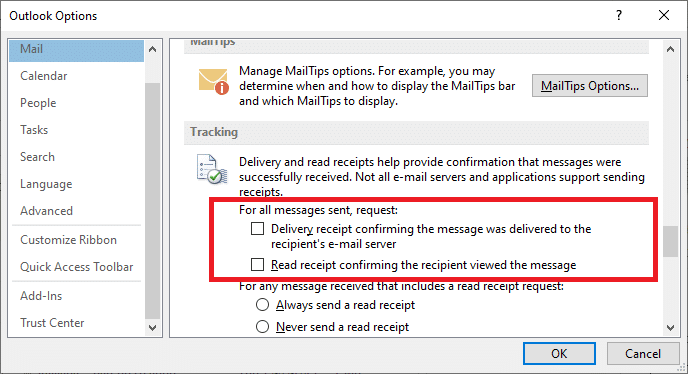
4. On the right side, scroll down until you see Tracking section.
5. Now, check the two options For all messages sent, request:
- Delivery receipt confirming the message was delivered to the recipient’s e-mail server.
- Read receipt confirming the recipient viewed the message.
6. Click OK to save changes to receive a confirmation message once when the mail has been delivered and once when it’s read by the recipient.
Also Read: How to Create a New Outlook.com Email Account?
How to Respond to a Read Receipt Request
Here’s how to respond to Outlook email read receipt request:
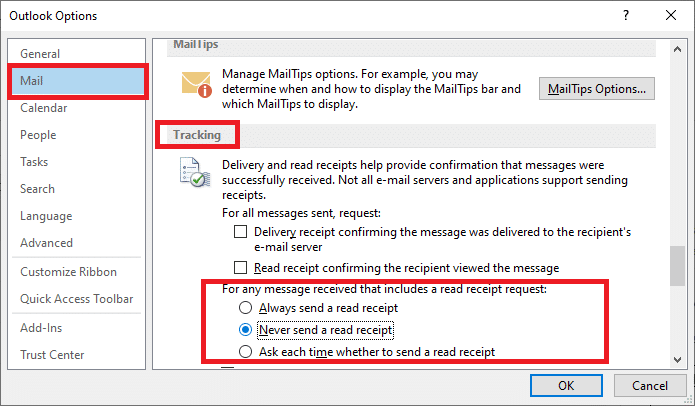
1. Launch Outlook. Navigate to File > Options > Mail > Tracking using Steps 1-4 of the previous method.
2. In the For any message that includes a read receipt request: section, choose an option according to your requirement:
- Always send a read receipt: If you wish to send a read receipt on Outlook for all mails you receive.
- Never send a read receipt: If you do not want to send a read receipt.
- Ask each time whether to send a read receipt: Choose this option to instruct Outlook to ask you permission to send a read receipt.
3. Click OK to save these changes.
By now, you have learnt how to request or respond to a Read Receipt for mails in Outlook. In the next section, we will discuss how to disable Outlook email read receipt.
How to Disable Email Read Receipt in Microsoft Outlook
Read below to learn how to turn Outlook Email Read Receipt off, if need be.
Option 1: For A Single Mail
To disable the Outlook email read receipt option, follow the steps mentioned below:
1. Open Outlook from the Windows search bar.
2. Click on New Email. Then, select the Options tab in the Untitled message window that opens up.
3. Here, uncheck the boxes marked:
- Request a Read Receipt
- Request a Delivery Receipt
4. Now, Send your mail to the recipient. You will no longer receive replies from receiving end.
Also Read: How to Send a Calendar Invite in Outlook
Option 2: For Every Email You Send
You can also disable email read receipt for every email you send in Outlook, as follows:
1. Launch Microsoft Outlook. Navigate to File > Options > Mail > Tracking as explained previously.
2. Uncheck the following two options to disable read receipts on Outlook:
- Delivery receipt confirming the message was delivered to the recipient’s e-mail server.
- Read receipt confirming the recipient viewed the message.
3. Click on OK to save changes.
Pro Tip: It is not necessary that you need to check/uncheck both options. You can choose to receive either only Delivery receipt or only Read receipt.
Recommended:
So, that is how to turn Outlook Email Read Receipt On or Off. Although the feature does not provide the necessary delivery/read receipt every time, it is helpful most of the time. If you have any queries or suggestions, contact us via the comment section.
