Merge Multiple Google Drive & Google Photos Accounts
Do you have more than one Google account? Is it getting difficult to switch between multiple accounts? Then you can merge data across multiple Google Drive and Google Photos account into one account using the below guide.
Google’s mail service, Gmail, heavily dominates the email service provider market and owns up to 43% of the total market share with more than 1.8 billion active users. This dominance can be attributed to a variety of perks associated with possessing a Gmail account. Firstly, Gmail accounts can easily be integrated with a number of websites & applications, and second, you get 15GB of free cloud storage on Google Drive and unlimited storage (depending on the resolution) for your photos and videos on Google Photos.
However, in the modern world, 15GB of storage space is barely enough to store all our files, and instead of buying more storage, we end up creating additional accounts to acquire some for free. Most users also have multiple Gmail or Discord accounts, for example, one for work/school, a personal mail, another for signing up on websites that are likely to send a lot of promotional emails, etc. and switching between them to access your files can be quite annoying.
Unfortunately, there is no one-click method to merge the files on different Drive or Photos accounts. Although there exists a work-around to this conundrum, the first is called Google’s Backup and Sync application & the other is the ‘Partner Sharing’ feature on Photos. Below we have explained the procedure to use these two and merge multiple Google Drive and Photos accounts.
How to Merge Multiple Google Drive & Google Photos Accounts
The procedure for merging Google Drive data is pretty straight-forward; you download all the data from one account and then upload it onto the other. This procedure can be quite time-consuming if you have a lot of data stored on your Drive, but favorably, the new privacy laws have forced Google to start the Takeout website via which users can download all the data associated with their Google account in a single click.
So we will be first visiting Google Takeout to download all the Drive data and then use the Backup & Sync application to upload it.
How to Merge Google Drive data of Multiple Accounts
Method 1: Download all your Google Drive data
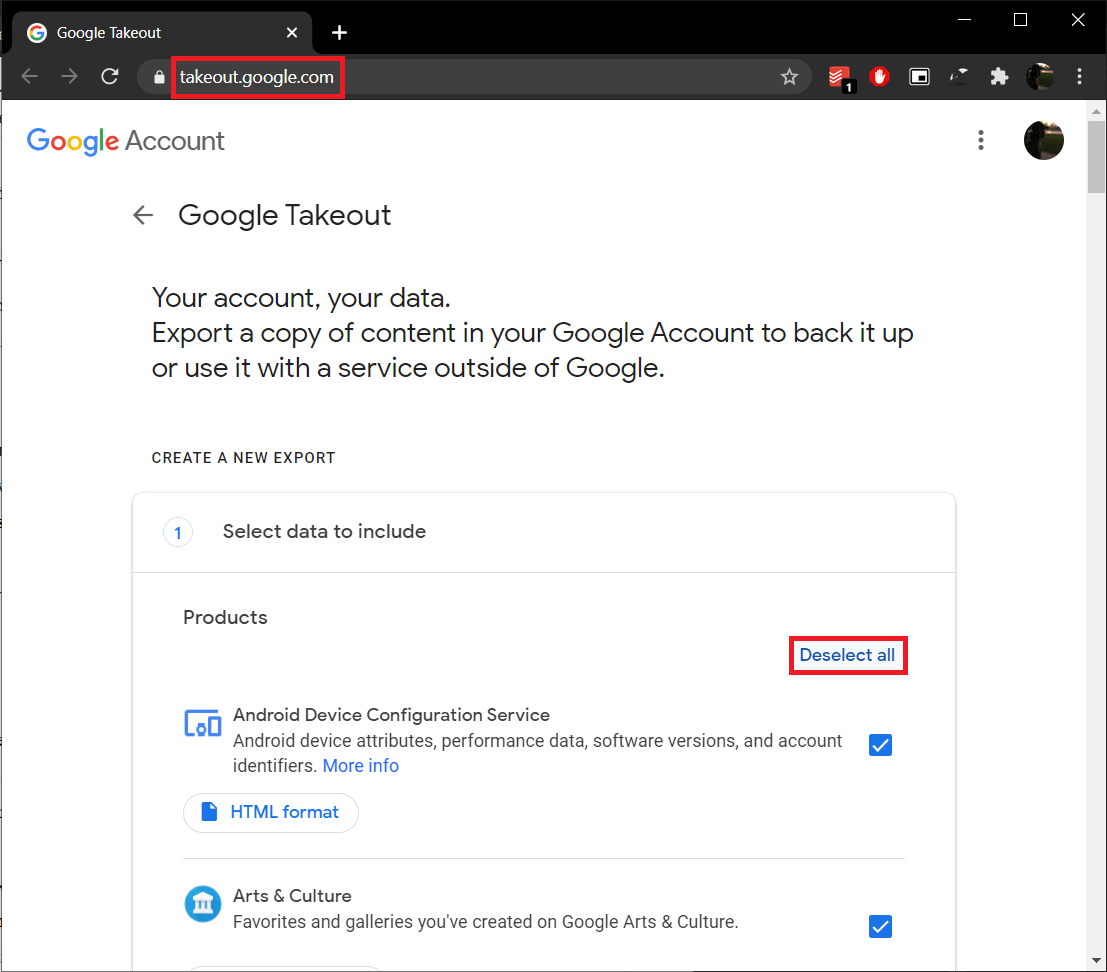
1. First up, ensure you are logged into the google account you wish to download data from. If you are already logged in, type takeout.google.com in the address bar of your browser and press enter.
2. Be default; all your data across Google’s several services and websites will be selected for download. Although, we are only here to download the stuff stored in your Google Drive, so go ahead and click on Deselect all.
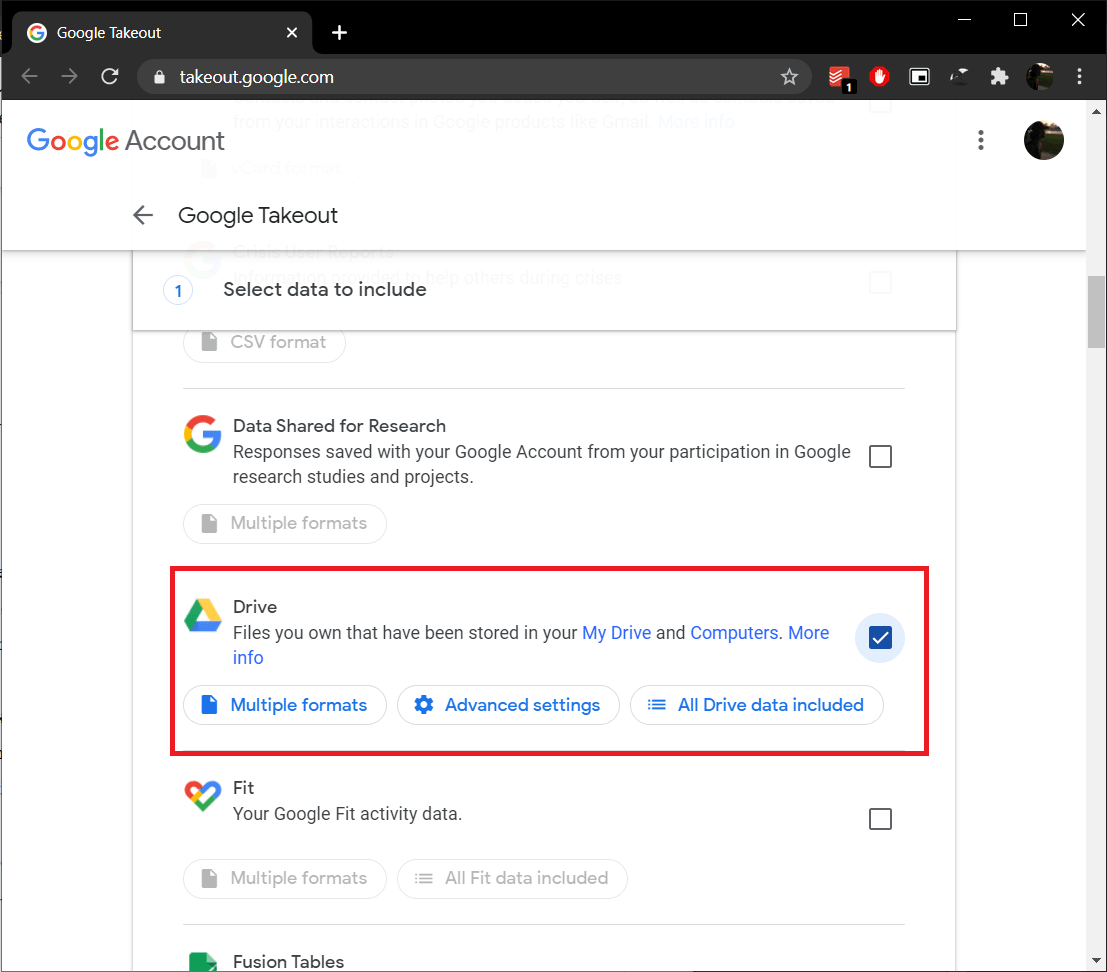
3. Scroll down the webpage until you find Drive and tick the box next to it.
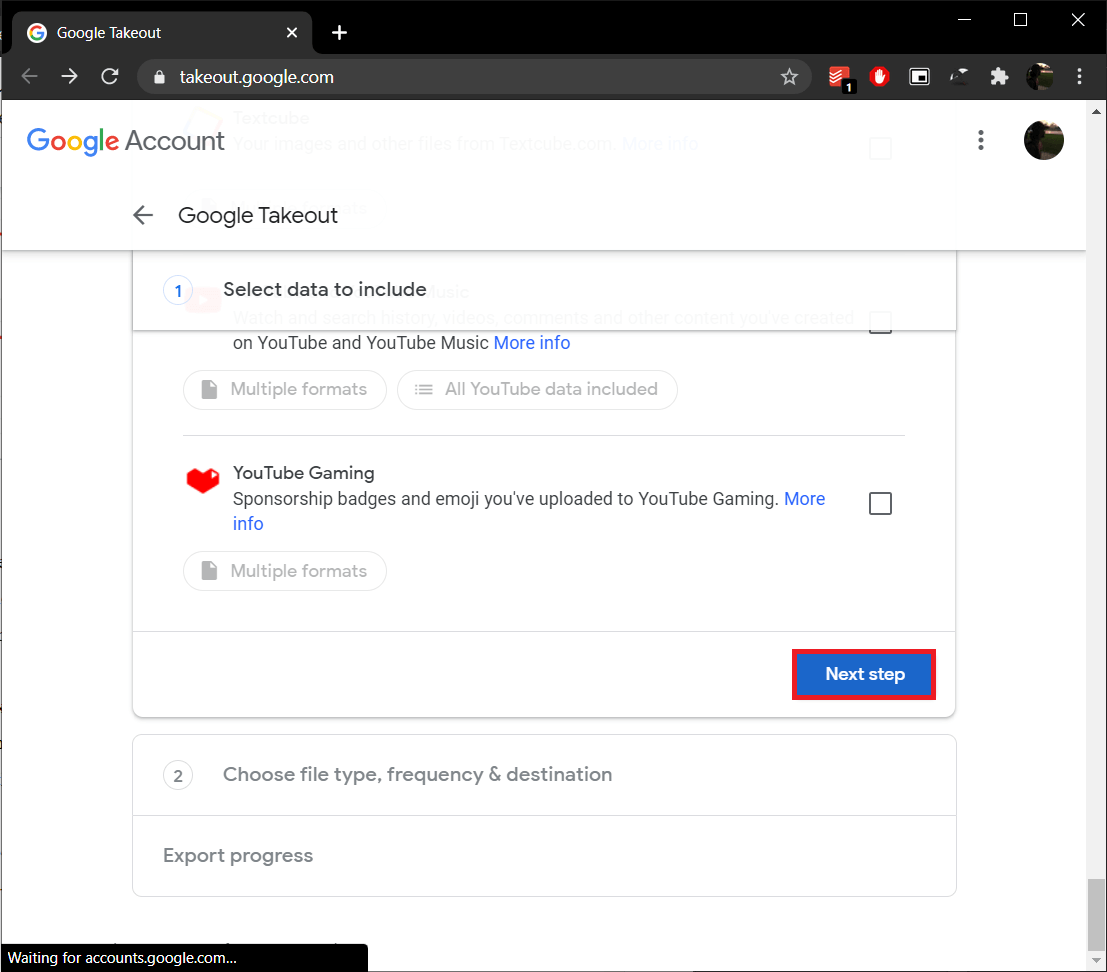
4. Now, scroll down further to the end of the page and click on the Next Step button.
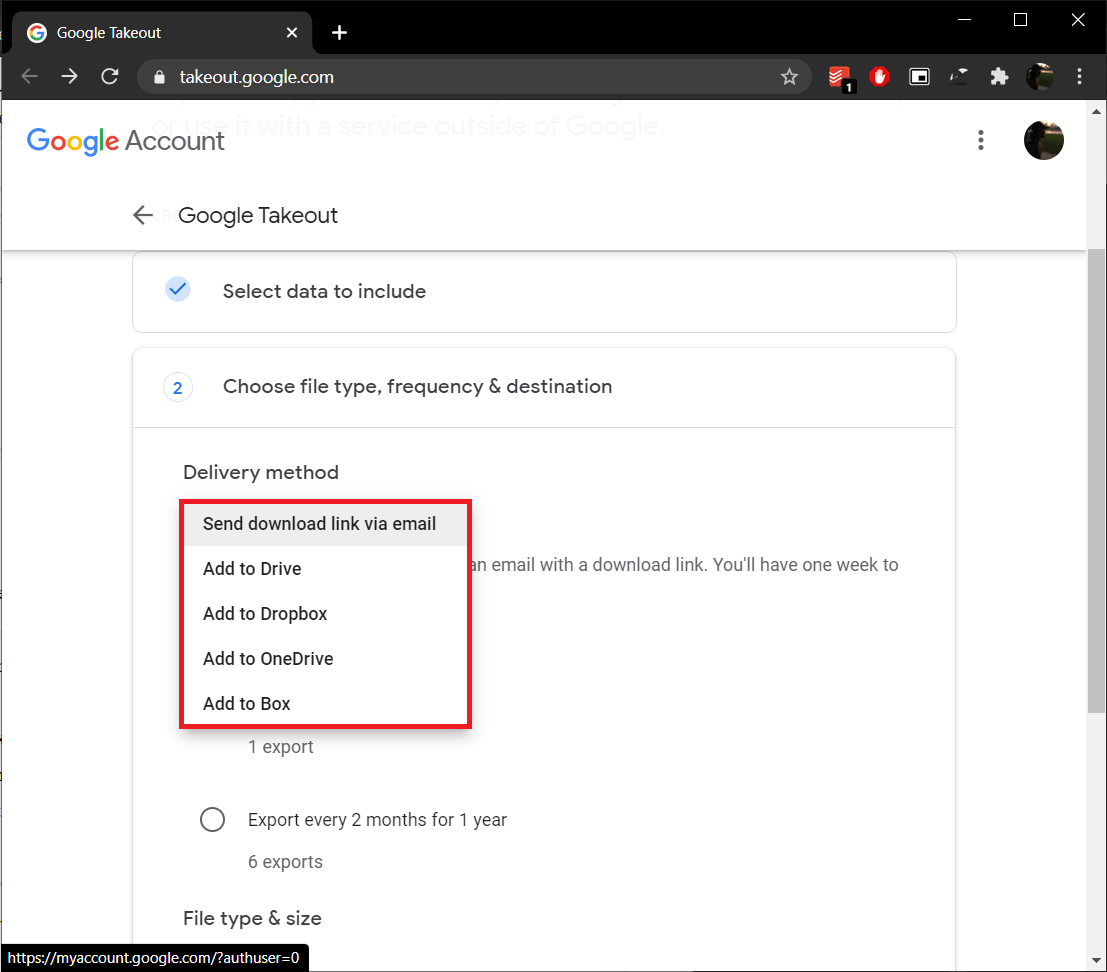
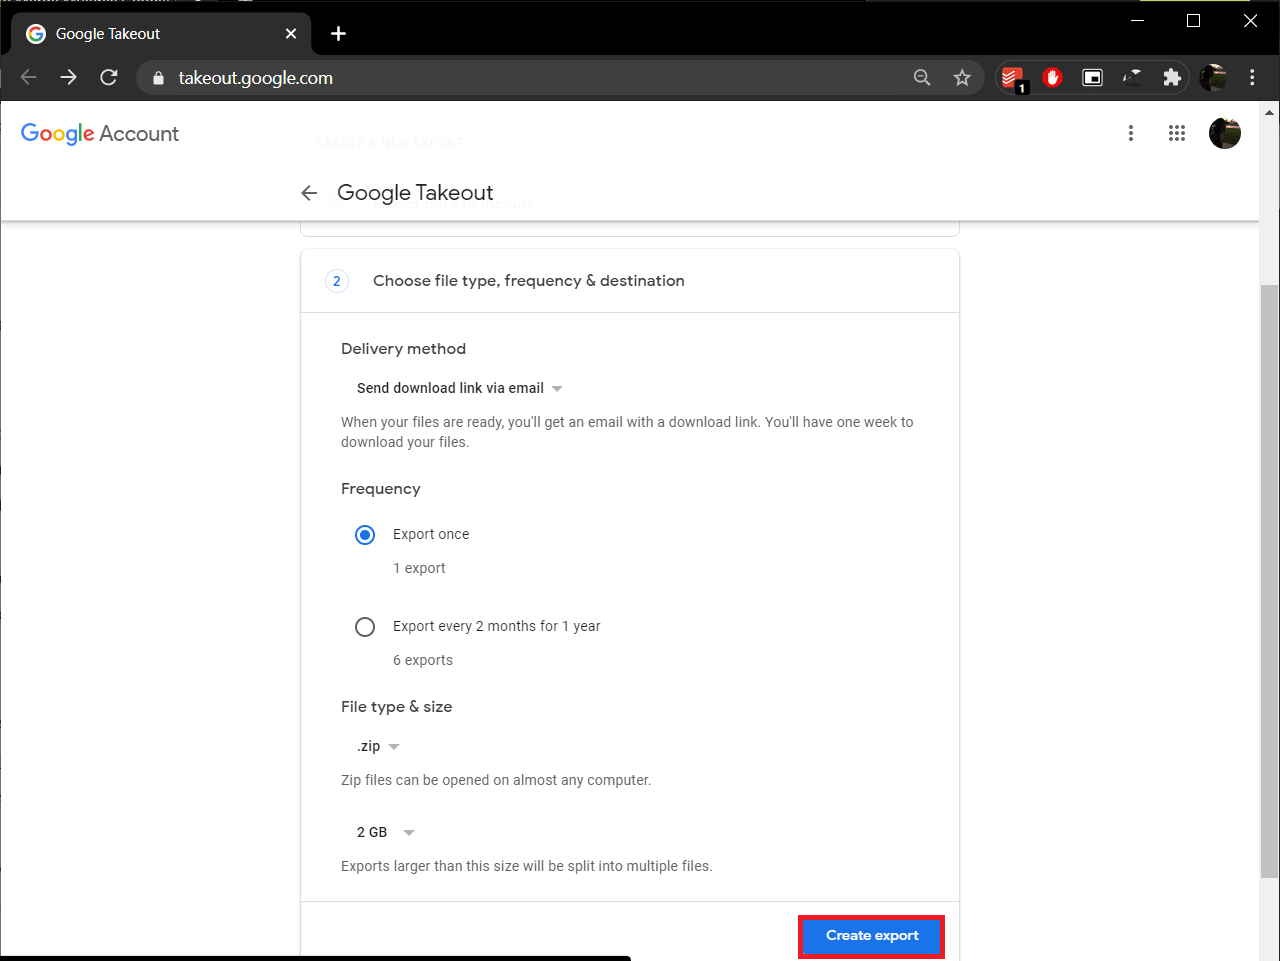
5. First, you will need to select a delivery method. You can either choose to receive an email with a single download link for all your Drive data or add the data as a compressed file to your existing Drive/Dropbox/OneDrive/Box account and receive the file location via an email.
The ‘Send download link via email’ is set as the default delivery method and is also the most convenient one.
Note: The download link will only be active for seven days, and if you fail to download the file within that period, you will have to repeat the entire process all over again.
6. Next, you can choose how often you would like Google to export your Drive data. The two available options are – Export Once and Export every 2 months for a year. Both options are pretty self-explanatory, so go ahead and choose whichever suits your needs the best.
7. Finally, set the backup file type and size according to your preference to finish. “.zip” & “.tgz” are the two available file types, and while .zip files are well-known and can be extracted without using any third-party applications, opening .tgz files on Windows demands the presence of specialized software like 7-Zip.
Note: When setting the file size, downloading large files (10GB or 50GB) requires a stable and high-speed internet connection. You can instead choose to split your Drive data into multiple smaller files (1, 2, or 4GB).
8. Recheck the options you selected in steps 5, 6 & 7, and click on the Create export button to start the exporting process.
Depending on the number and size of files you have stored in your Drive storage, the exporting process may take some time. Leave the takeout web page open and continue with your work. Keep checking your Gmail account for a download link of the archive file. Once you receive it, click on the link and follow the instructions to download all your Drive data.
Follow the above procedure and download data from all the Drive accounts (except the one where everything will be merged) that you wish to consolidate.
Method 2: Set up Backup and Sync from Google
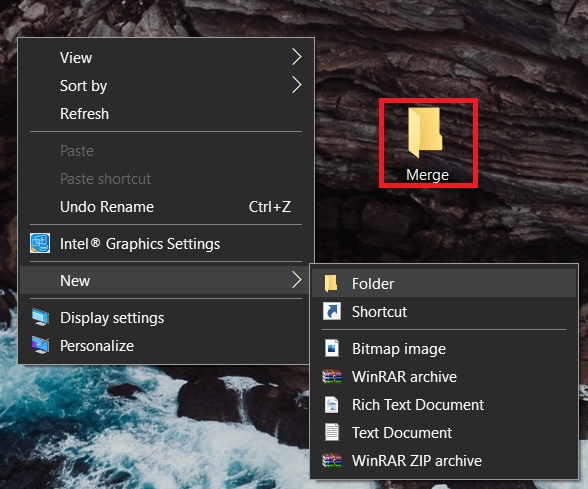
1. Before we set up the backup application, right-click on any blank space on your desktop and select New followed by Folder (or press Ctrl + Shift + N). Name this new folder, ‘Merge’.
2. Now, extract the contents of all the compressed files (Google Drive Data) you downloaded in the previous section to the Merge folder.
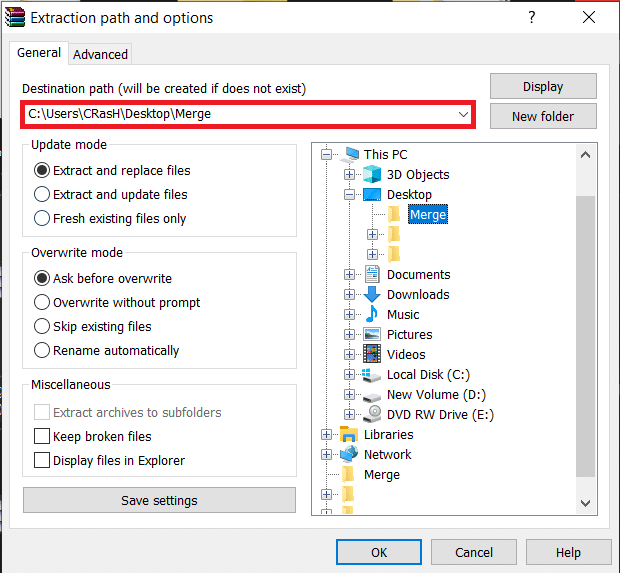
3. To extract, right-click on the compressed file and select the Extract files… option from the ensuing context menu.
4. In the following Extraction path and options window, set the destination path as the Merge folder on your desktop. Click on OK or press Enter to start extracting. Make sure to extract all the compressed files in the Merge folder.
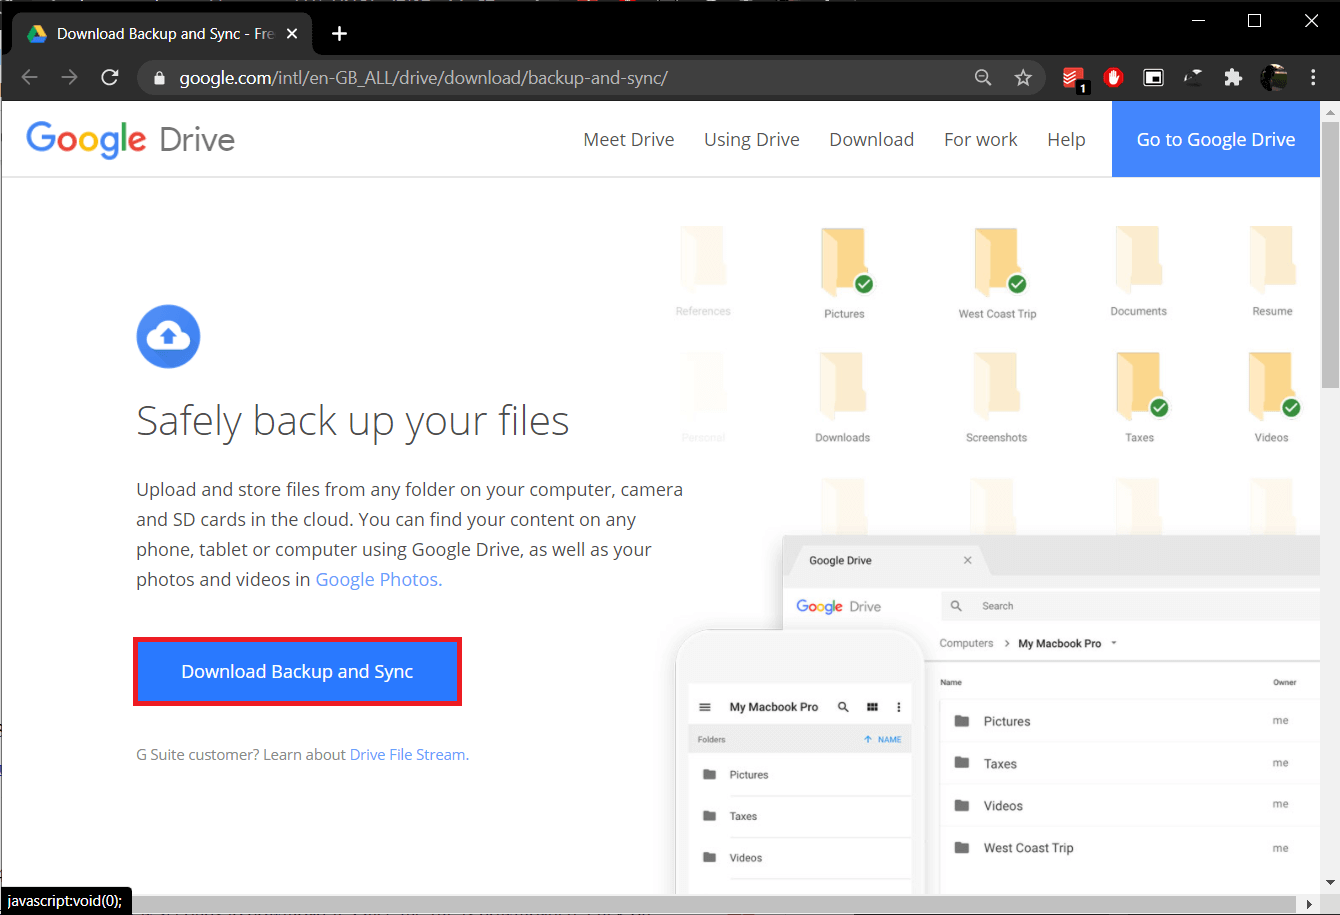
5. Moving on, fire up your preferred web browser, visit the download page for Google’s Backup and Sync – Free Cloud Storage application and click on the Download Backup and Sync button to start downloading.
6. The installation file for Backup and Sync is only 1.28MB in size so it shouldn’t take your browser more than a few seconds to download it. Once the file is downloaded, click on installbackupandsync.exe present in the downloads bar (or the Downloads folder) and follow all the on-screen instructions to install the application.
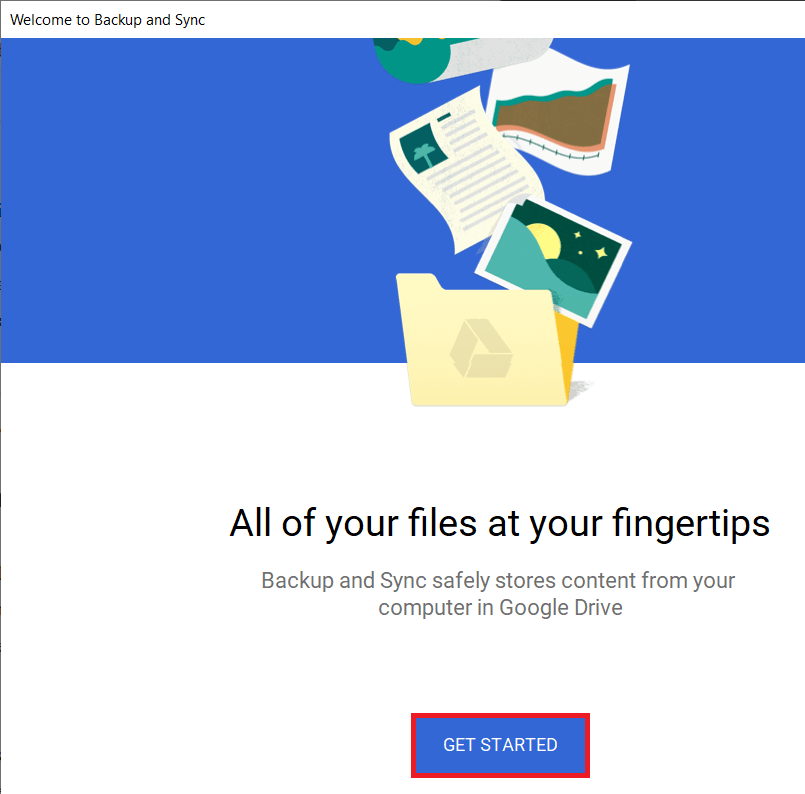
7. Open Backup and Sync from Google once you are done installing it. You will first be greeted by a welcome screen; click on Get Started to continue.
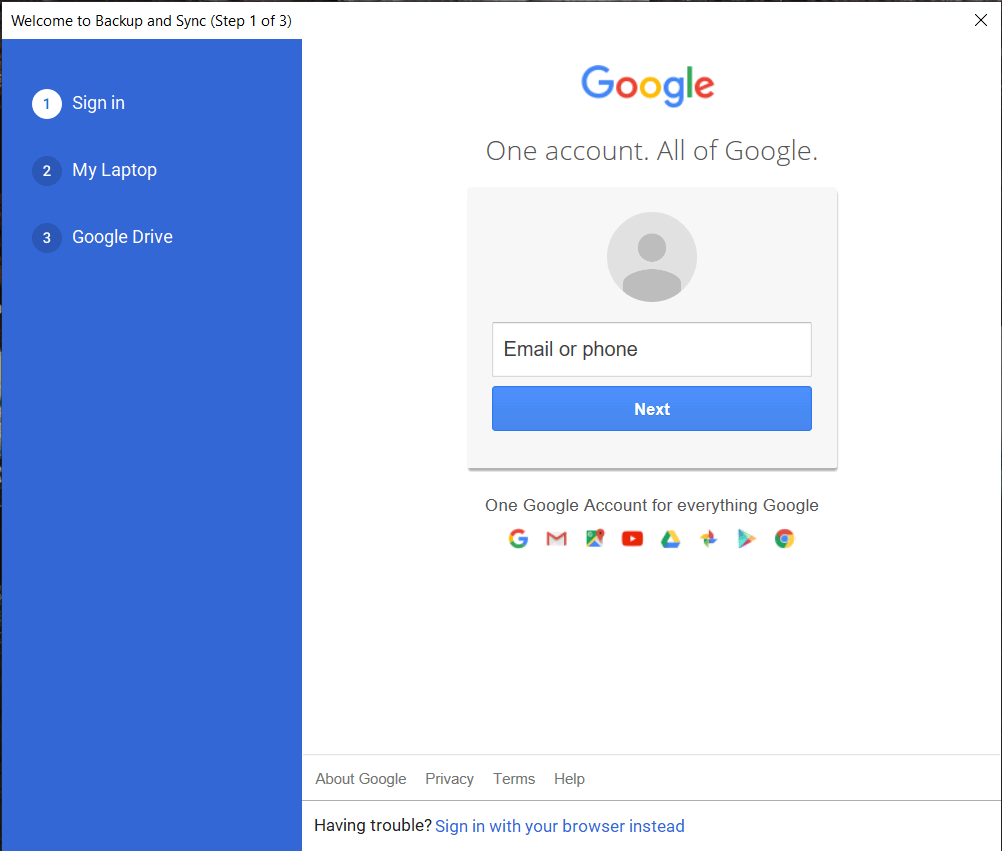
8. Sign in to the Google account you would like to merge all the data into.
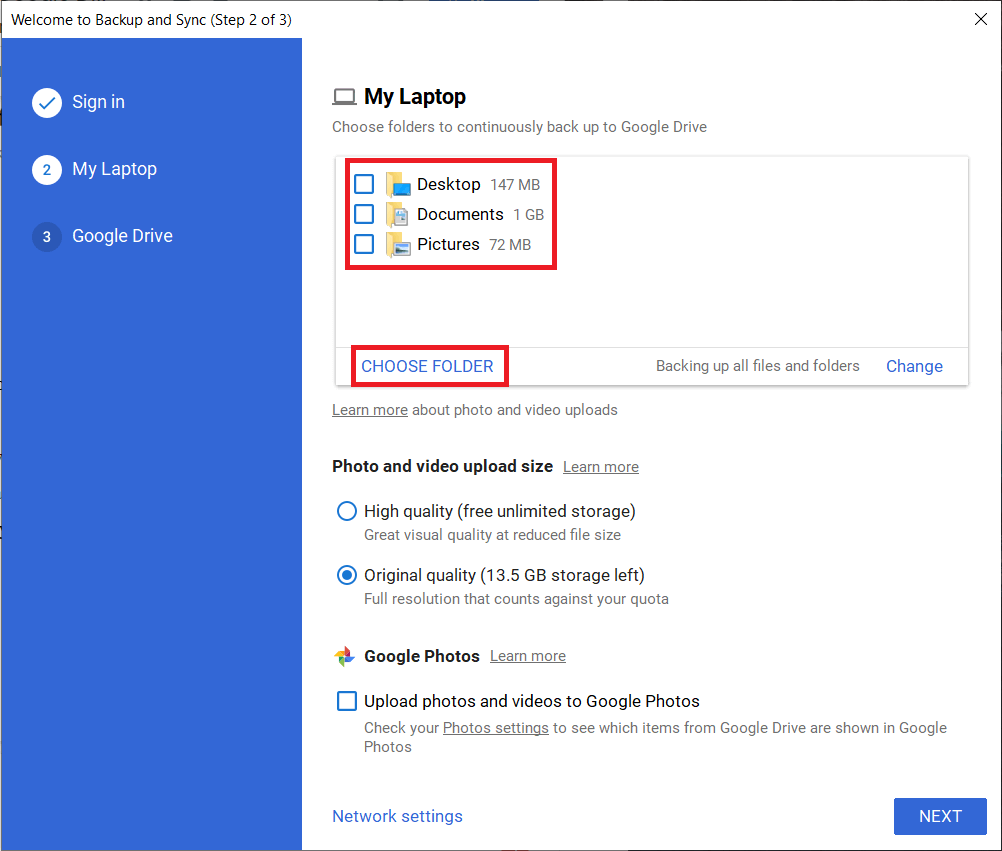
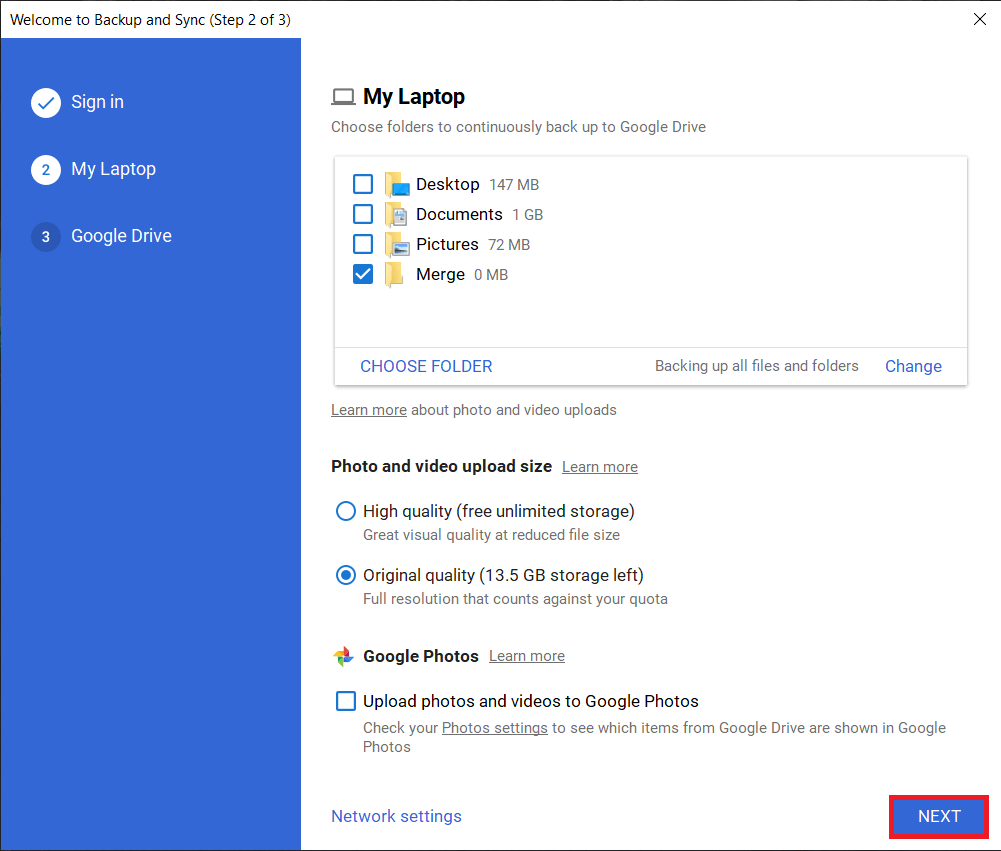
9. On the following screen, you can choose the exact files and folders on your PC to be backed up. By default, the application selects all items on your Desktop, files in the Documents and Pictures folder to continuously backup. Uncheck these items and click on the Choose folder option.
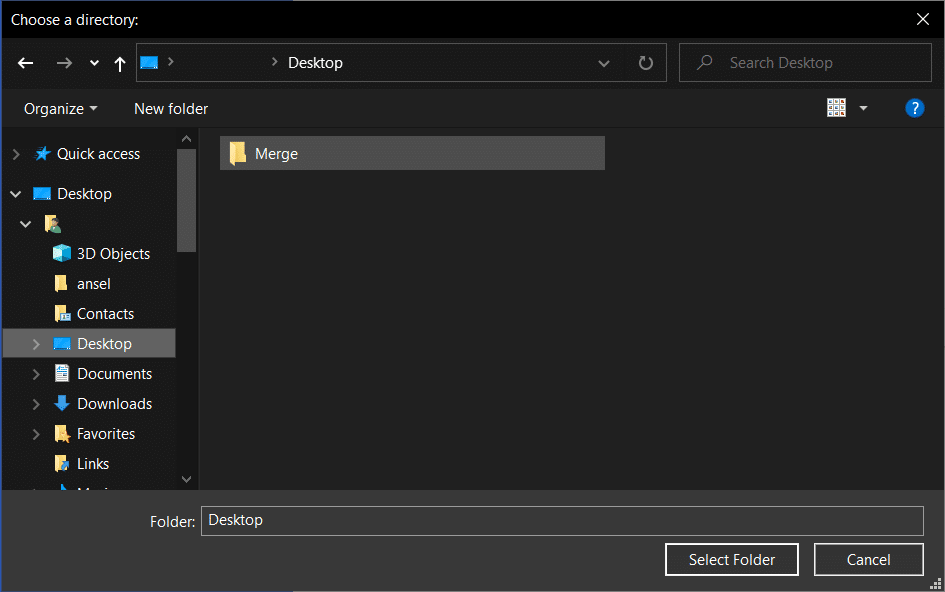
10. In the Choose a directory window that pops up, navigate to the Merge folder on your desktop and select it. The application will take a few seconds to validate the folder.
11. Under the Photo and Video upload size section, select the upload quality according to your preference. Ensure there is enough free storage space on your Drive if you are choosing to upload media files in their original quality. You also have the option to upload them to Google Photos directly. Click on Next to move forward.
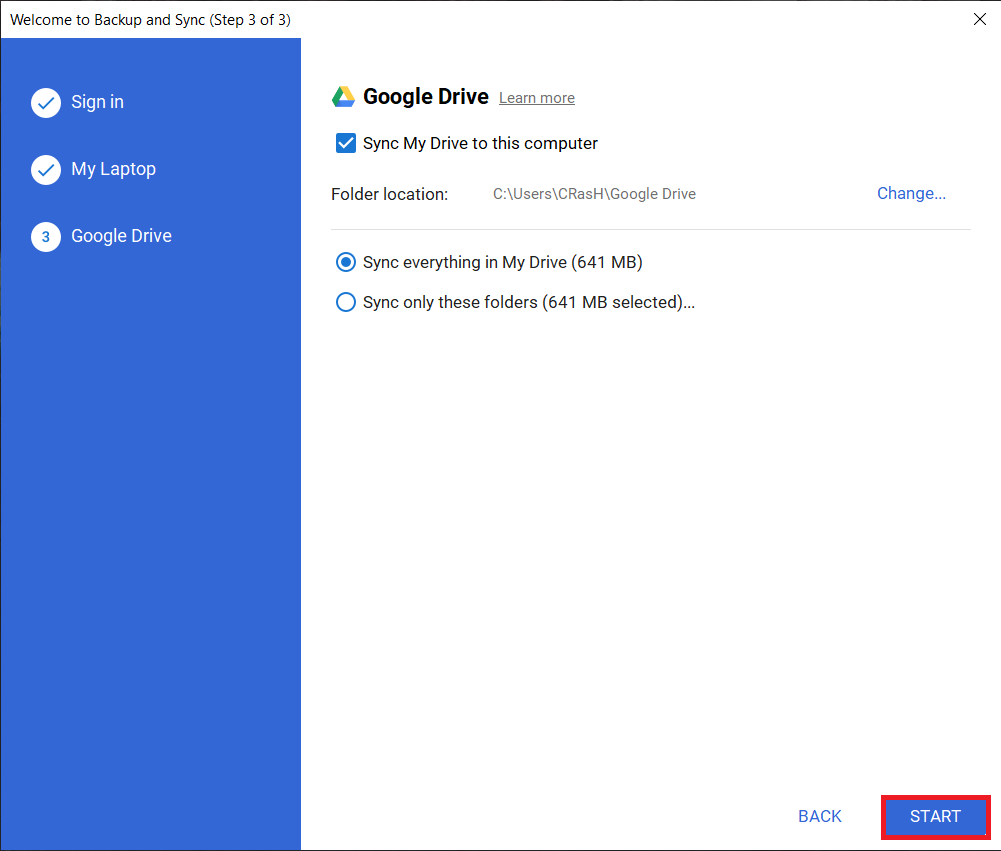
12. In the final window, you can choose to sync the existing contents of your Google Drive with your PC.
13. Ticking the ‘Sync My Drive to this computer’ option will further open up another selection – Sync everything in the drive or a few select folders. Again, please choose an option (and Folder location) according to your preference or leave the Sync My Drive to his computer option unticked.
14. Finally, click on the Start button to commence the backing up process. (Any new content in the Merge folder will be automatically backed up so you can continue to add data from other Drive accounts to this folder.)
Also Read: Restore Apps and Settings to a new Android phone from Google Backup
How to Merge Multiple Google Photos Account
Merging two separate Photo accounts is much easier than merging Drive accounts. Firstly, you won’t need to download all your pictures and videos so you can relax, and second, Photos accounts can be merged right from the mobile application itself (If you do not have it already, visit Photos App downloads). This is made possible by the ‘Partner sharing’ feature, which allows you to share your entire library with another Google account, and then you can merge by saving this shared library.
1. Either open the Photos application on your phone or https://photos.google.com/ on your desktop browser.
2. Open Photos Settings by clicking on the gear icon present at the top-right corner of your screen. (To access Photos settings on your phone, first, click on your profile icon and then on Photos settings)
3. Locate and click on the Partner Sharing (or Shared libraries) settings.
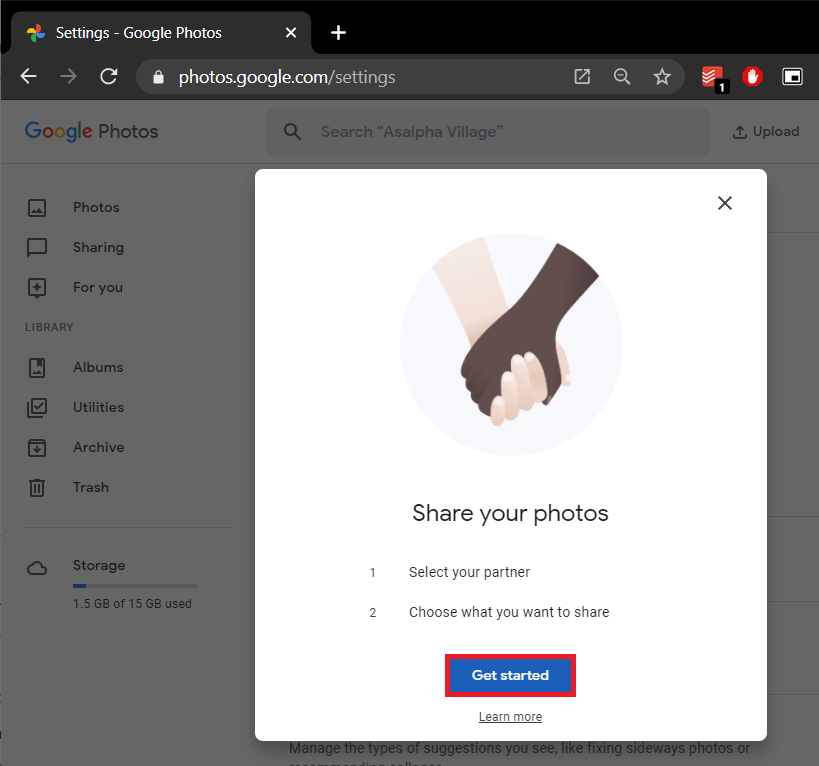
4. In the following pop-up, click on Learn more if you would like to read Google’s official documentation on the feature or Get started to continue.
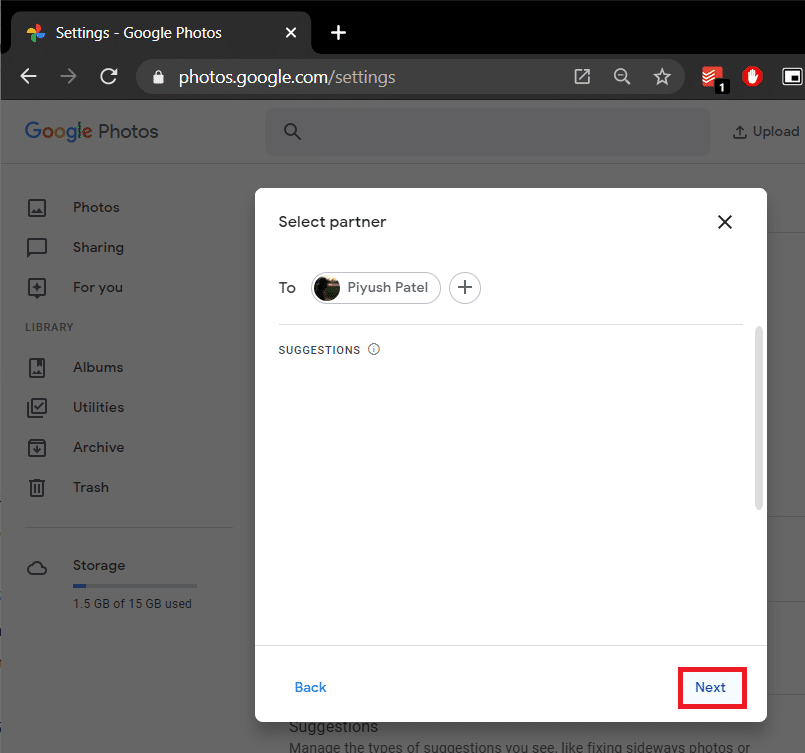
5. If you frequently send emails to your alternate account, you can find it in the Suggestions list itself. Although, if that is not the case, enter the email address manually and click on Next.
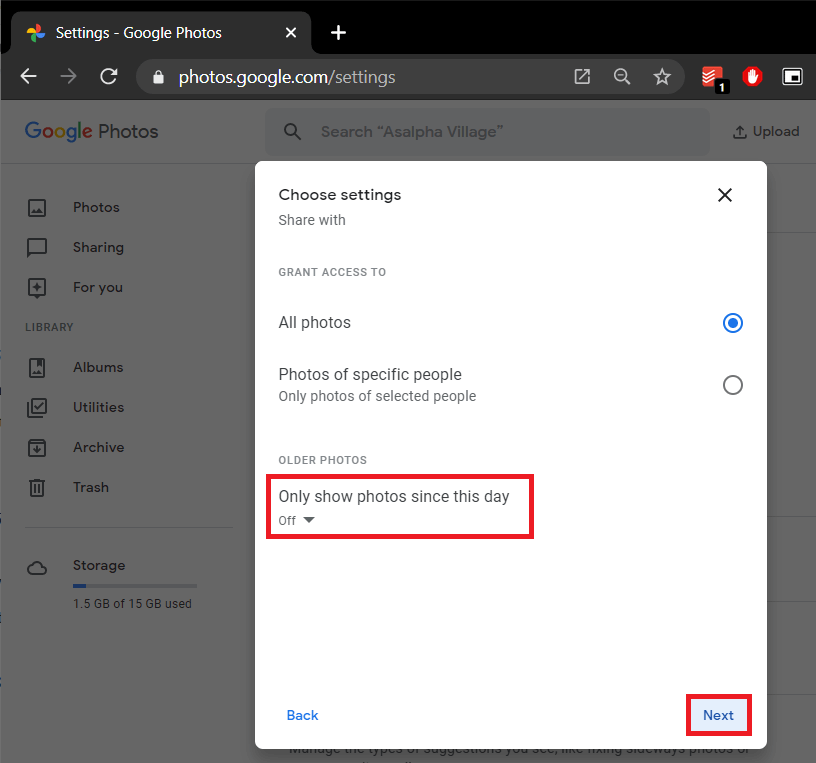
6. You can either choose to share all photos or only the ones of a particular person. For merging purposes, we will need to select All photos. Also, ensure that the ‘Only show photos since this day option’ is off and click on Next.
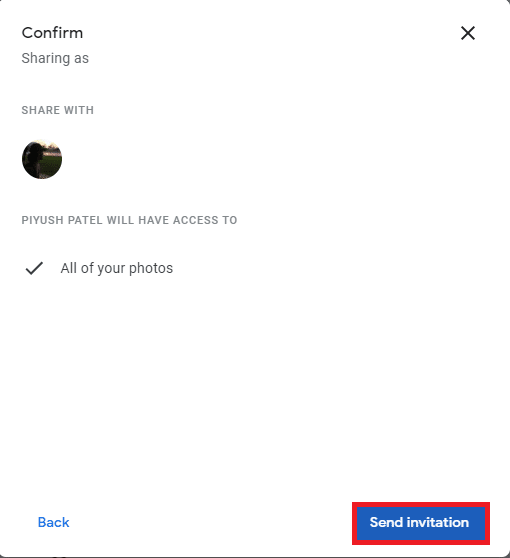
7. On the final screen, recheck your selection and click on Send invitation.
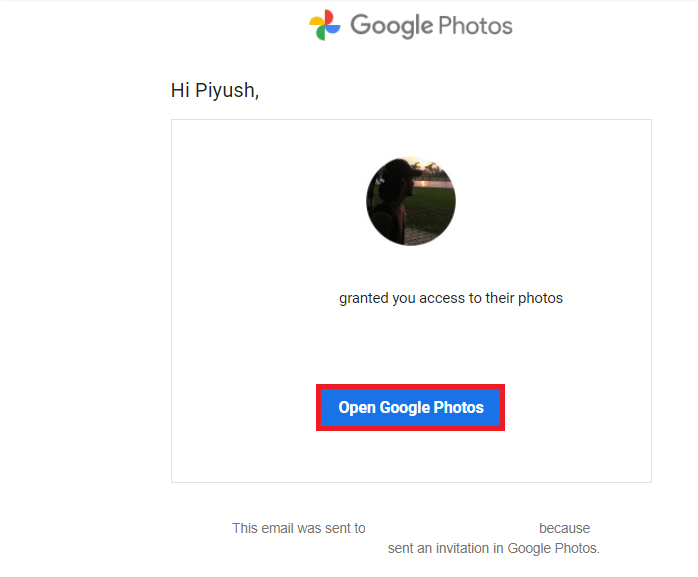
8. Check the mailbox of the account you just sent the invitation to. Open the invitation mail and click on Open Google Photos .
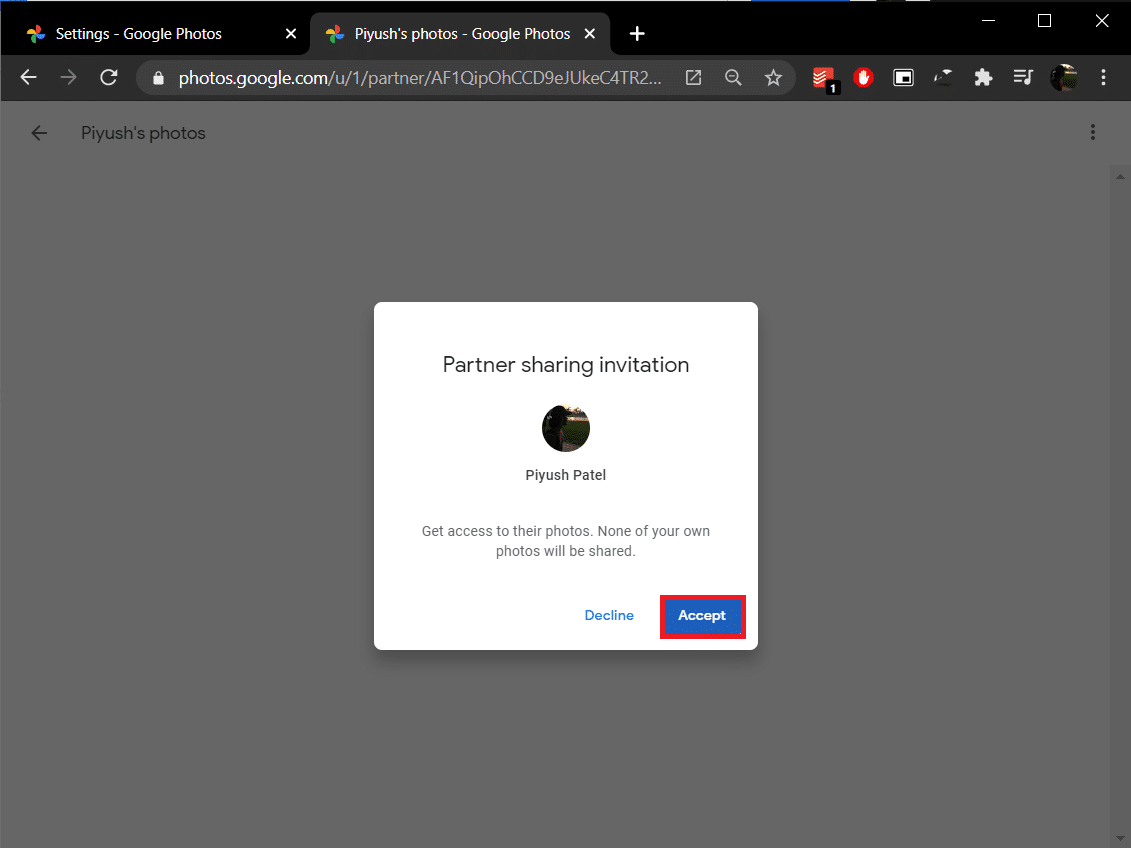
9. Click on Accept in the following pop up to view all the shared photos.
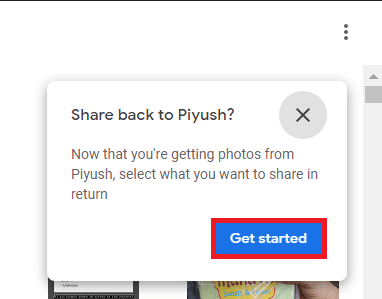
10. In a few seconds, you will receive a ‘Share back to <name>’ pop up at the top-right, inquiring whether you would like to share the photos of this account with the other one. Confirm by clicking on Getting Started.
11. Again, choose the photos to be shared, set the ‘Only show photos since this day option’ to off, and send the invitation.
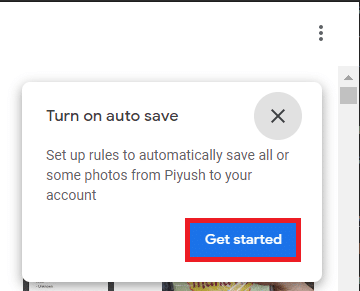
12. On the ‘Turn on autosave’ pop up that follows, click on Get Started.
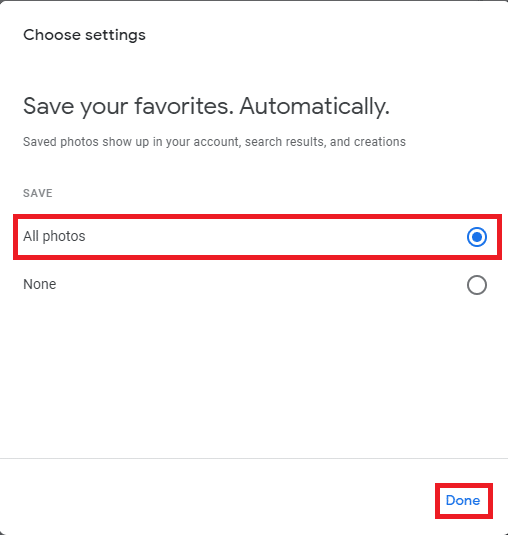
13. Choose to save All photos to your library and click on Done to merge the content across the two accounts.
14. Also, open the original account (the one that is sharing its library) and accept the invitation sent in step 10. Repeat the procedure (steps 11 and 12) if you would like access to all your photos on both accounts.
Recommended:
Let us know if you are facing any difficulties merging your Google Drive & Photos accounts using the above procedures in the comment section below, and we will get back to you ASAP.
