- in Windows 10 by Admin
What is USB Selective Suspend on Windows 10 and How to Disable It
Windows 10 has several built-in features that reduce power consumption. There’s a system-wide Battery Saver, a Power troubleshooter, USB selective suspend, and more. These features help to extend the battery life of your Windows PC.
In this explainer, we’ll walk you through the intricacies behind “USB selective suspend,” what it does on your Windows computer, and how to disable the feature if it ever poses a problem.
What is USB Selective Suspend?
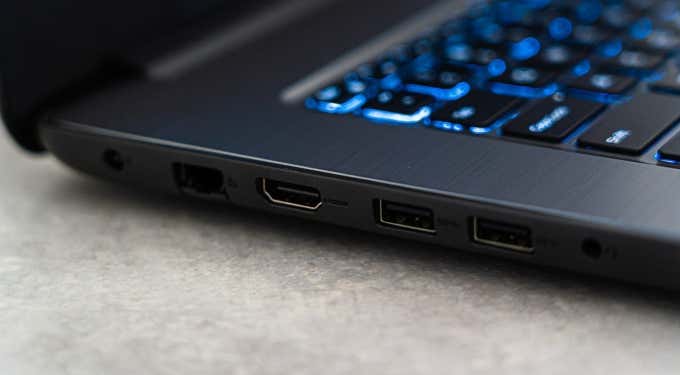
Many external devices, accessories, and peripherals draw power from your PC when you plug them into a USB port. If your computer runs on battery power, these external devices will deplete your battery faster than usual. That’s why Windows temporarily suspends idle USB devices to conserve battery power.
Say, for example, there’s a USB fingerprint reader connected to your computer, and you haven’t used it for over an hour. Windows may suspend the device and put it in a “low power state” where it consumes very little battery power. Think of it as Windows hibernating or putting your USB device to sleep. If you have several devices connected to your PC, Windows will only suspend the idle USB devices and ports.
USB selectively hibernates passive USB devices to save battery power. That’s all there is to the feature. Refer to this official Microsoft documentation to learn more about the feature.
Problems Associated With USB Selective Suspend
As described above, it’s clear that USB selective suspend has immense benefits on your PC’s battery life. However, there are instances when the setting causes some USB devices to freeze or become unresponsive—mainly when your PC stays idle for too long.
USB selective suspend is enabled by default on all Windows devices. While we recommend leaving USB selective suspend enabled on your battery-powered computer, you should disable the feature if you’re having USB-related troubles. Say, for instance, your USB drive stopped showing up in the File Explorer. Or, your Windows PC won’t detect a USB keyboard/mouse.
How to Disable USB Selective Suspend on Windows 10
Disabling USB selective suspend is an effective troubleshooting solution that can resolve the mentioned USB-related issues. There are always several ways to get this done.
In the sections below, we’ll show you how to disable USB selective suspend from the Control Panel, Device Manager, or by using the Command Prompt.
Disable USB Selective Suspend From the Control Panel
One way to prevent your PC from temporarily suspending USB devices is to edit the Windows power settings. Follow the steps below for direction.
1. Launch the Windows Control Panel and set the “View by” option to Category.
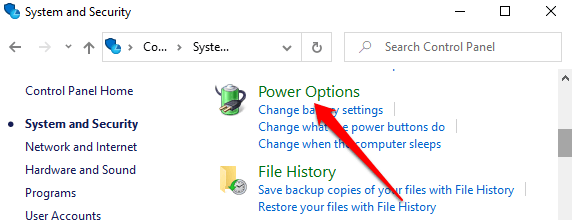
2. Open the System and Security menu and select Power Options.
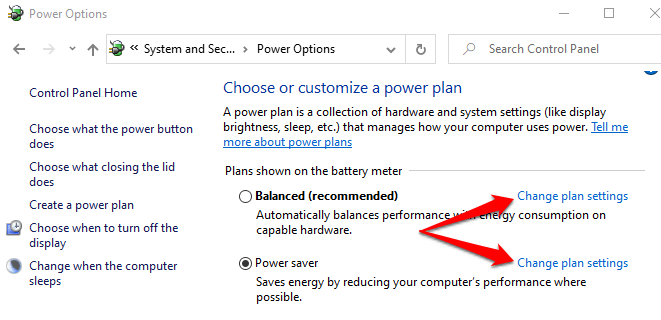
3. Select the Change plan settings option next to your current power plan — Balanced or Power Saver or High Performance.
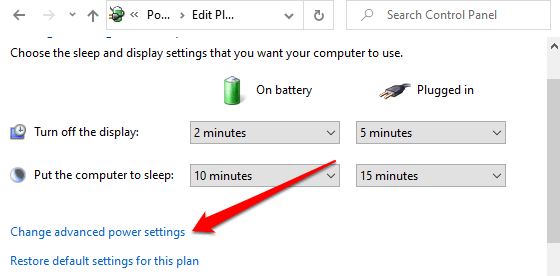
4. Select Change advanced power settings. That will open a new “Power Options” window.
5. Expand the USB Settings section and double-click USB selective suspend setting.
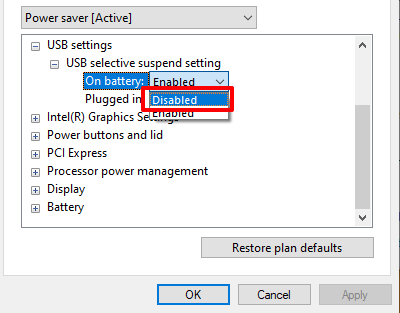
If you’re using a laptop or tablet, you’ll find two options in the USB selective suspend settings: “On Battery” and “Plugged In.” Ideally, you’d only want to enable the feature when your PC is on battery power—since USB selective suspend is designed to extend battery life. However, Windows hands you the liberty to disable USB selective suspend for both power options.
6. Double-click the Enabled option next to the power plan you want to customize (“On battery” or “Plugged in”) and select Disabled.
7. Select Apply and then OK to save the new USB selective suspend setting.
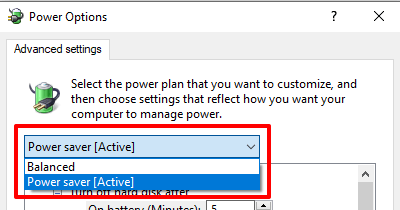
Note that the USB selective suspend configuration is unique to your current/preferred power plan. If you switch plans (say from “Balanced” to “Power saver”), you’ll need to repeat these steps and disable USB selective suspend for the new battery plan.
Quick Tip: You can change the USB selective suspend setting for another power plan without going back to the Control Panel. Click the drop-down button showing the “Active” plan, select another power plan, and expand the USB settings section and proceed to disable USB selective suspend.
From the Device Manager
You can also disable USB selective suspend by modifying the power management setting of the drivers powering your PC’s USB ports. Here’s what you need to do:
1. Right-click the Start icon and select Device Manager on the Quick Access menu.
2. Expand the Universal Serial Bus controllers section, right-click any of the “Generic USB Hub” or “USB Root Hub” drivers, and select Properties.
Note: The “USB Root Hub” manages your PC’s USB ports for compatibility with low and high-speed devices/connections. On the other hand, “Generic USB Hub” powers USB hub devices and accessories.
3. Go to the Power Management tab and deselect “Allow the computer to turn off this device to save power.”
4. Finally, select OK to save the setting. Repeat these steps for all relevant USB drivers on your computer.
Disable USB Selective Suspend Using Command Prompt
The Command Prompt is a tool that you can use to perform a wide range of operations. By entering specific command lines in the tool, you can modify system configurations, repair corrupt files, adjust power management settings, and lots more.
We’ll show you how to disable USB selective suspend.
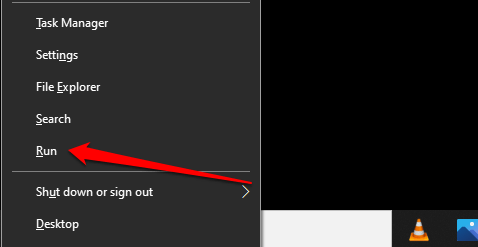
1. Right-click the Start menu and select Run, or use the Windows key + R shortcut.
2. Type or paste the command below in the Command Prompt console and press Enter.
powercfg /SETACVALUEINDEX SCHEME_CURRENT 2a737441-1930-4402-8d77-b2bebba308a3 48e6b7a6-50f5-4782-a5d4-53bb8f07e226 0
Reconnect the problematic USB device to your computer and check if it now works correctly.
More Troubleshooting Techniques
Are you still having problems using USB devices? Or, does your PC not disable USB selective suspend despite trying the methods mentioned above? Restart your computer and check if that changes anything. Windows may also fail to recognize a USB device that’s loosely plugged into your computer. Hence, ensure you fit the device tightly into the US port—or use another USB port.
If the issue persists, there could be a problem with your USB drivers. Open the Windows Device Manager and update your PC’s USB drivers. Conversely, rolling back the USB drivers to a previous version may also fix the problem.
