Why is My Mac Internet So Slow All of a Sudden?

Wi-Fi is one of the most important utilities while using any device i.e. your iPhone, iPad, or MacBook as it allows you to remain connected with everyone, instantly. Almost every application nowadays requires an internet connection. That is why a proper Wi-Fi connection should always be ensured on all devices. However, Wi-Fi may not work properly sometimes and would directly contribute to hindrance in your routine work on your MacBook. In this article, we have answered the question: Why is my Mac internet so slow all of a sudden. So, scroll down to learn how to speed up Wi-Fi on Mac.
Why is My Mac Internet So Slow all of a sudden?
- Outdated Network Settings: When you haven’t updated your MacBook for a very long time, your Wi-Fi connection may get affected. It is so because, in newer versions, several network-related fixes revamp the network setting from time to time. In the absence of these updates, the network settings may become outdated, which may contribute to Mac’s slow Wi-Fi issue.
- Distance: One of the most common reasons for Mac slow Wi-Fi is the distance of your Mac from the Wi-Fi router. Make sure that your device is placed closer to the Wi-Fi router to speed up Wi-Fi on Mac.
- Plan settings: Another reason why your Wi-Fi may not be functioning at high speeds is because of your network plan. Contact your internet service provider to inquire about the same.
Let us now take a look at all possible ways which you can implement to fix Mac slow Wi-Fi issue.
Method 1: Use an Ethernet Cable
Using an Ethernet cable instead of a wireless connection proves to be a lot better in terms of speed. This is because:
- Wi-Fi tends to slow down its speed because of attenuation, signal loss, & congestion.
- Moreover, Wi-Fi hotspots with the same frequency as your Wi-Fi router also tend to interfere with the available bandwidth.
This is especially, true for people who live in apartments since there are too many Wi-Fi routers in nearby flats too. Therefore, plugging your MacBook into the modem may help speed up Wi-Fi on Mac.
Method 2: Move the Router Closer
If you don’t wish to use the cable, make sure that the Wi-Fi router is kept close to your MacBook. You can do the following to fix the issue:
- Place your internet router in the center of the room.
- Check the aerials of the router. Make sure that they are pointing in the right direction.
- Avoid using Wi-Fi from a different room since it tends to impede the connection significantly.
- Upgrade your Wi-Fi router as the latest models support high-speed internet and provide a wider range.
Method 3: Reset your Wi-Fi Router
Another alternative to resetting the default Wi-Fi is resetting the Wi-Fi router itself. Doing so refreshes the internet connection and helps speed up Wi-Fi on Mac.
1. Press the RESET button on your Wi-Fi modem and hold it for 30 seconds.
2. The DNS light should blink for a few seconds and then, get stable again.
You can now connect your MacBook to Wi-Fi to check if the problem has been resolved.
Also Read: Xfinity Router Login: How to Login to a Comcast Xfinity Router
Method 4: Switch to Faster ISP
As mentioned earlier, Mac slow Wi-Fi could be because of your ISP norms. Even if you have the best kit at your home, you won’t get high-speed internet, if you resort to low MBPS connections. Therefore, try the following:
- Buy a premium package of Wi-Fi from the service provider.
- Upgrade your existing plan to the one that provides better speeds.
- Switch to another ISP, for better speed at an affordable price.
Method 5: Enable Wireless Security
If you have a plan with specific limits, the chances are that your Wi-Fi is being stolen. To avoid this freeloading, turn on the security of your Wi-Fi connection. This will ensure that no one else is using your Wi-Fi without your permission. The most common settings to protect your Wi-Fi are in the form of WPA, WPA2, WEP, etc. Out of all these settings, WPA2-PSK provides the most decent level of security. Choose a strong password so that random people cannot guess it.
Method 6: Close Unnecessary Apps and Tabs
Often, the answer to why is my Mac internet so slow all of a sudden is unnecessary applications functioning in the background. These applications and tabs on your browser keep downloading unnecessary data, thereby causing Mac slow Wi-Fi issue. Here’s how you can speed up Wi-Fi on Mac:
- Close all applications and websites such as Facebook, Twitter, Mail, Skype, Safari, etc.
- Disable Auto-Update in case, it is already enabled.
- Turn-off Auto-Sync to iCloud: The recent introduction of iCloud on MacBook is also responsible for significant utilization of Wi-Fi bandwidth.
Also Read: How to Force Quit Mac Applications With the Keyboard Shortcut
Method 7: Remove Existing Wi-Fi Preference
Another alternative to speed up Wi-Fi on Mac is to remove pre-existing Wi-Fi preferences. Follow the given steps to do so:
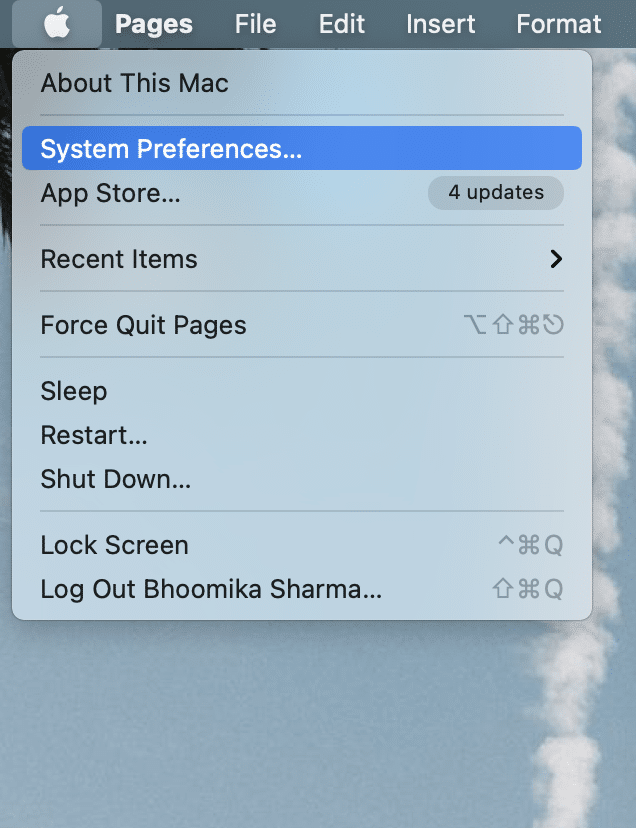
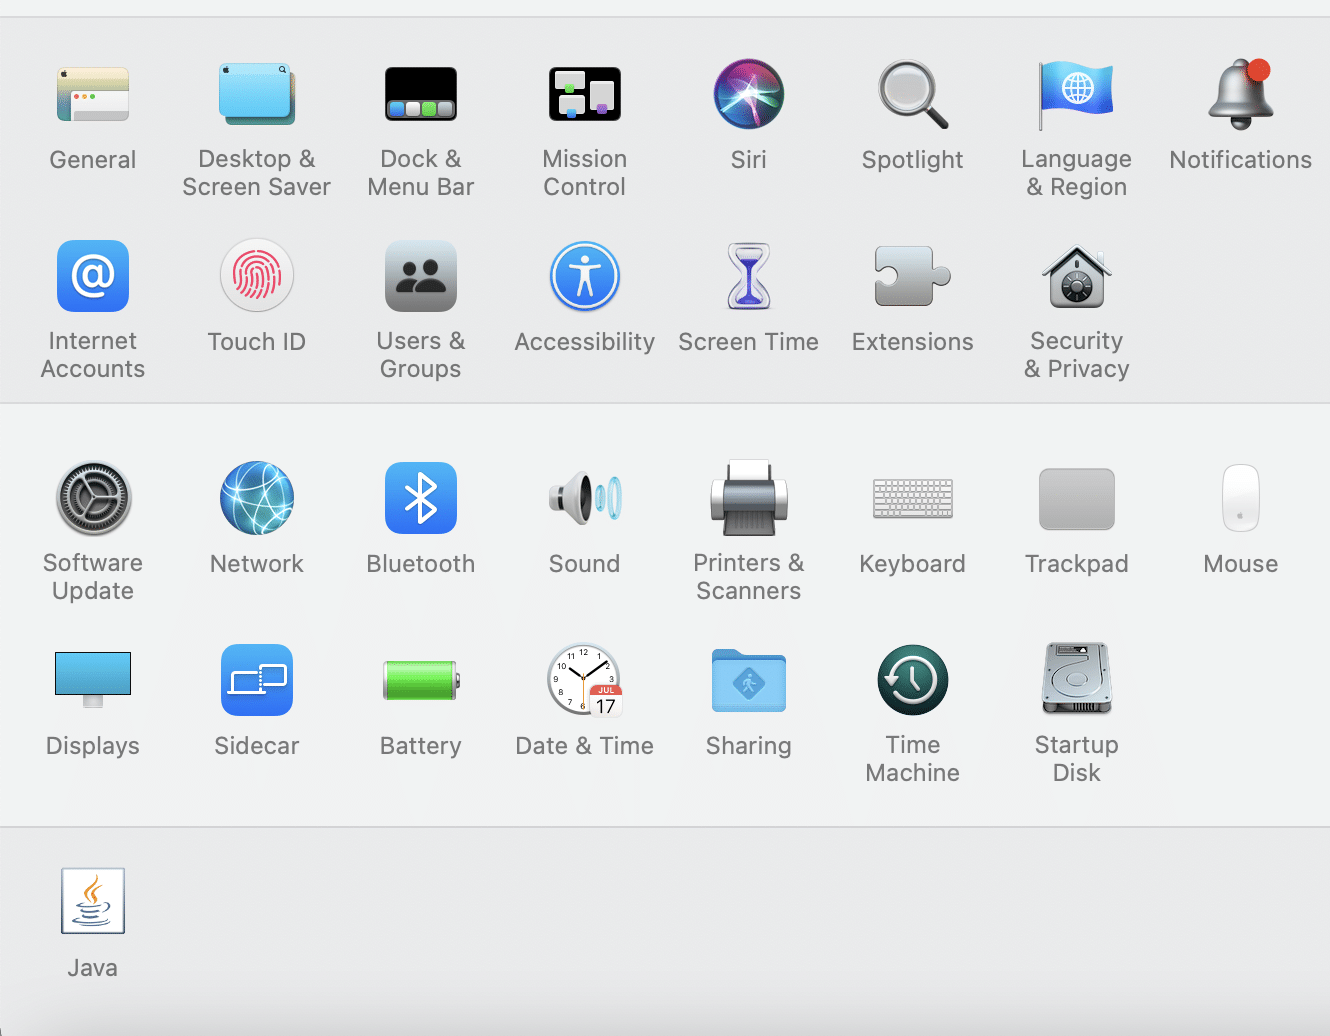
1. Click on System Preferences from the Apple menu.
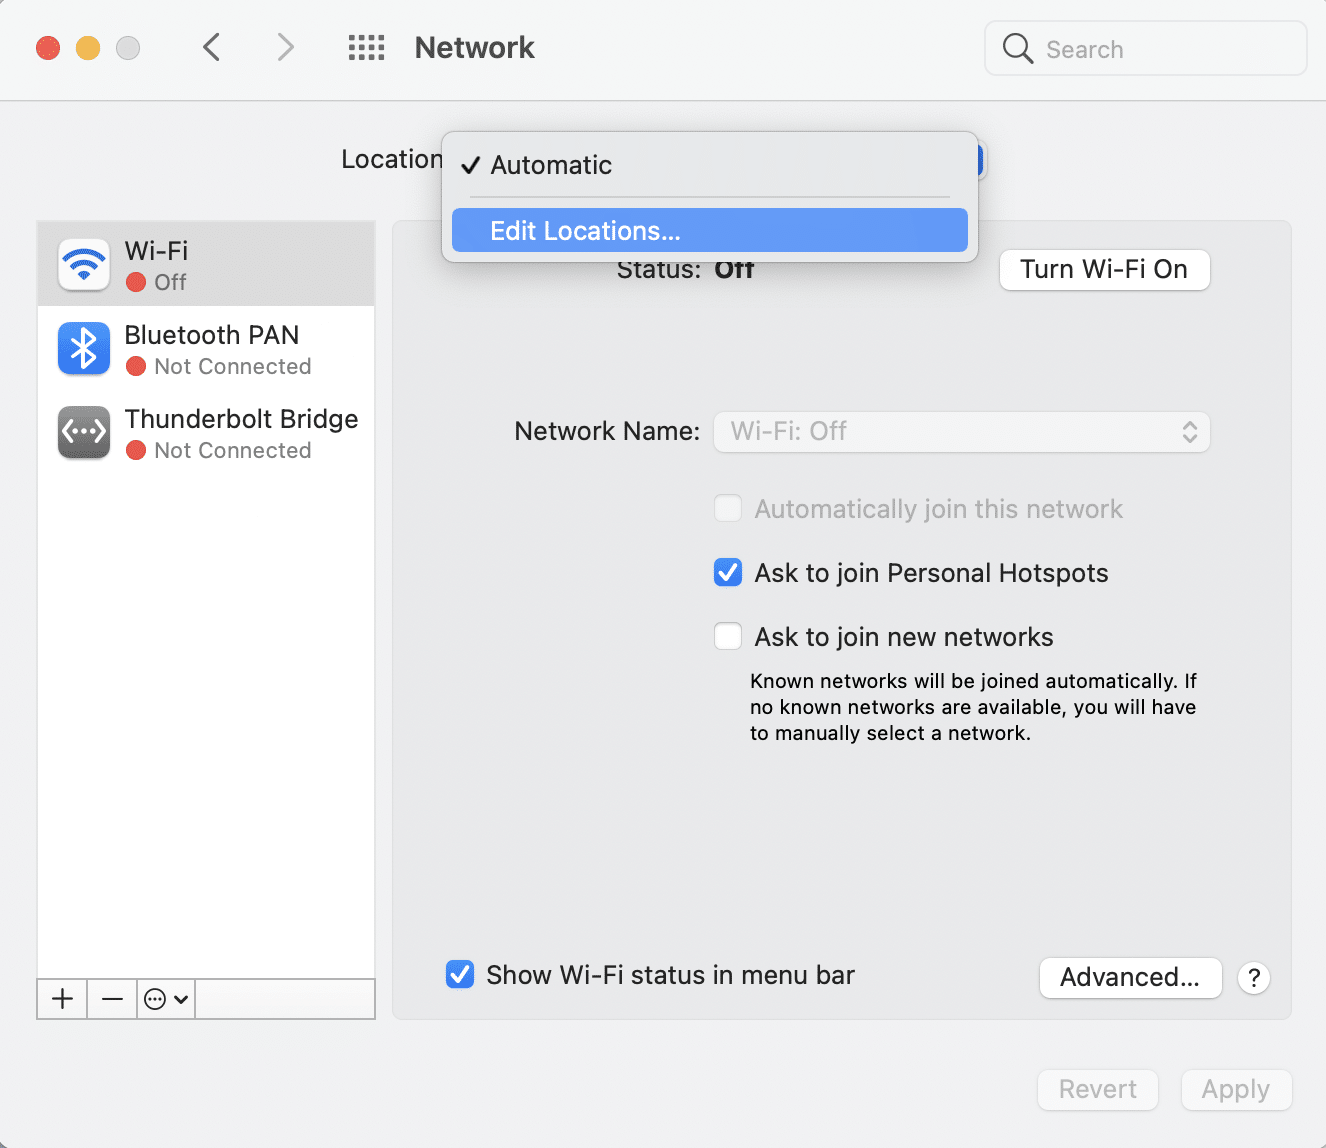
2. Select Network. On the left panel, click on the network that you would like to connect to.
3. Click on the Location drop-down menu and select Edit Locations…
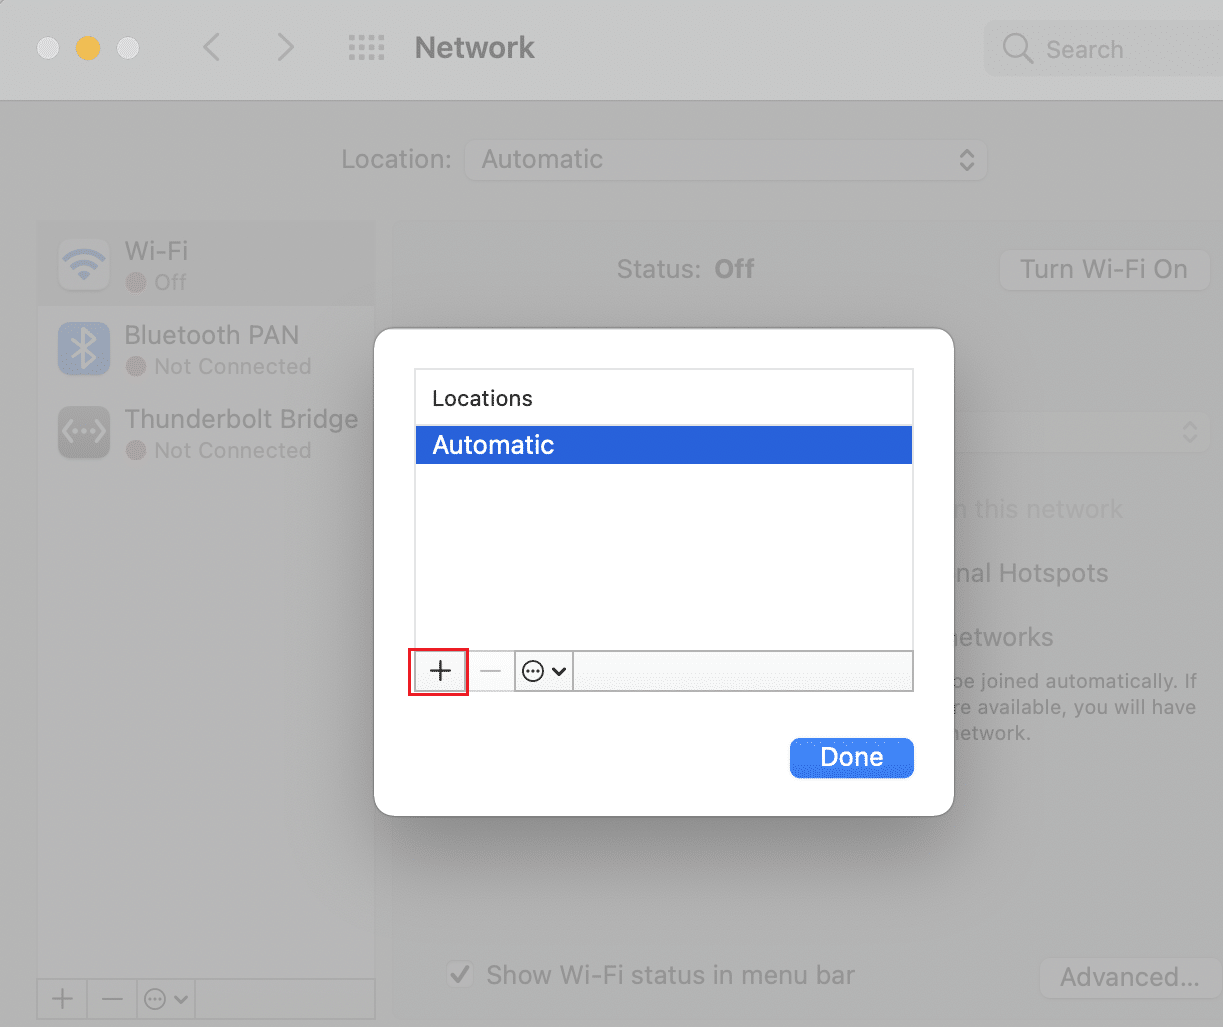
4. Now click on the (plus) + sign to create a new location.
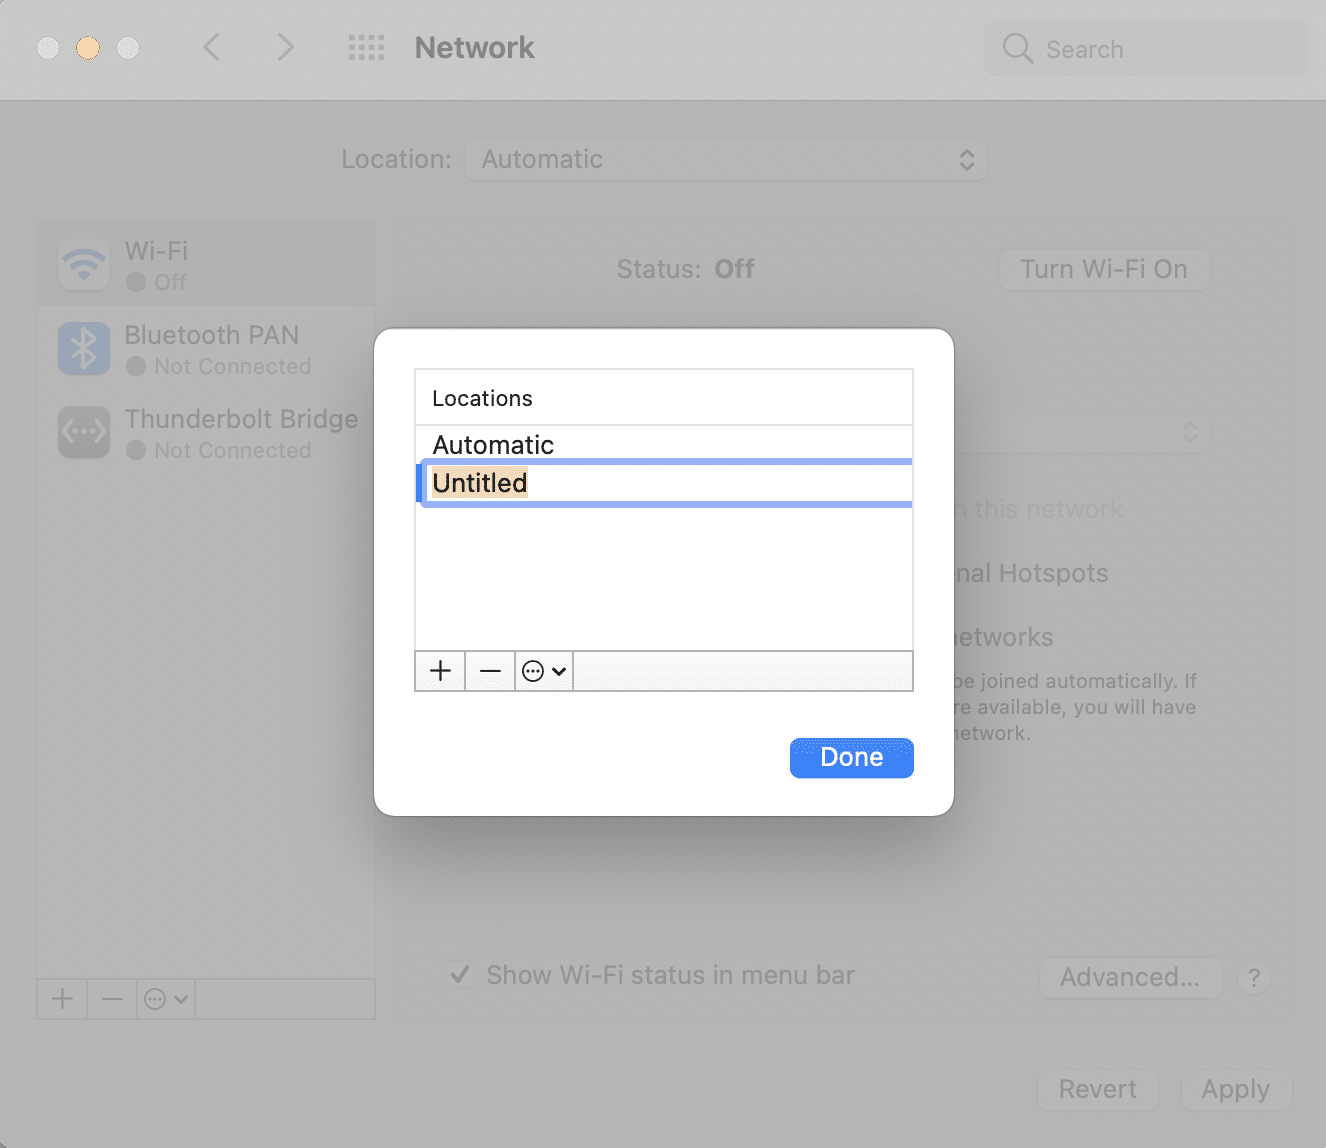
5. Give it the name of your choice and click on Done, as depicted.
6. Join this network by typing the password.
7. Now click on Advanced > TCP/IP tag.
8. Here, select Renew “DCPH Lease” and click on Apply.
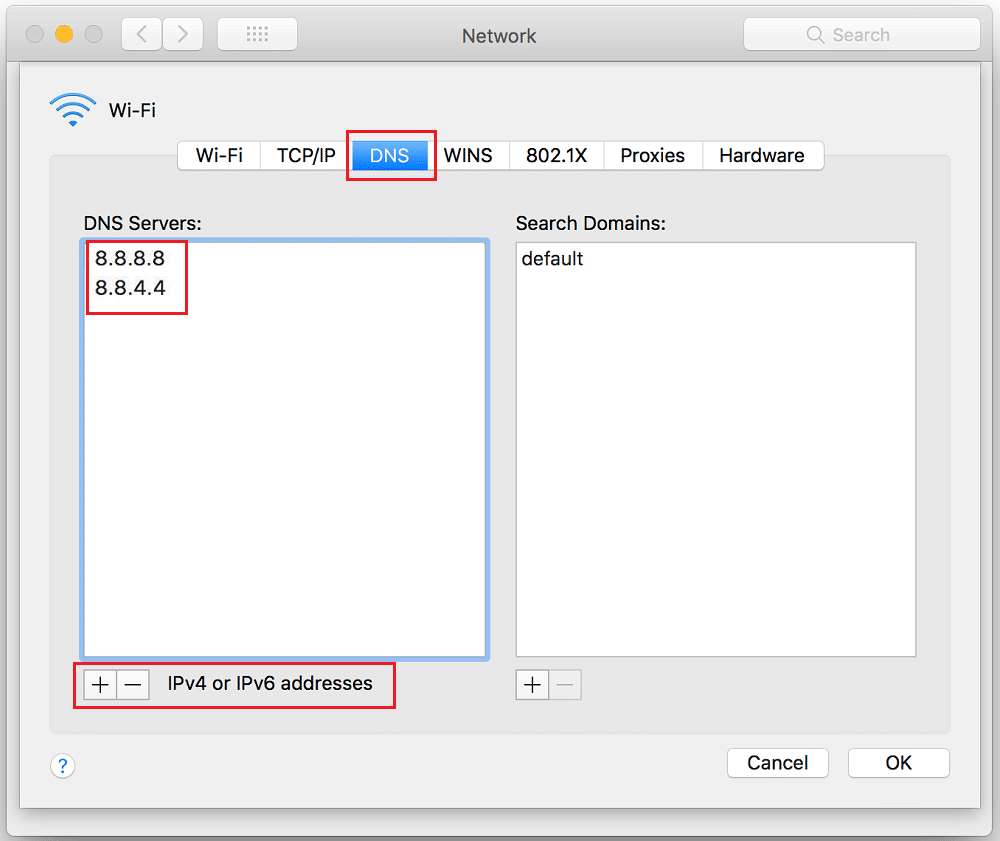
9. Next, click on the DNS button on the Network screen.
10. Under the DNS Servers Column, click on the (plus) + sign.
11. Either add OpenDNS (208.67.222.222 and 208.67.220.220) or Google DNS (8.8.8.8 and 8.8.4.4).
12. Navigate to the Hardware tab and manually change the Configure option.
13. Modify the MTU option by changing the numbers to 1453.
14. Once you are done, click on OK.
You have now created a new Wi-Fi network. There should be no need to wonder why is my Mac internet so slow all of a sudden.
Method 8: Reset Mac Wi-Fi to Default
To speed up Wi-Fi on Mac, you can also try resetting the network settings to default values. This method will work for any macOS launched after macOS Sierra. Just, follow the given steps:
1. Switch off your MacBook Wi-Fi connection and remove all previously established wireless networks.
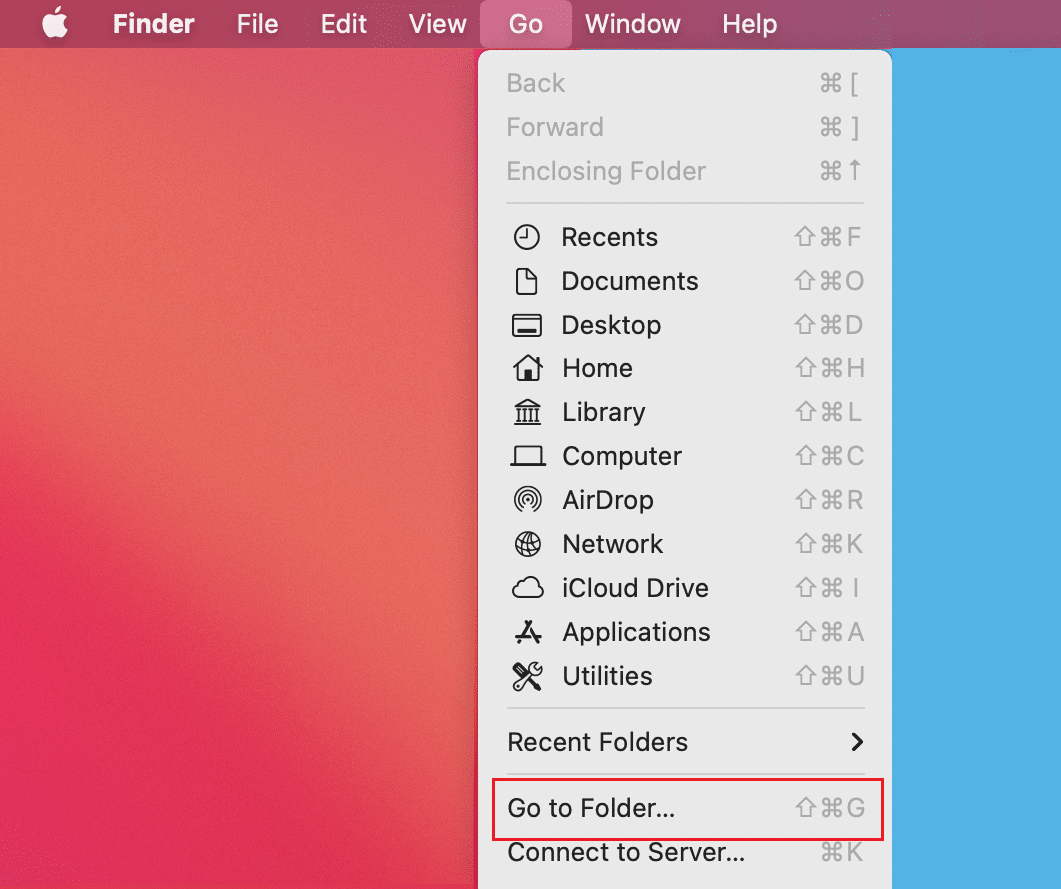
2. Now, click on Finder > Go > Go To Folder, as illustrated.
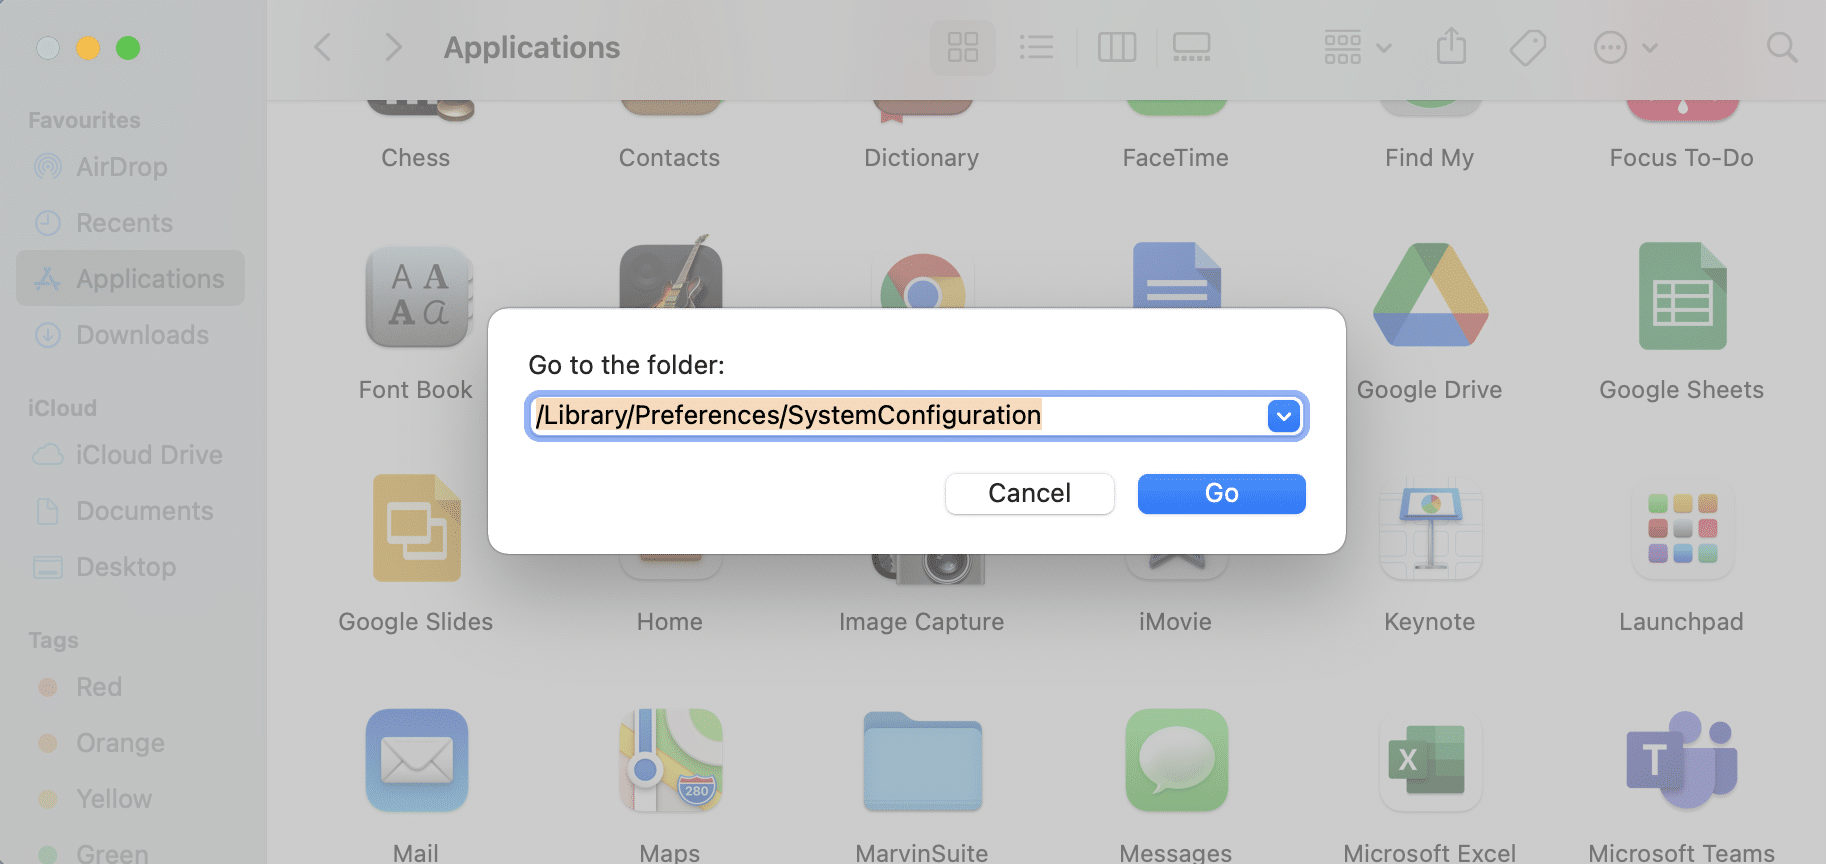
3. Type /Library/Preferences/SystemConfiguration/ and press Enter.
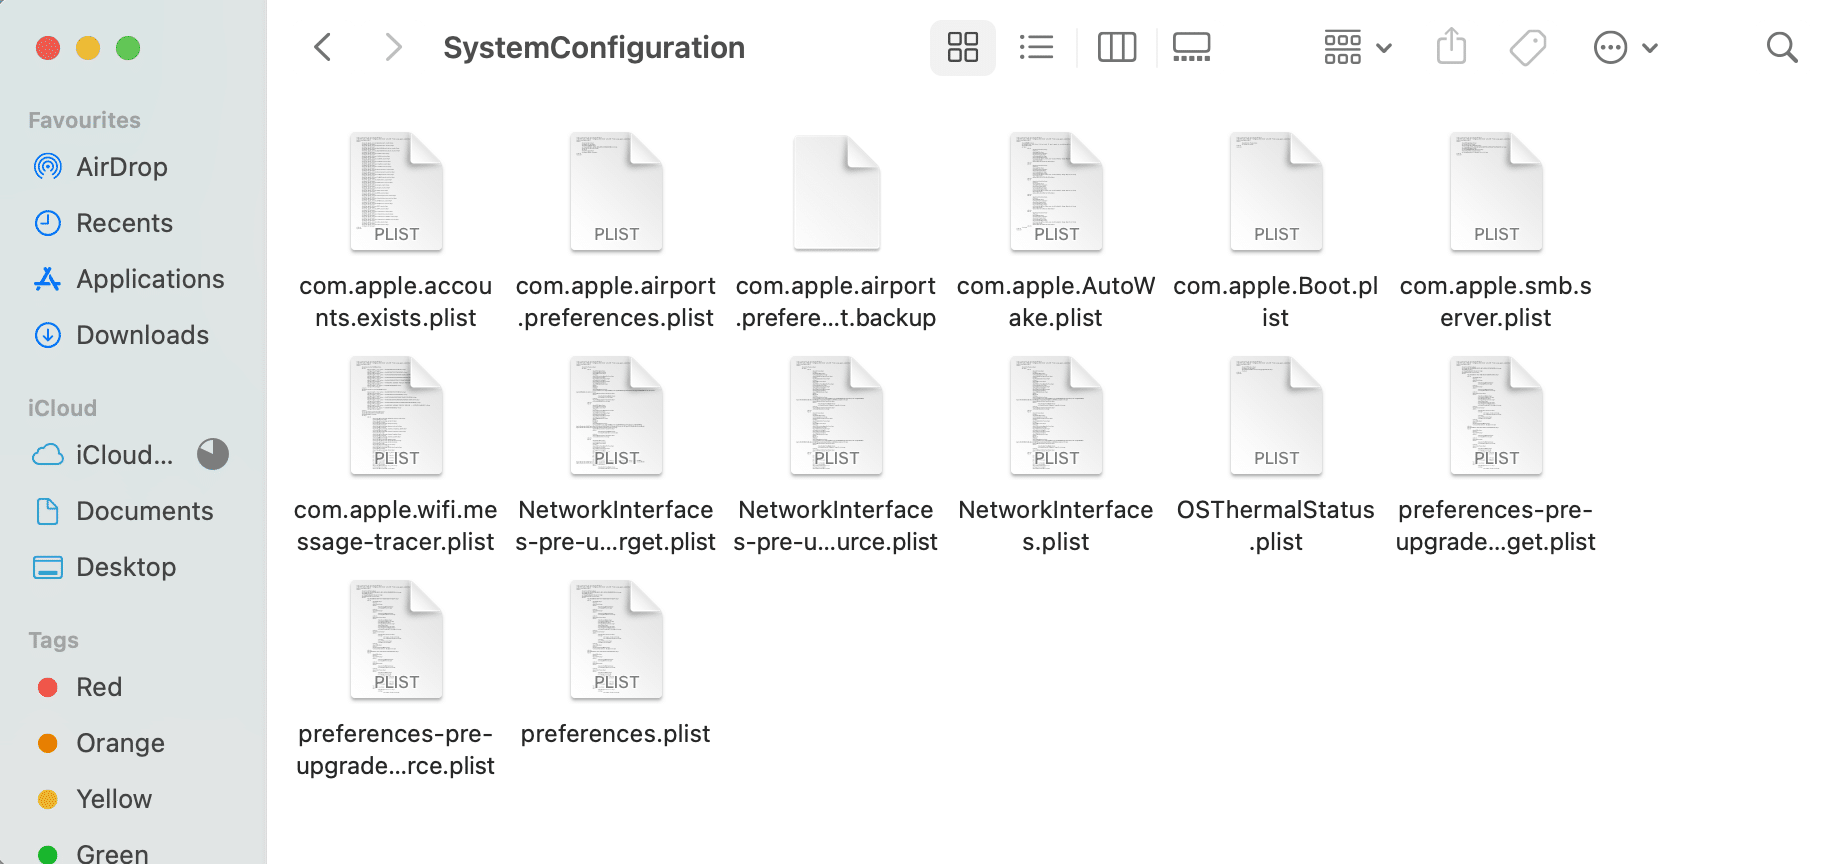
4. Search for these files:
- plist
- apple.airport.preferences.plist
- apple.network.identification.plist or com.apple.network.eapolclient/configuration.plist
- apple.wifi.message-tracer.plist
- plist
5. Copy these files and paste them on your desktop.
6. Now delete the original files by right-clicking them and selecting Move to Bin.
7. Enter your password, if prompted.
8. Reboot your Mac and turn on the Wi-fi.
Once your MacBook restarts, check the previous folder again. You will notice that new files have been created. This means that your Wi-Fi connection has been restored to factory settings.
Note: If the method works fine, then delete the copied files from the desktop.
Also Read: Fix iTunes Keeps Opening By Itself
Method 9: Use Wireless Diagnostics
This method is based on the inbuilt application of Mac i.e. wireless diagnostics. Apple Support hosts a dedicated page to Use Wireless Diagnostics. Follow the given steps to utilize it to speed up Wi-Fi on Mac:
1. Close all open applications and tabs.
2. Press and hold the Option key from the keyboard.
3. Simultaneously, click on the Wi-Fi icon at the top of the screen.
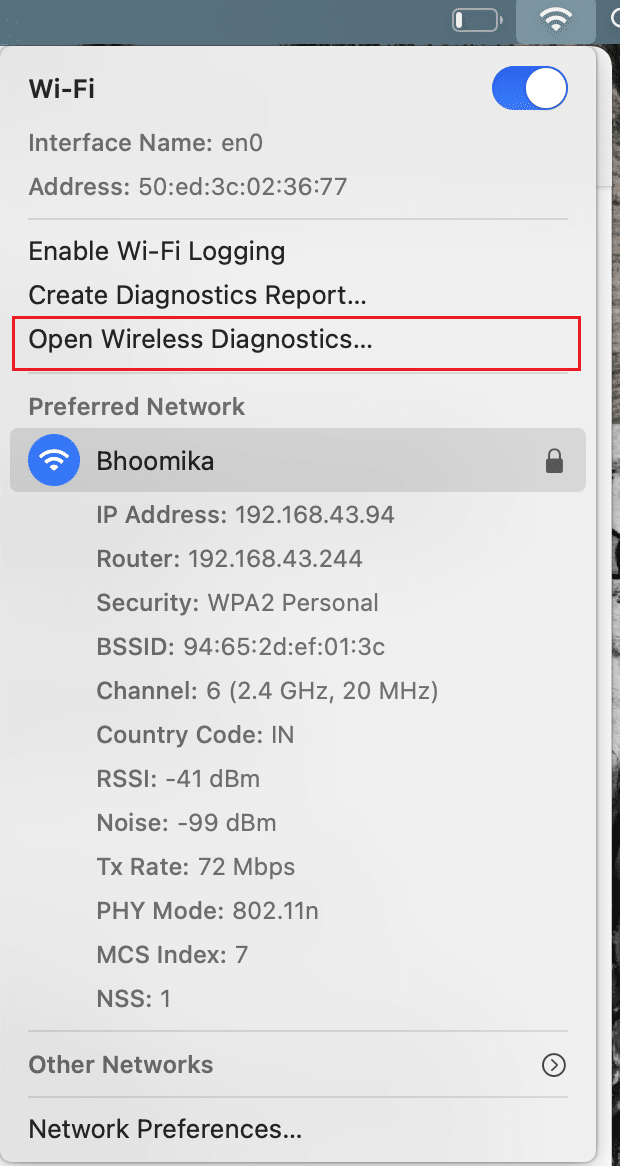
4. Once the drop-down menu is displayed, click on Open Wireless Diagnostics.
5. Enter your password, when prompted. Your wireless environment will now be analyzed.
6. Follow the on-screen instructions and click on Continue.
7. Once the process is completed, a message is displayed, Your Wi-Fi connection appears to be working as expected.
8. From the Summary section, you can click on i (info) to view a detailed list of issues fixed.
Method 10: Switch to 5GHz Band
You can try switching your MacBook to 5 GHz frequency if your router can function in both 2.5 GHz or 5 GHz bands. In most cases, this helps to speed up Wi-Fi on Mac. However, if you live in an apartment where your neighbors are using a lot of devices that function on 2.4 GHz frequency, then there could be some interference. Also, 5 GHz frequency is capable of transferring more data. Follow the given steps:
1. Open System Preferences and select Network.
2. Then click on Advanced and move the 5 GHz network to the top.
3. Try connecting to your Wi-Fi again to check if the problem has been resolved.
Method 11: Update the Firmware
Make sure that your router is functioning with the latest software. In most cases, the update takes place automatically. However, in case the automatic function is not available, you can upgrade it from the software interface.
Method 12: Use Tin Foil
If you are up for some DIY, creating a tin foil extender may help speed up Wi-Fi on Mac. Since metal is a good conductor and can easily reflect Wi-Fi signals, you can use it to direct them towards your Mac device.
1. Take a sheet of foil and wrap it around a naturally curved object. For example – a bottle or a rolling pin.
2. Once the foil is wrapped, remove the object.
3. Position this behind the router and angle it towards your MacBook.
Try connecting to the Wi-Fi once again to confirm that it works faster than before.
Also Read: How to Copy Playlists to iPhone, iPad, or iPod
Method 13: Change the Channel
Fortunately, Apple enables its users to view the broadcasting network of nearby users. In case, the nearby networks are using the same channel, your Wi-Fi will automatically slow down. To find out the network band your neighbors are using, and to understand why is my Mac internet so slow all of a sudden, follow these simple steps:
1. Press and hold the Option key and click on the Wi-Fi icon
2. Then, open Wireless Diagnostics, as depicted.
3. Click on Window from the top menu bar and then, select Scan. The list will now display the devices that are connected to your network. The screen will also display the best channels that you can use for higher speed.
4. Change the channel by turning the router off and then, on again. The strongest option will be chosen automatically.
5. If the Wi-Fi connectivity problem is intermittent, select Monitor my Wi-Fi connection option instead of Continue to Summary.
6. On the Summary page, you can view the list of issues fixed and internet connection tips by clicking on the info icon.
Method 14: Optimize Safari
If your Wi-Fi issues are restricted to Mac browser Safari, it is time for some optimization.
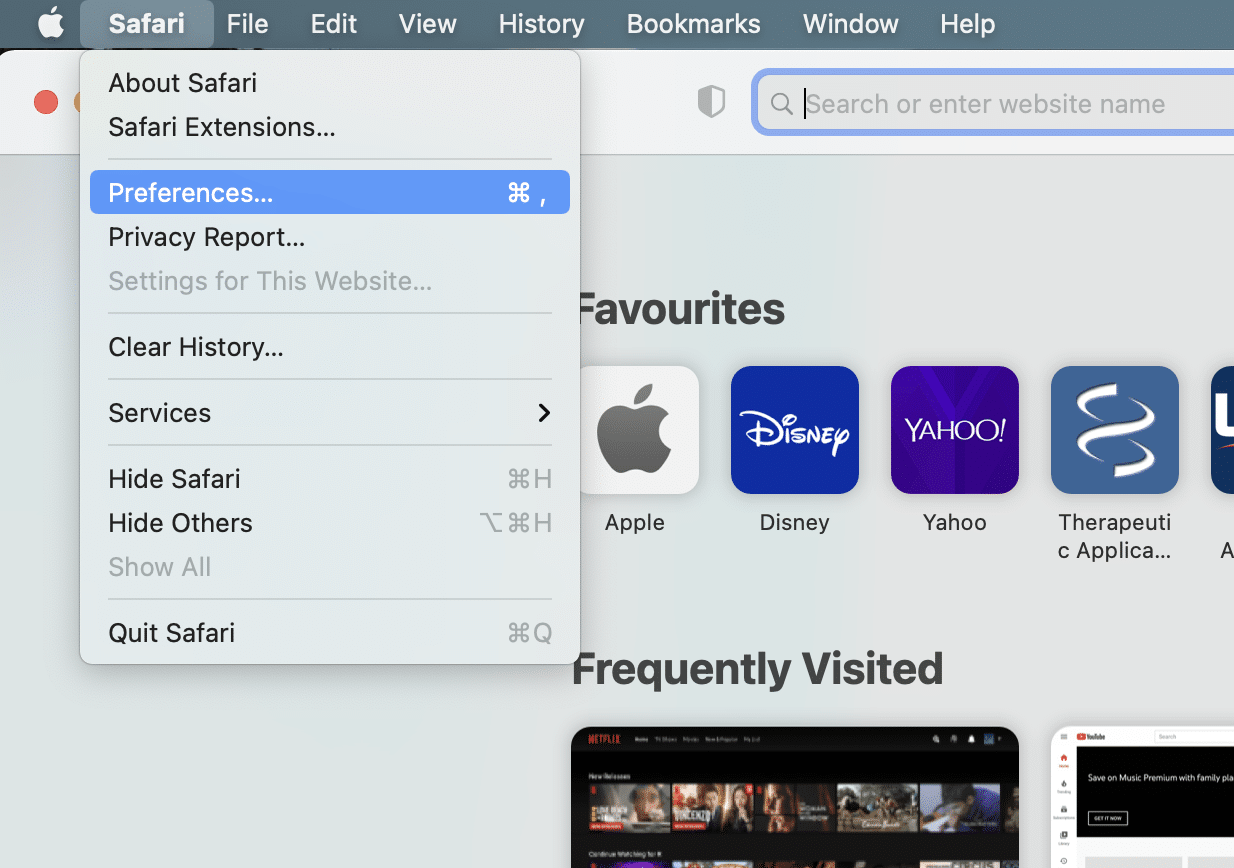
1. Open Safari and click on Preferences.
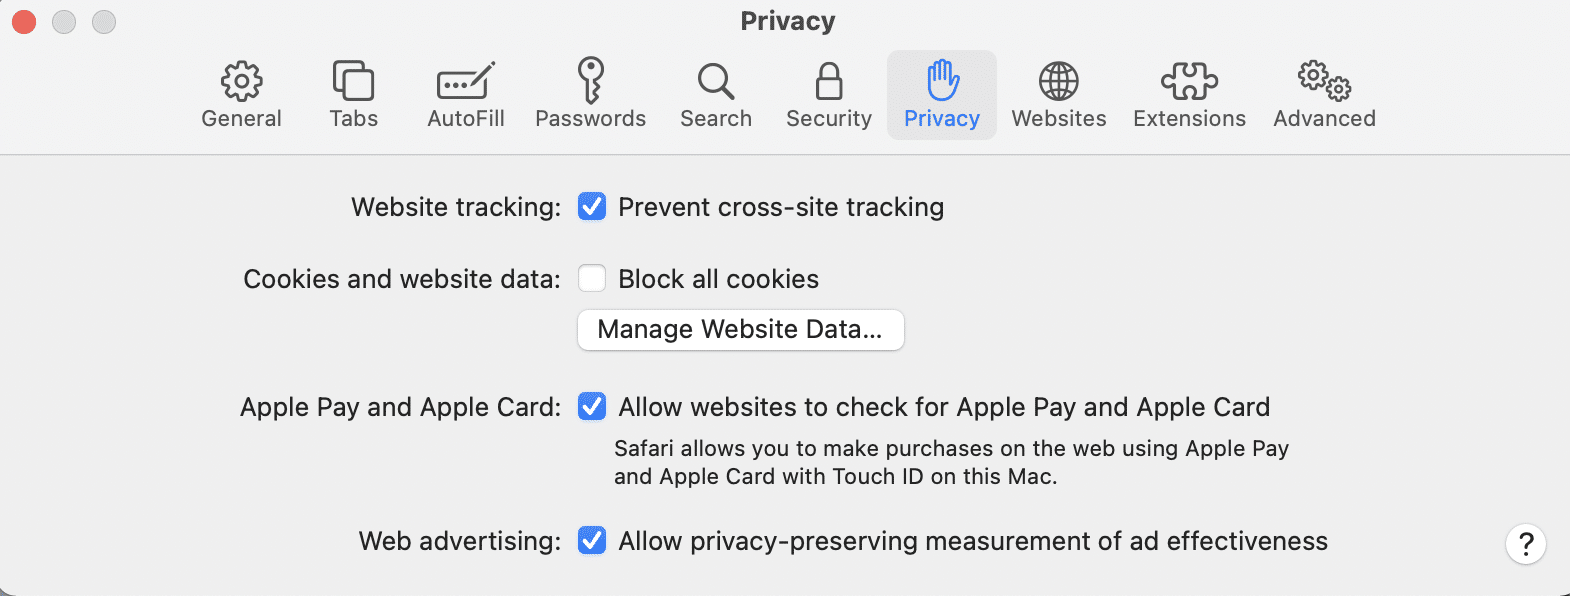
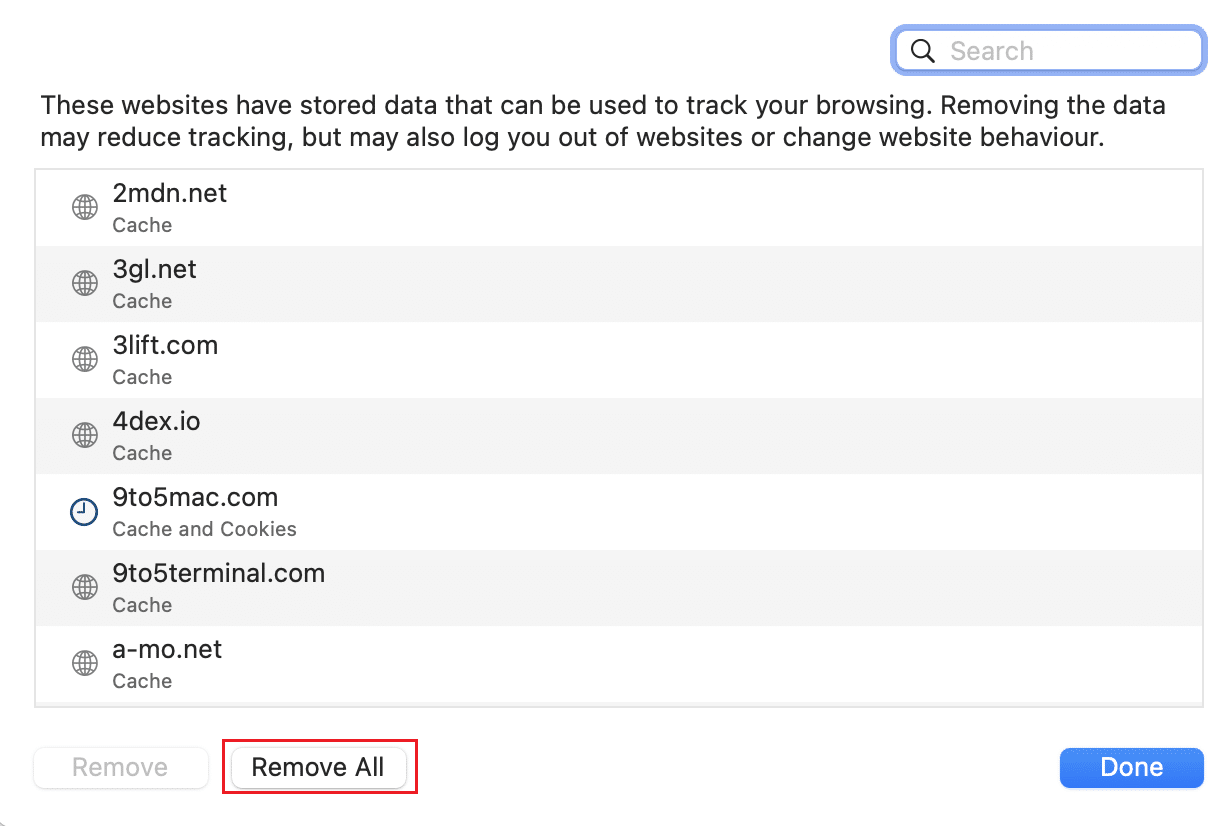
2. Select the Privacy tab and click the Manage Website Data… button.
3. Now select Remove All.
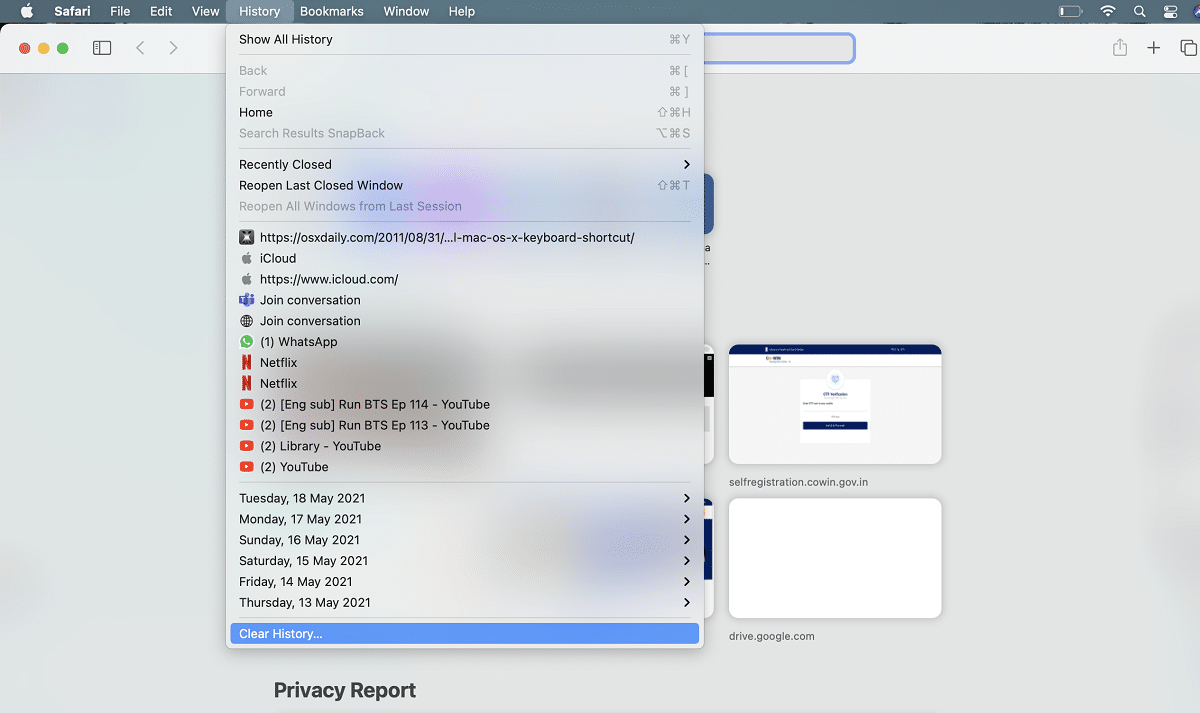
4. Clear Safari history by clicking on the Clear History button under the History tab, as highlighted.
5. Disable all the Safari extensions by clicking on the Extensions tab under Preferences.
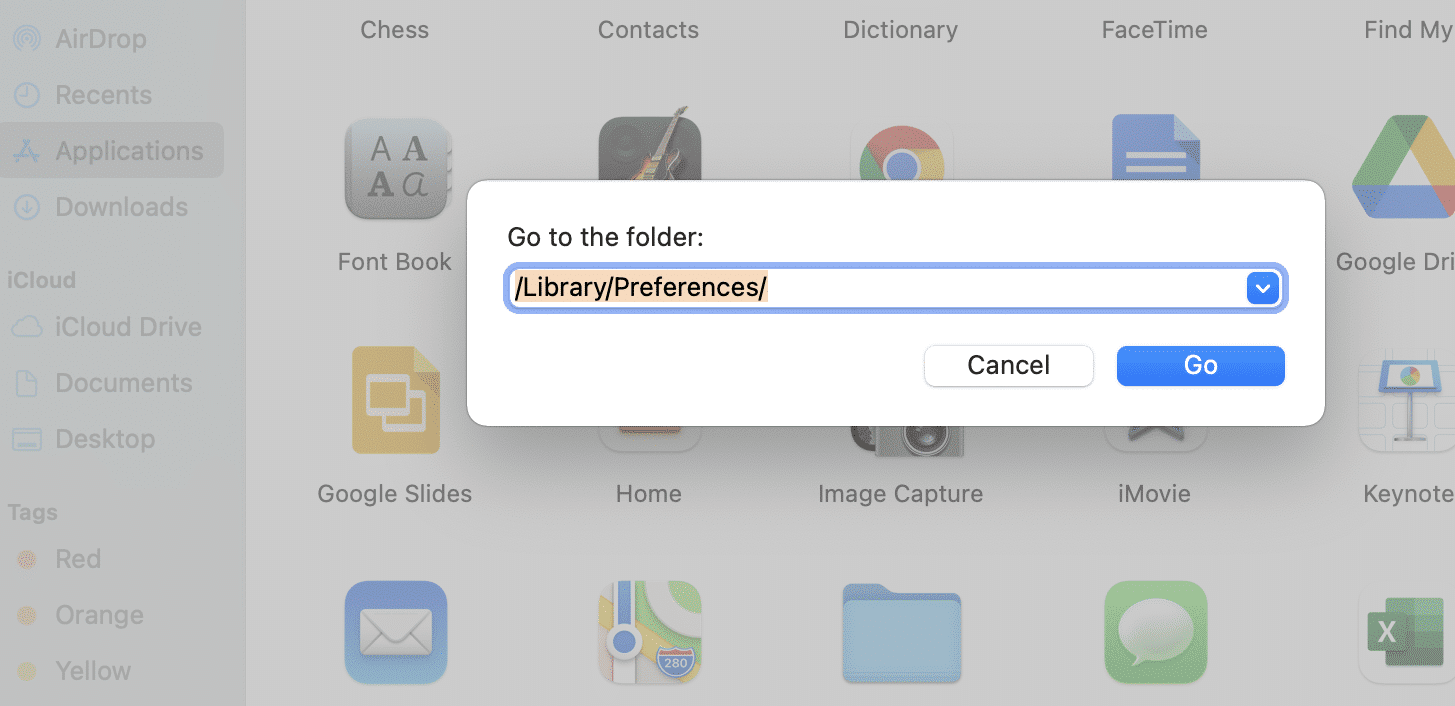
6. Navigate to ~Library/Preferences folder, as shown.
7. Here, delete the preferences file of Safari browser: apple.Safari.plist
Once all these settings have been modified, try to connect to your Wi-Fi once again and open a website in the browser to check if it functions properly now.
Recommended:
A stable Wi-Fi connection is a prerequisite for working and studying properly. Thankfully, this comprehensive troubleshooting guide is a one-shot solution to help you understand why is your Mac internet so slow all of a sudden and help speed up Wi-Fi on Mac. If you were able to fix Mac slow Wi-fi problems, share your experience with us in the comments below!
