When you face a VIDEO TDR failure or nvlddmkm.sys failed error on Windows PCs, it is most likely that graphics card driver may be corrupt or outdated. Let us guide you to fix nvlddmkm.sys failed issue on Windows 8 and 10 computers. So, continue reading.
What is VIDEO TDR Failure on Windows 8 & 10?
This error is similar to the Blue Screen of death or BSOD error. Here, TDR stands for Timeout, Detection & Recovery. This is a part of Windows OS, and when it malfunctions, the Graphics Driver fails to work. Windows is unable to resolve this error on its own. Hence, you have to perform given troubleshooting steps to fix the same. This error depends on the type of Graphics card as you will receive
- nvlddmkm.sys failed error for NVIDIA graphics card,
- igdkmd64.sys failed error for Intel graphics card, and
- atkimpag.sys failed error for AMD/ATI graphics cards.
Fix VIDEO TDR Failure nvlddmkm.sys Failed Error on Windows 10
Some potential causes of this error are:
We have tried and tested all the methods ourselves. You should follow these methods step-by-step to fix this problem.
Note: We advise you to read our guide on How to Create a System Restore Point in Windows 10 to be able to restore your computer if something goes wrong.
Method 1: Run Hardware and Devices Troubleshooter
The in-built Windows troubleshooting tool will often fix the Windows 10 nvlddmkm.sys failed error.
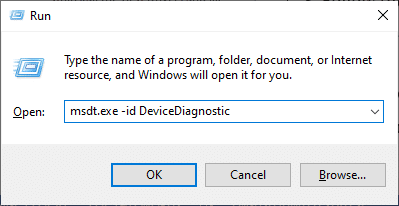
1. Press Windows + R keys together to launch Run dialog box.
2. Type msdt.exe -id DeviceDiagnostic and hit Enter.
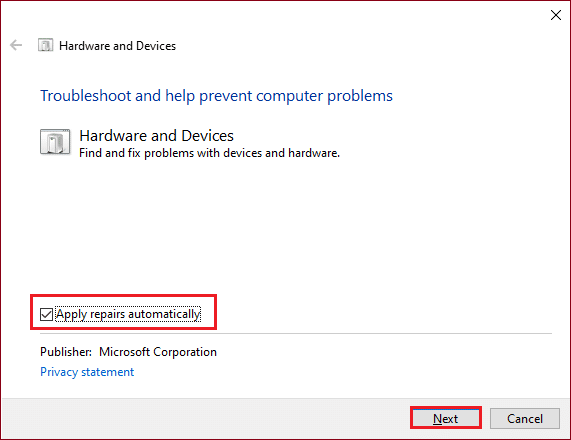
3. Click on Advanced in Hardware and Devices window
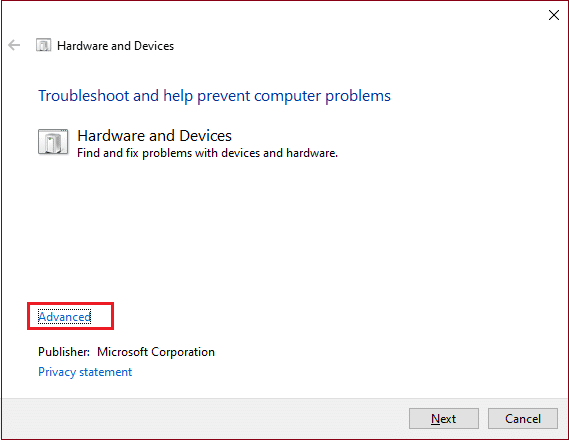
4. Check Apply repairs automatically option and click on Next.
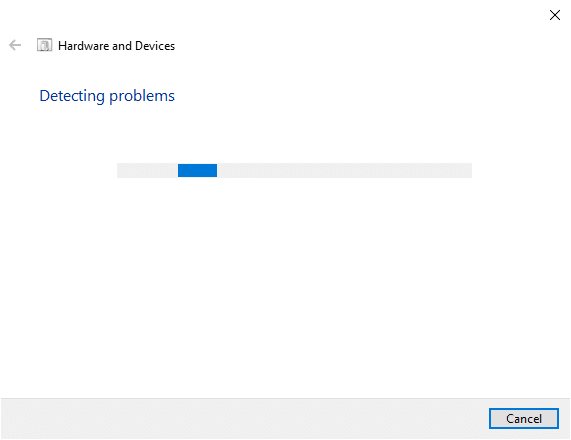
5. Wait for the scan to be completed.
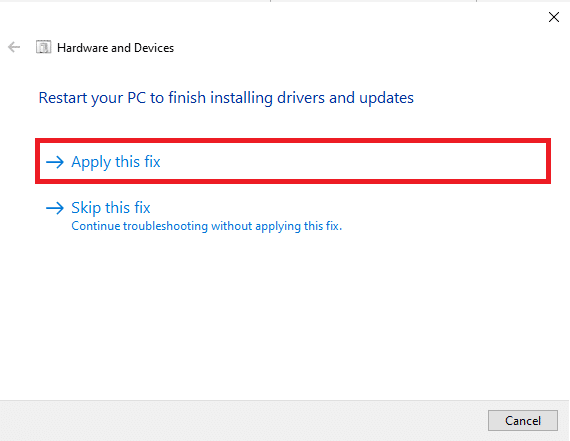
6. Then, click on Apply this fix.
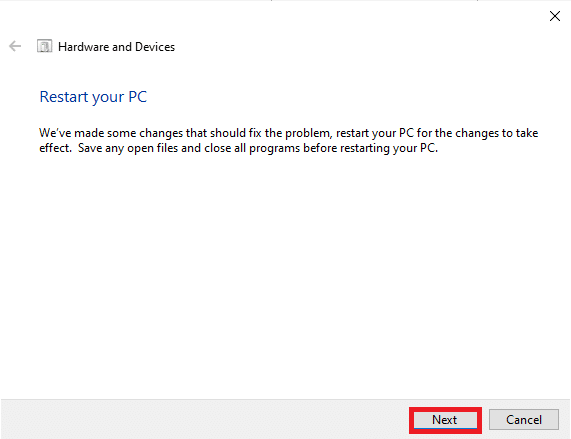
7. Click on Next to Restart your PC and get the issue resolved.
Also Read: Fix Windows 10 Yellow Screen of Death
Method 2: Disable Browser Hardware Acceleration Feature
Sometimes, web browsers run in the background and consume a lot of CPU & GPU resources. Hence, it is better to disable the hardware acceleration in the web browser and test the PC again. Here, we have shown Google Chrome as an example for this method.
1. Launch Google Chrome and click on the three-dotted icon present at the top right corner.
2. Now, click on Settings as depicted in the below picture.
![]()
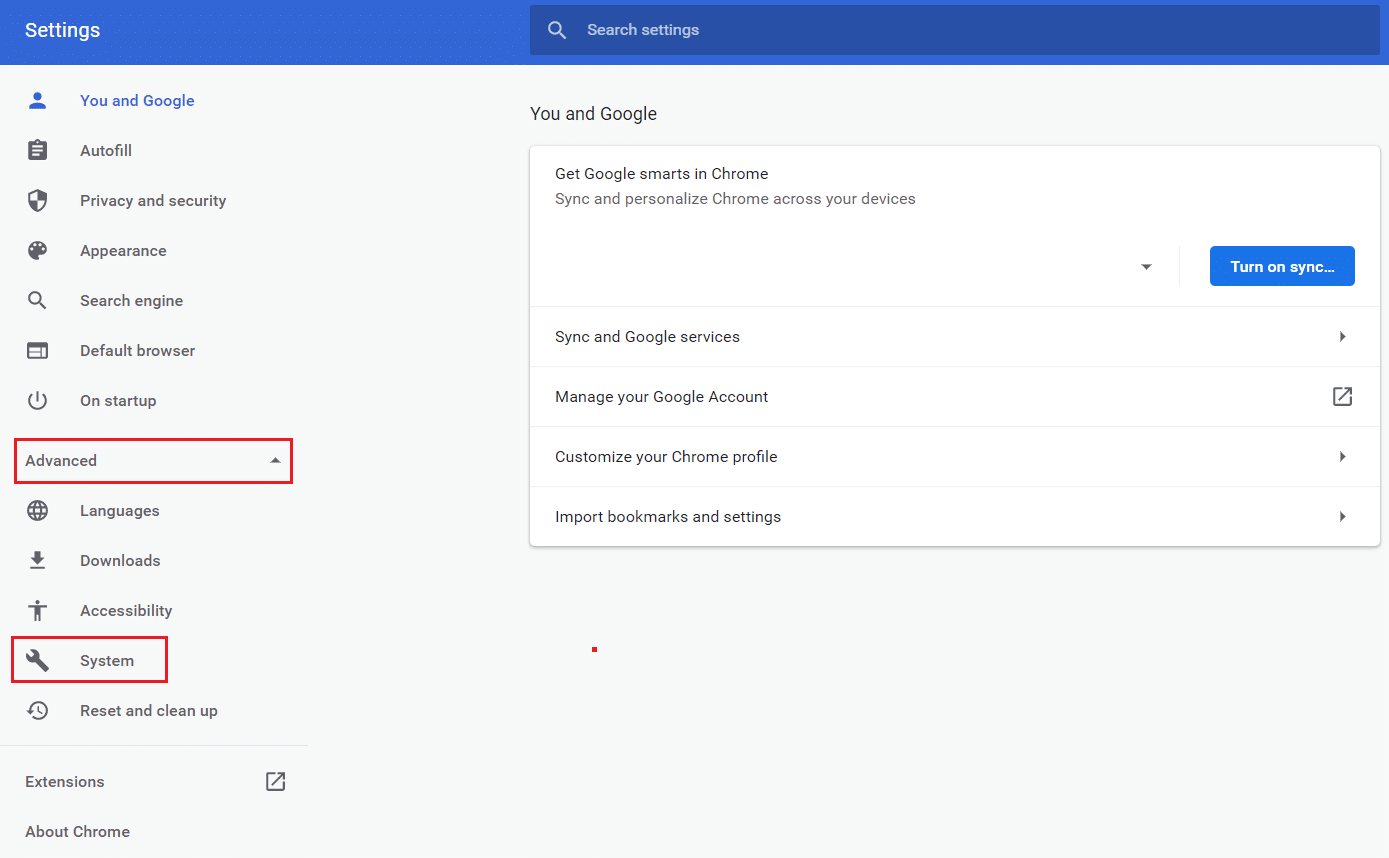
3. Now, expand the Advanced section in the left pane and click on System, as shown.
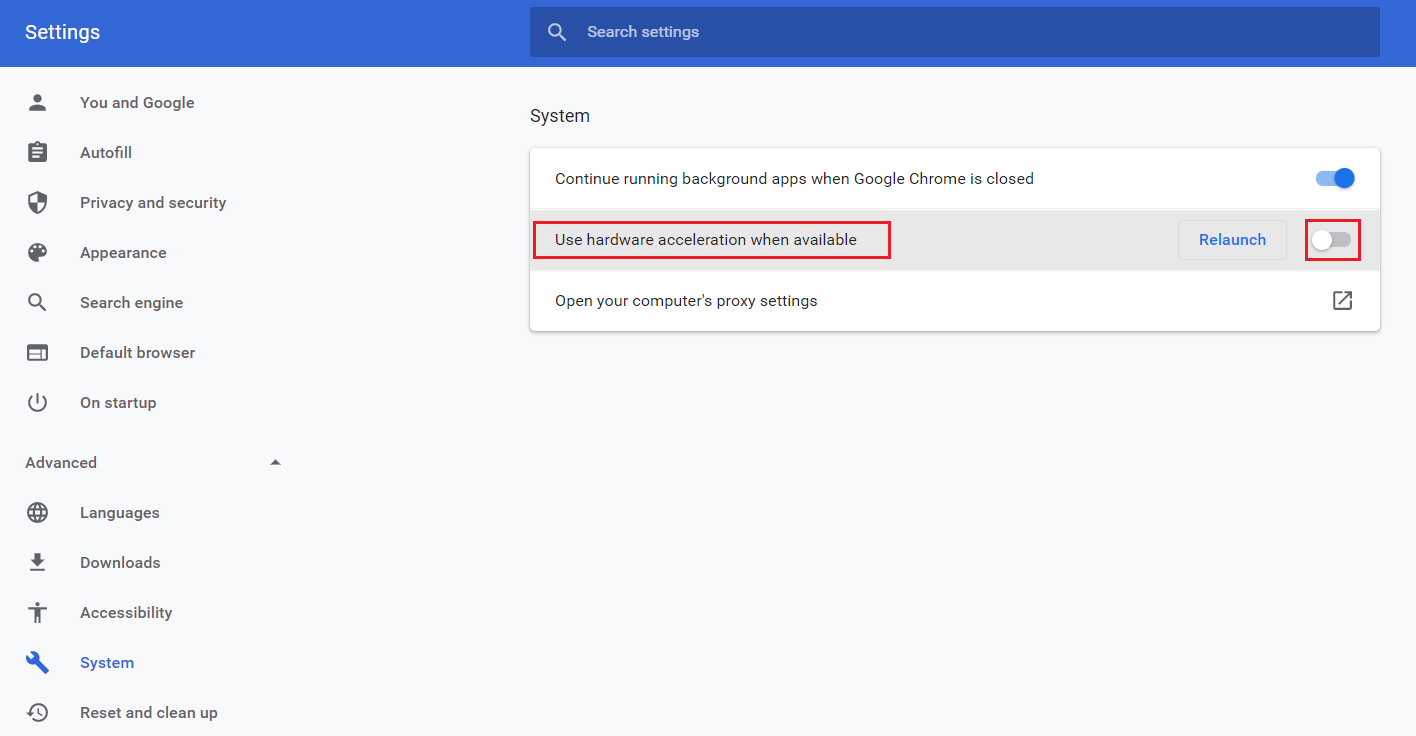
4. Here, switch Off the toggle for Use hardware acceleration when available option.
5. Finally, restart your PC. Check if VIDEO TDR failure or nvlddmkm.sys failed error is rectified.
Method 3: Close Unnecessary Background Processes
There may be plenty of applications that run in the background. This will increase the CPU and memory usage, thereby affecting the performance of your computer & possibly, cause nvlddmkm.sys failed error. Here’s how to end unwanted processes:
1. Launch Task Manager by pressing Ctrl + shift + Esc keys together.
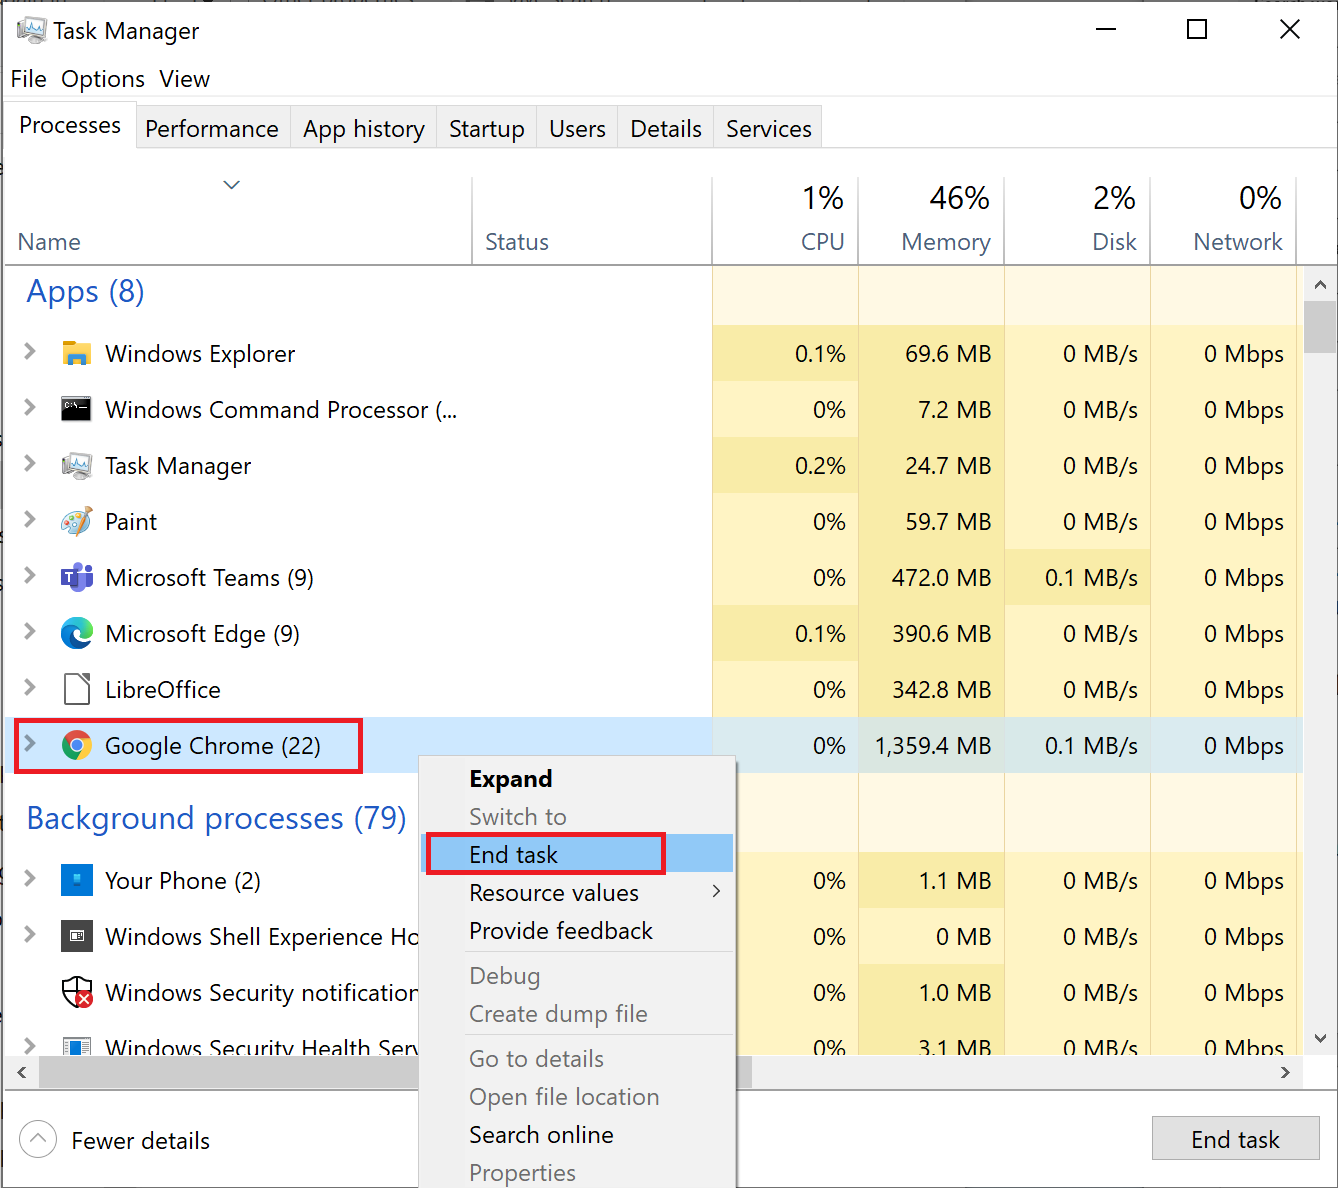
2. In the Processes tab, search and select unnecessary task running in the background. For example, Google Chrome.
3. Right-click on it and select End task, as depicted below.
4. Repeat the same for all unwanted processes and reboot your Windows PC.
Also Read: Fix PC Turns On But No Display
Method 4: Update/ Rollback Display Drivers
If the graphic card drivers are outdated, then try to update them to fix the issue. Or, if they are in the latest version, yet are causing the said error then rollback of drivers will help.
Option 1: Update Graphics Card Driver
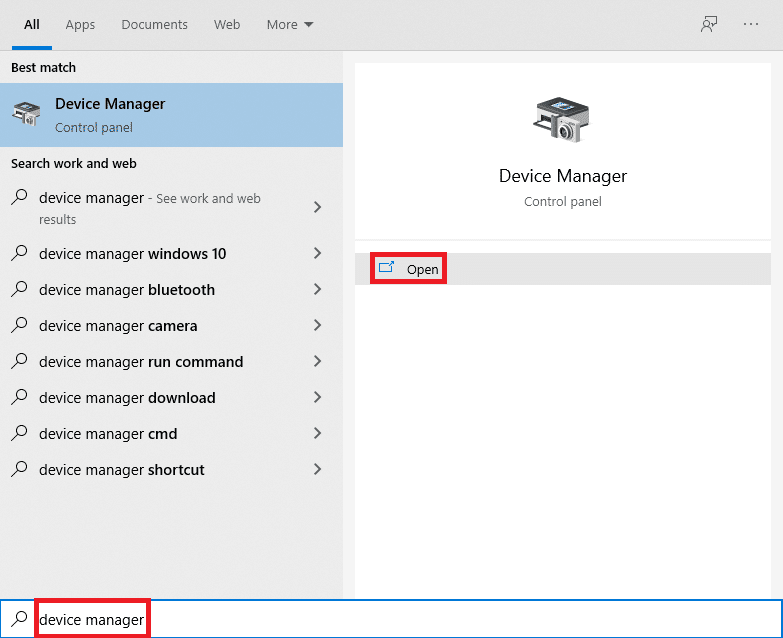
1. Hit the Windows key, type device manager, and click on Open.
2. Click on the arrow next to Display adapters to expand it.
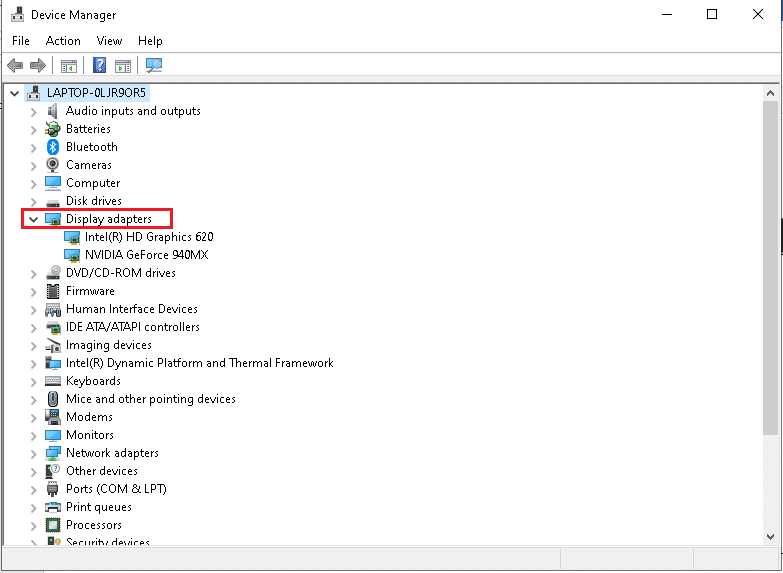
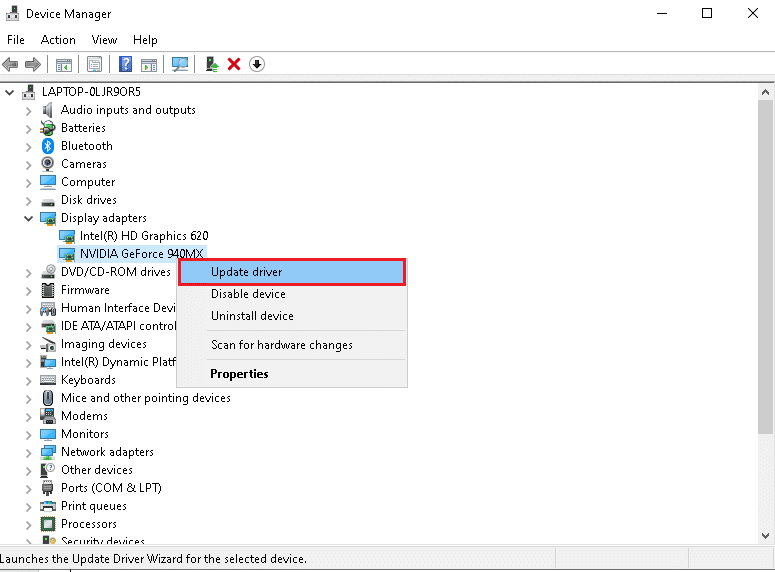
3. Right-click on your graphics driver (e.g. NVIDIA GeForce driver) and select Update driver, as shown.
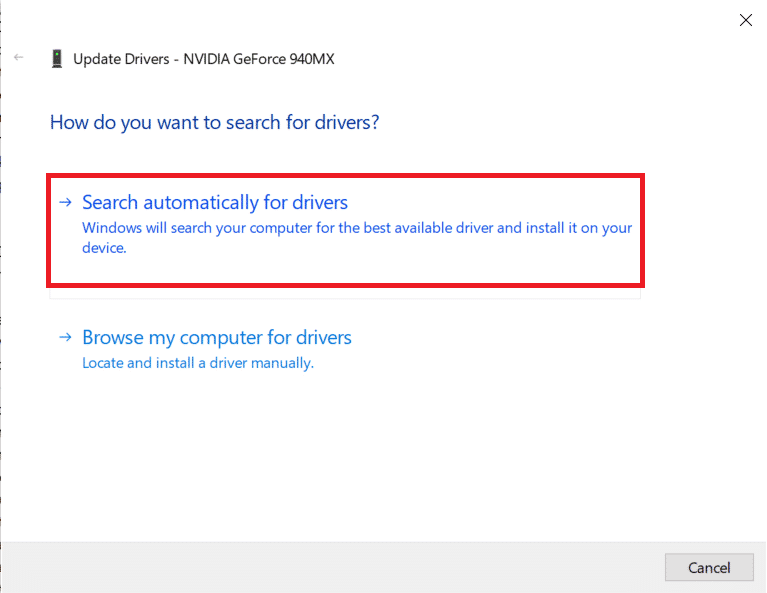
4. Now, click on Search automatically for drivers to find and install drivers automatically.
5A. Wait for the drivers to be updated to the latest version. Then, Restart your PC.
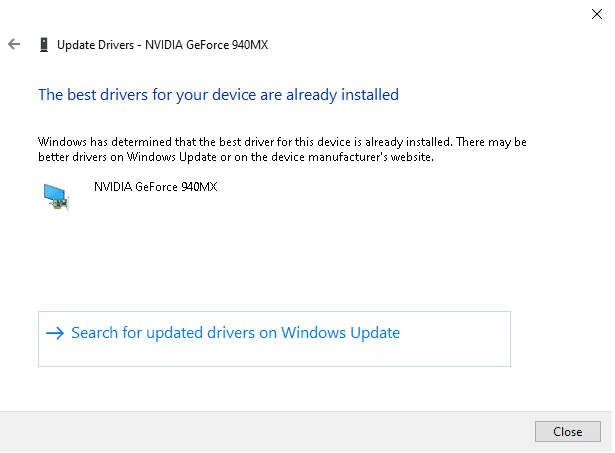
5B. If they are already in an updated stage, the following screen displays with the message: The best drivers for your device are already installed. Click on the Close button to exit the window.
Option 2: Rollback Driver Updates
1. Navigate to Device Manager > Display Adapters as shown in the above method.
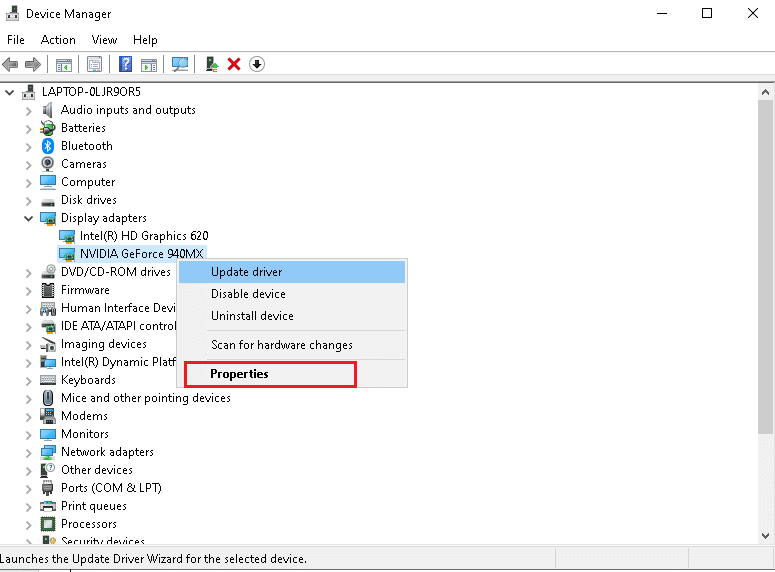
2. Right-click on your display driver (e.g. NVIDIA GeForce driver) and select Properties, as illustrated below.
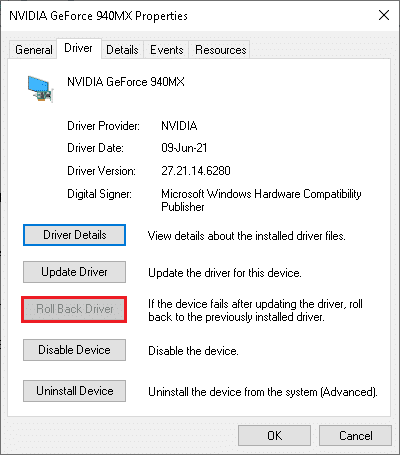
3. Switch to the Driver tab and click Roll Back Driver, as shown.
Note: If the option to Roll Back Driver is greyed out, then it indicates that your Windows PC does not have the pre-installed driver files or tit has never been updated. In this case, try alternative methods discussed in this article.
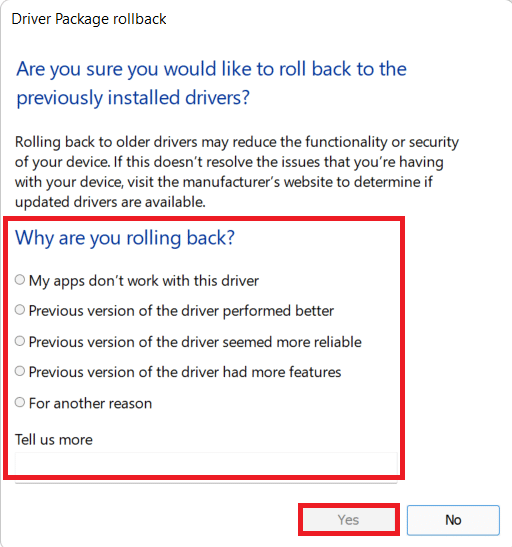
4. Provide a Reason for Why are you rolling back? in the Driver Package rollback window. Then, click the Yes button, shown highlighted.
5. Now, restart your system to make the rollback effective.
Also Read: What is NVIDIA Virtual Audio Device Wave Extensible?
Method 5: Reinstall Graphics Adapter Driver
If you have tried the above method and did not attain a solution, then reinstall Graphics adapter driver to solve VIDEO TDR failure Windows 10 NVIDIA issue as follows:
1. Launch Device Manager and expand Display adapters as instructed in Method 4.
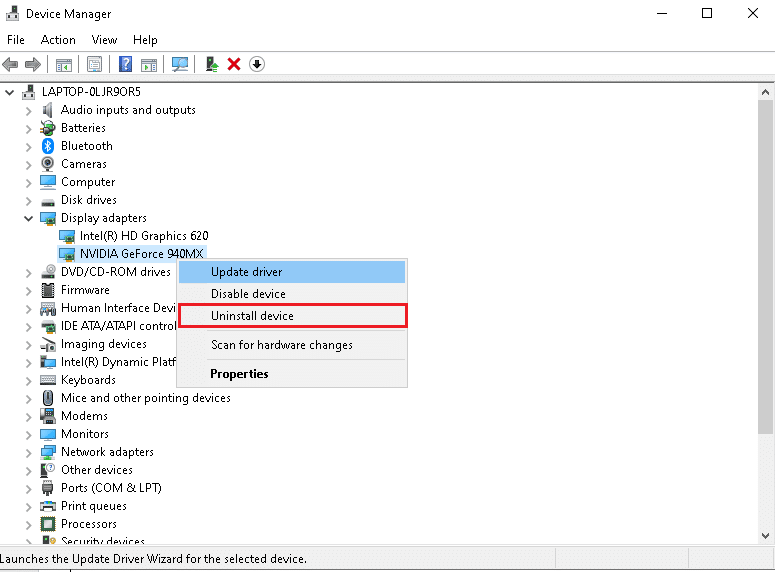
2. Now, right-click NVIDIA GeForce 940MX and select Uninstall device, as depicted below.
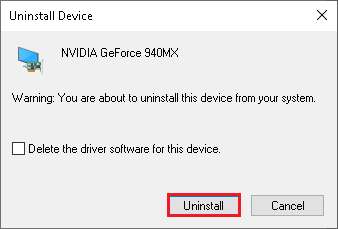
3. Check the box marked Delete the driver software for this device and confirm the prompt by clicking Uninstall, as shown.
4. Next, go to the NVIDIA Drivers Downloads page.
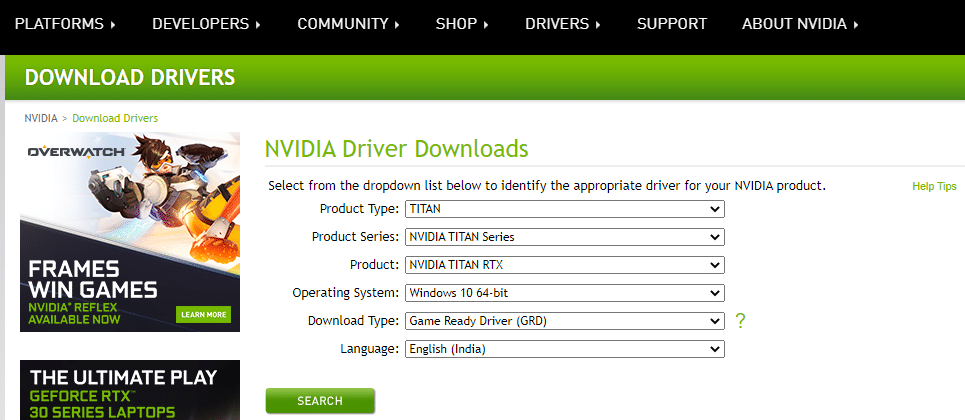
5. Find and Download the drivers corresponding to the Windows version on your PC.
6. Now, run the downloaded file and follow the given instructions to install it.
Method 6: Restore nvlddmkm.sys File
If you are using NVIDIA graphics card and the driver files are corrupt, then you are advised to restore the nvlddmkm.sys file to solve VIDEO TDR failure Windows 10 NVIDIA issue as follows:
1. Press Windows + E keys together to open File Explorer.
2. Now, navigate to C:WindowsSystem32drivers and search for nvlddmkm.sys.
3. Right-click on nvlddmkm.sys file and select Rename option, as shown.
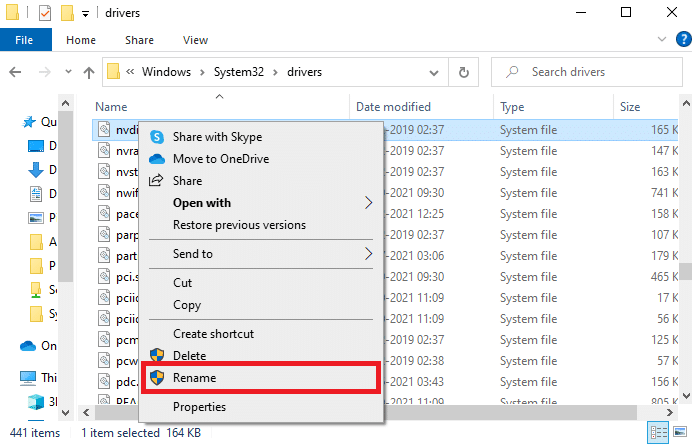
4. Rename it to nvlddmkm.sys.old.
5. Then, navigate to This PC and search nvlddmkm.sy_ in Search this PC field, as illustrated below.
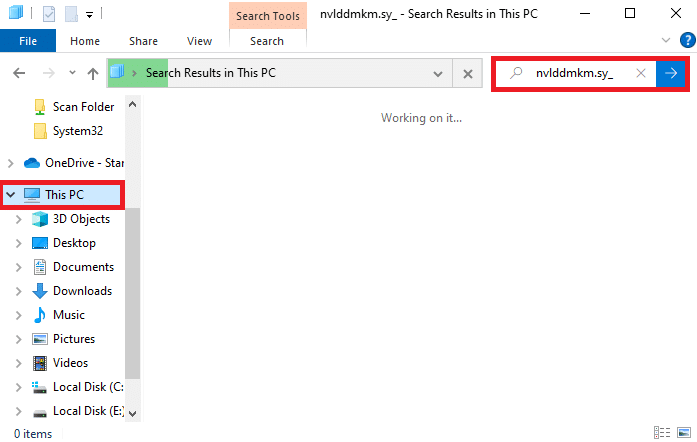
6. Copy nvlddmkm.sy_ file from the search results by pressing Ctrl + C keys.
7. Paste it on your Desktop by by pressing Ctrl + V keys.
8. Next, click on Start, type Command Prompt, and click on Run as administrator.
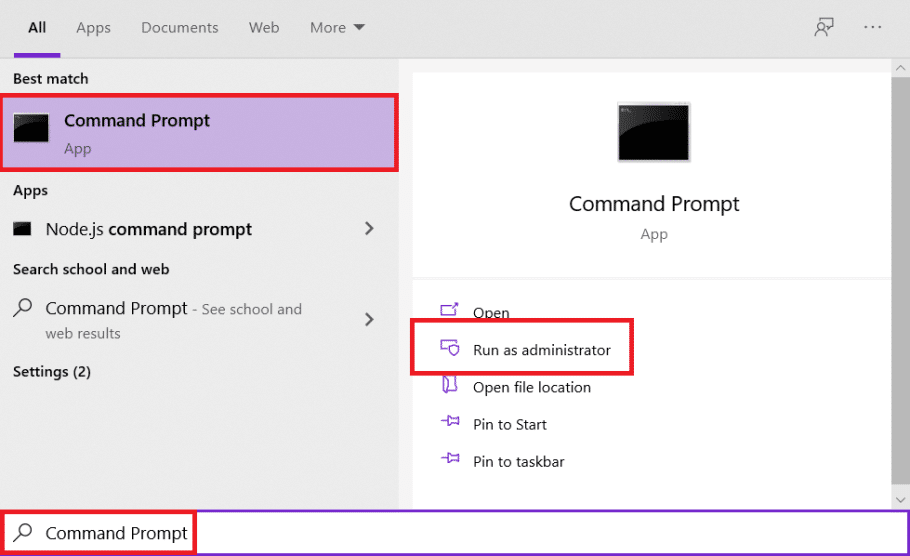
9. Type the following commands one by one and hit Enter key after each command.
chdir desktop
expand -r nvlddmkm.sy_nvlddmkm.sys
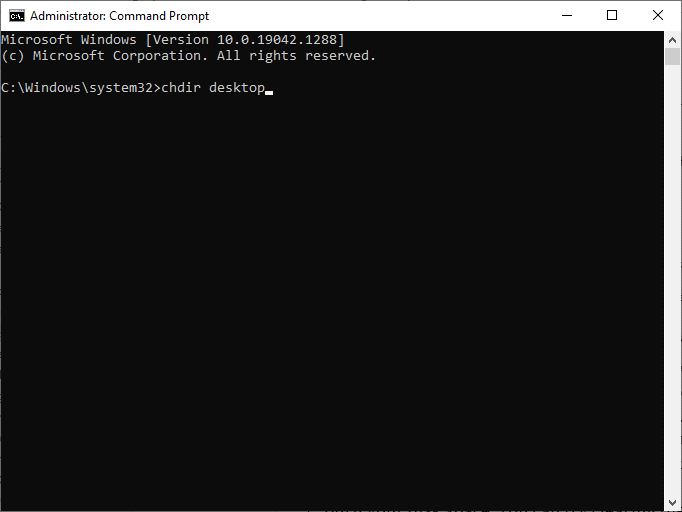
10. Close the Command Prompt and copy nvlddmkm.sys file from the Desktop by pressing Ctrl + C keys.
11. Again, navigate to the following location and paste the File by pressing Ctrl + V keys.
C:WindowsSystem32drivers
12. Reboot your PC and check if the issue is fixed now.
Also Read: Fix Windows 10 Blue Screen Error
Method 7: Run SFC & DISM Tools
Windows 10 users can automatically scan and repair system files by running System File Checker and Deployment Image Servicing and Management built-in tools. These tools scan, repair & delete files and will help fix nvlddmkm.sys failed error.
1. Launch the Command Prompt as administrator as instructed in Method 6.
2. Type the following commands one by one and hit Enter key after each:
DISM.exe /Online /Cleanup-Image /CheckHealth
DISM.exe /Online /Cleanup-image /Scanhealth
DISM.exe /Online /Cleanup-image /Restorehealth
Note: You must have a working internet connection to run these commands.
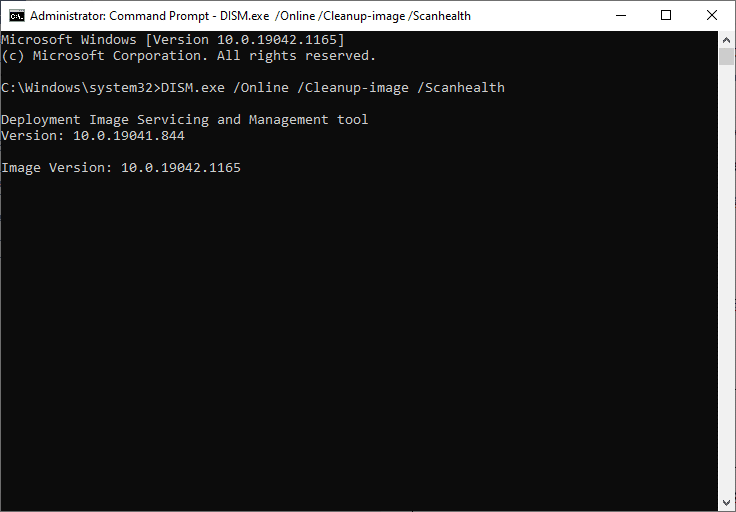
3. Wait for the process to run successfully and restart the PC. If the issue persists then, follow the next steps.
4. Launch Command Prompt as administrator again.
5. Type sfc /scannow command and hit the Enter key.
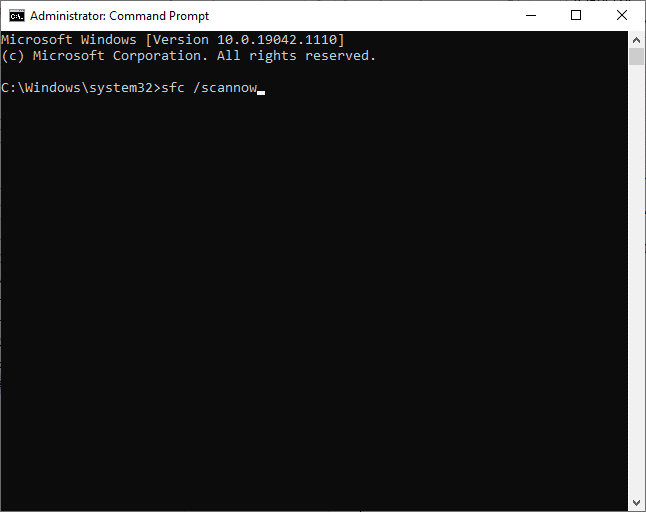
6. Wait for the Verification 100 % completed statement, and once done, boot your device in normal mode.
Method 8: Turn Off Fast Startup
Turning off the fast startup option is recommended as VIDEO TDR failure fix. To understand this, read our guide on Why You Need To Disable Fast Startup In Windows 10?. Then, follow the given steps to fix Windows 10 nvlddmkm.sys failed issue:
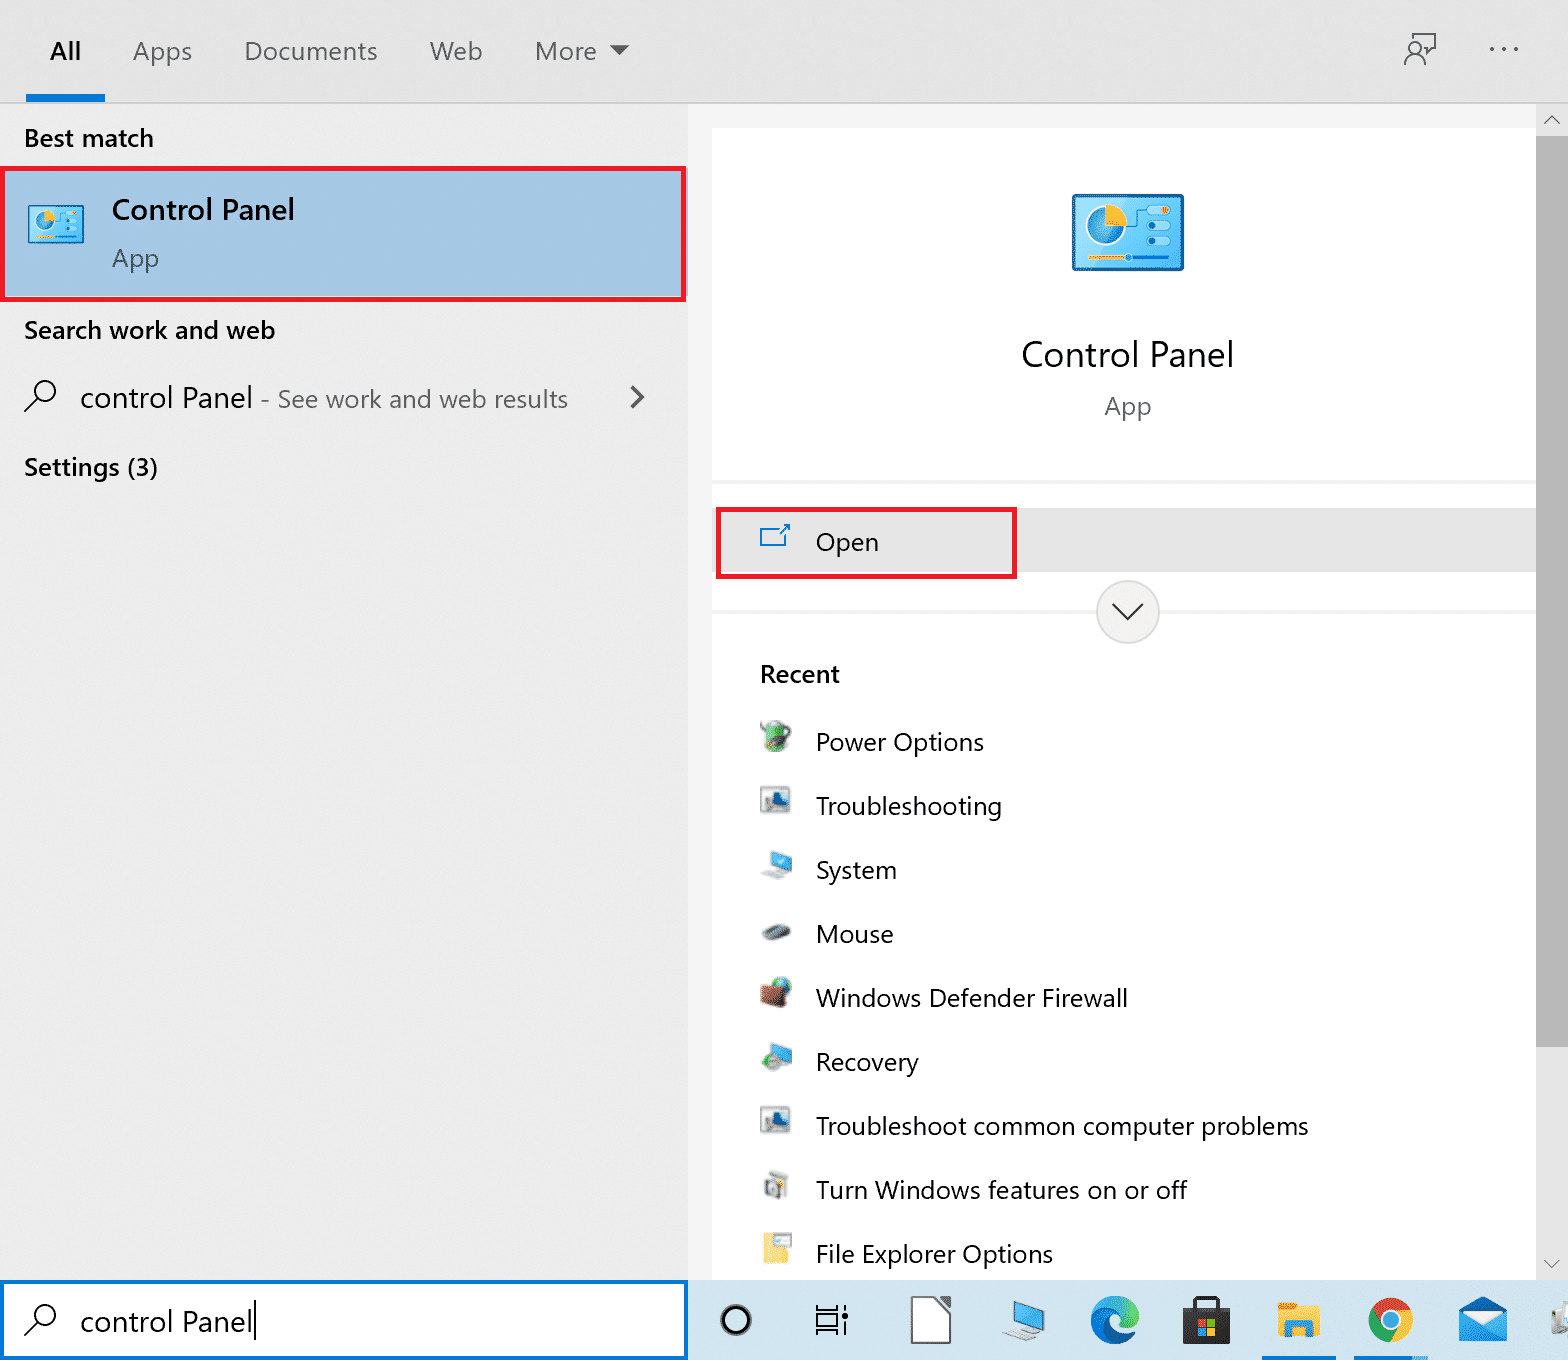
1. Hit the Windows key, type control panel, and click Open, as shown.
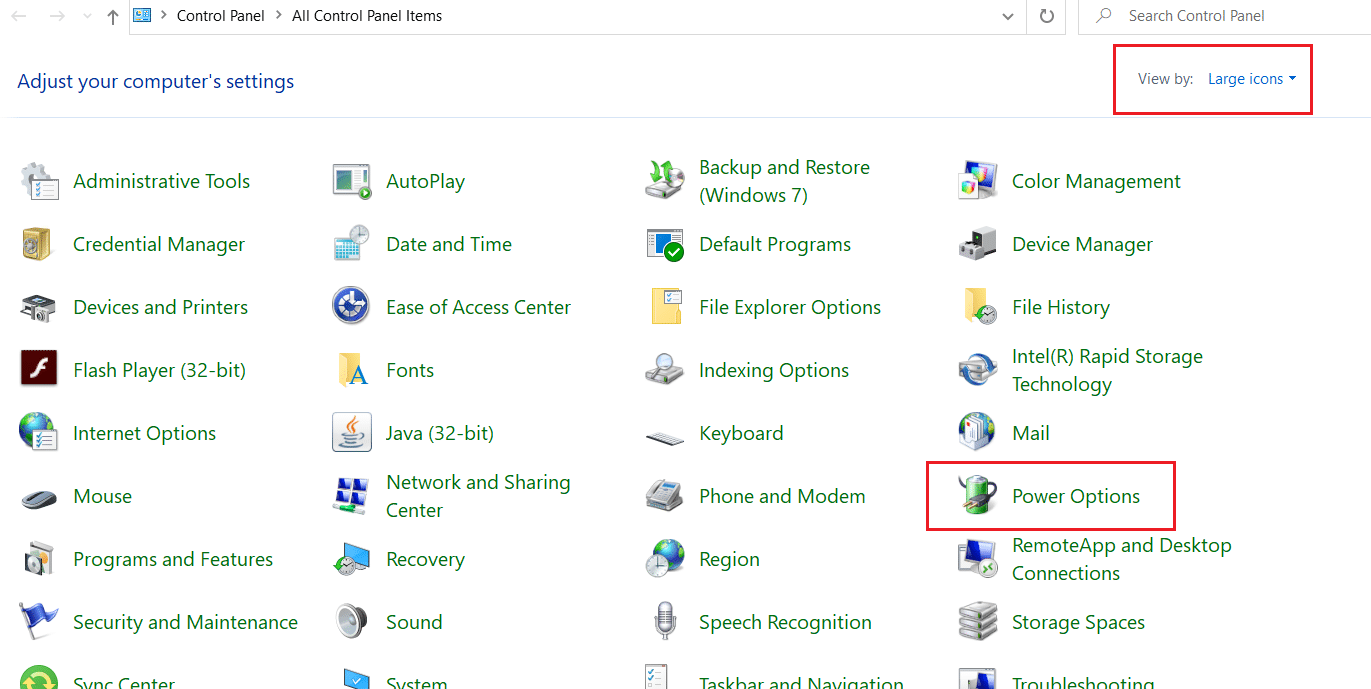
2. Set View by > Large icons and click on Power Options.
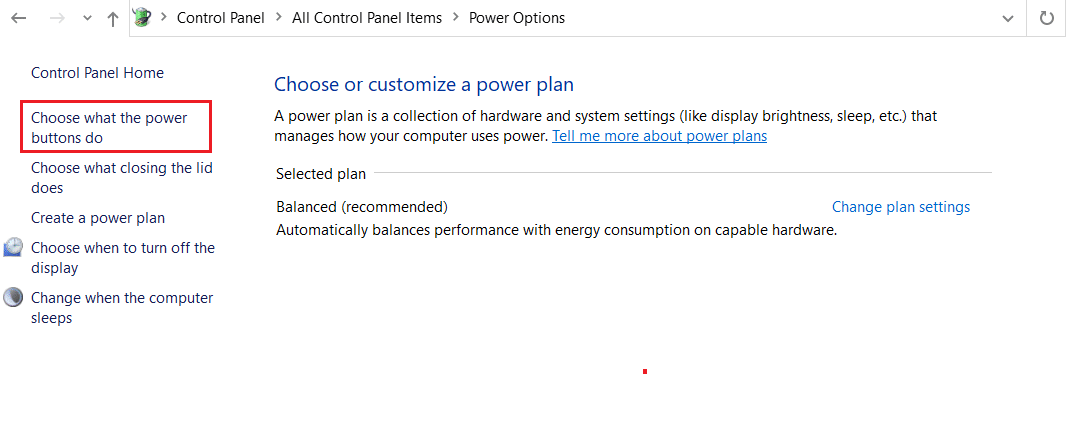
3. Here, select Choose what the power button does option, as highlighted below.
4. Now, click on Change settings that are currently unavailable, as depicted below.
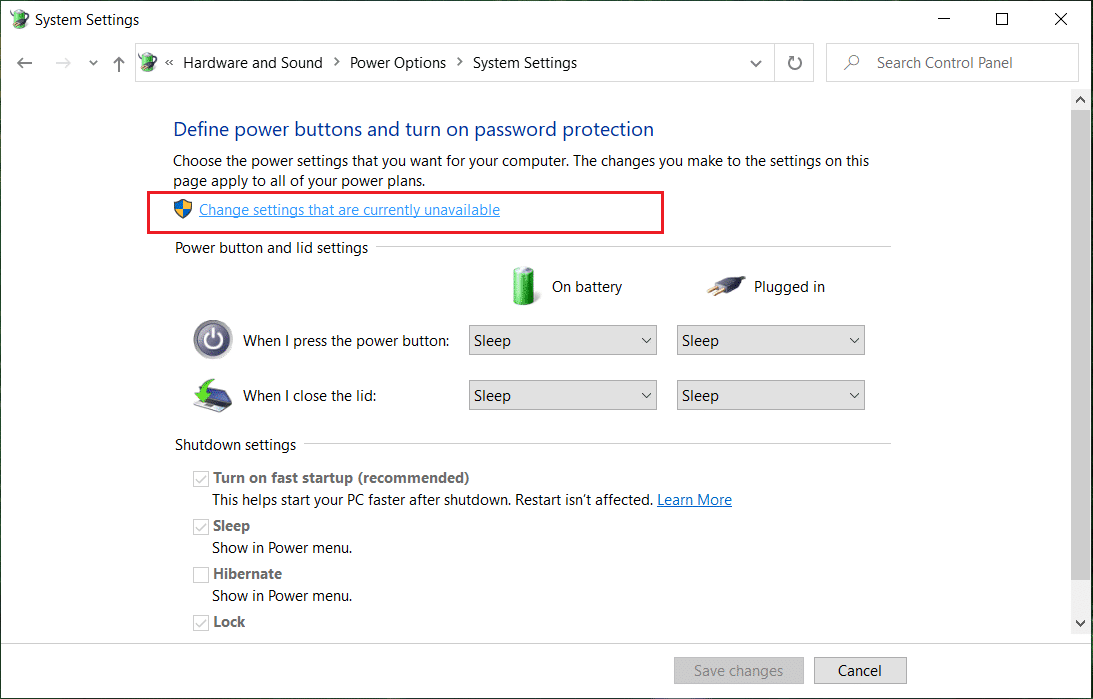
5. Next, uncheck the box marked Turn on fast startup (recommended) to disable it.
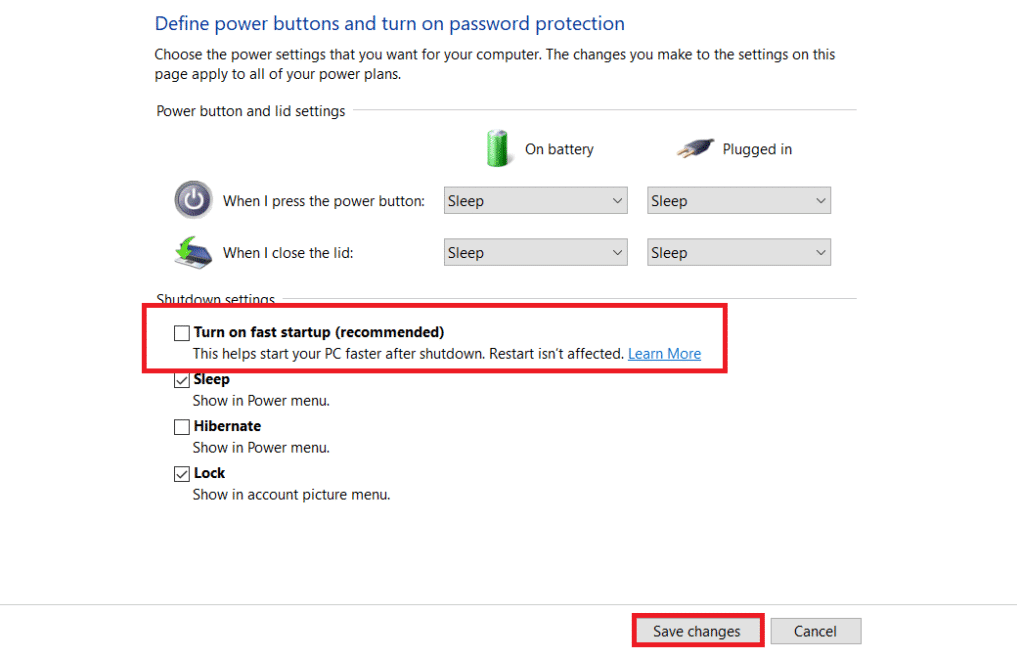
6. Finally, click on Save changes and restart your PC.
Check if VIDEO TDR failure Windows 10 issue is resolved now.
Also Read: How to Delete PayPal Account
Method 9: Remove Incompatible Programs
To determine the cause behind this error, we need to start Windows 10 in Safe Mode. Read our article on How to boot Windows 10 into safe mode here. Then, remove the conflicting programs by implementing these steps in order to fix VIDEO TDR failure Windows 10 issue:
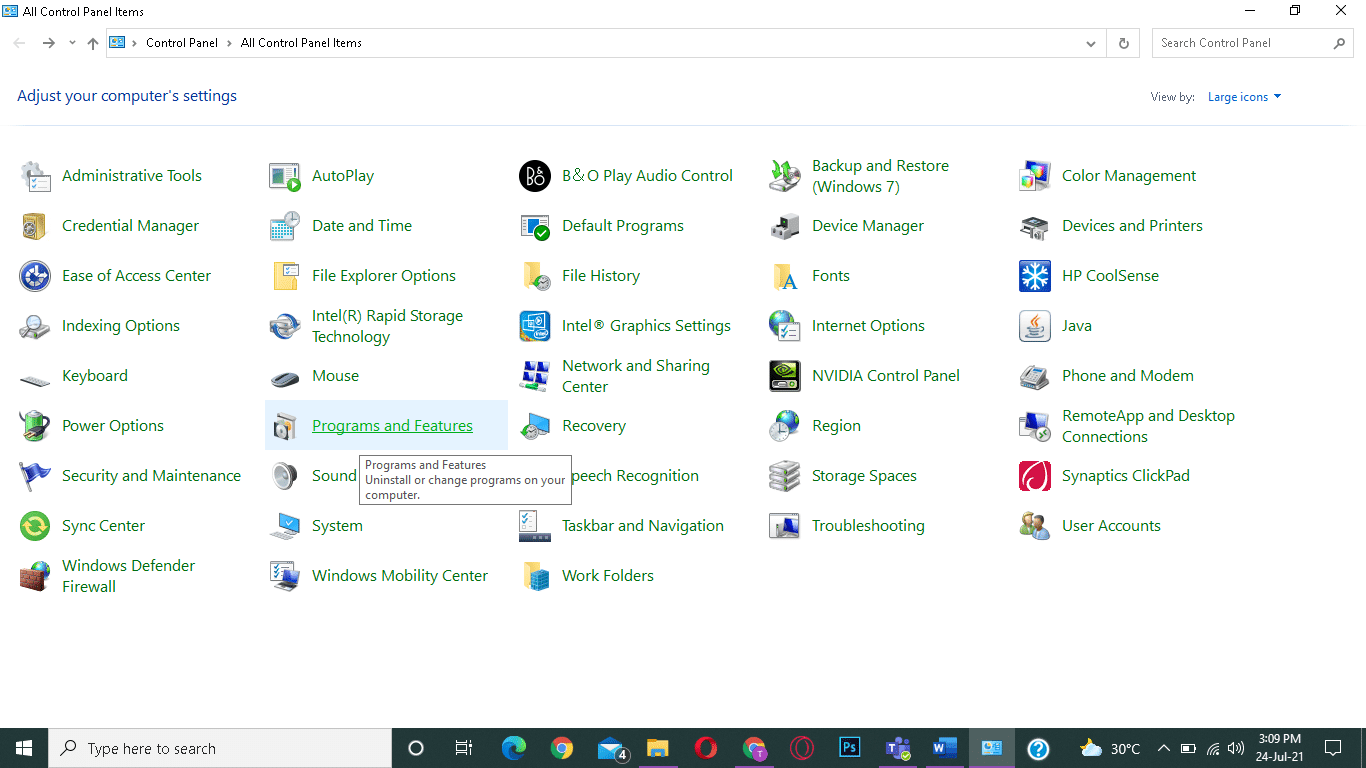
1. Launch Control Panel as illustrated in Method 8.
2. Here, set View by > Large icons and click on Programs and Features, as shown.
3. Next, select the conflicting application (For example- CC Cleaner) and click on Uninstall/Change, as shown.
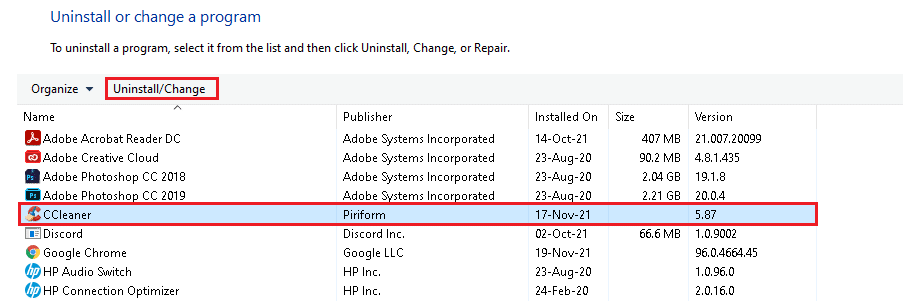
4. Click on Yes in the confirmation prompt to uninstall it.
Method 10: Update Windows
Installing new updates will help you to fix bugs in your PC. Hence, always ensure that you use your system in its updated version. Otherwise, the files in the computer will not be compatible leading to VIDEO TDR failure Windows 10 & 8 issue.
1. Press the Windows + I keys together to open Settings.
2. Now, select Update & Security.
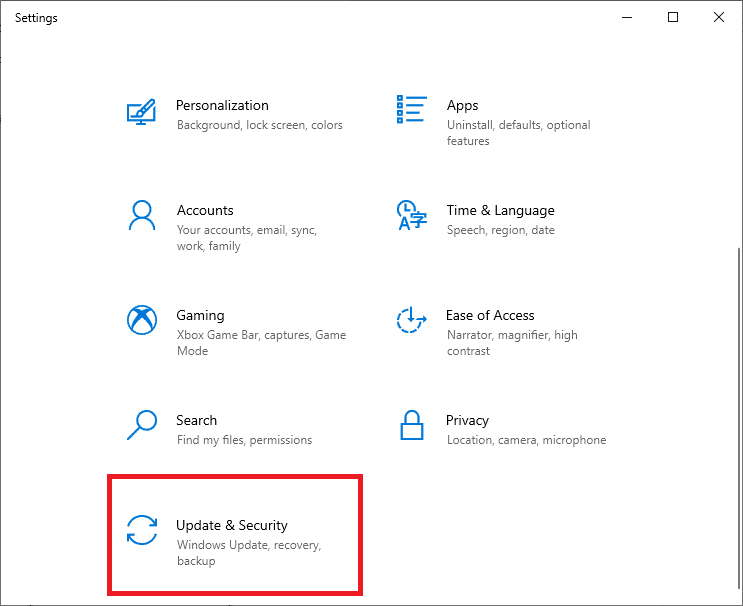
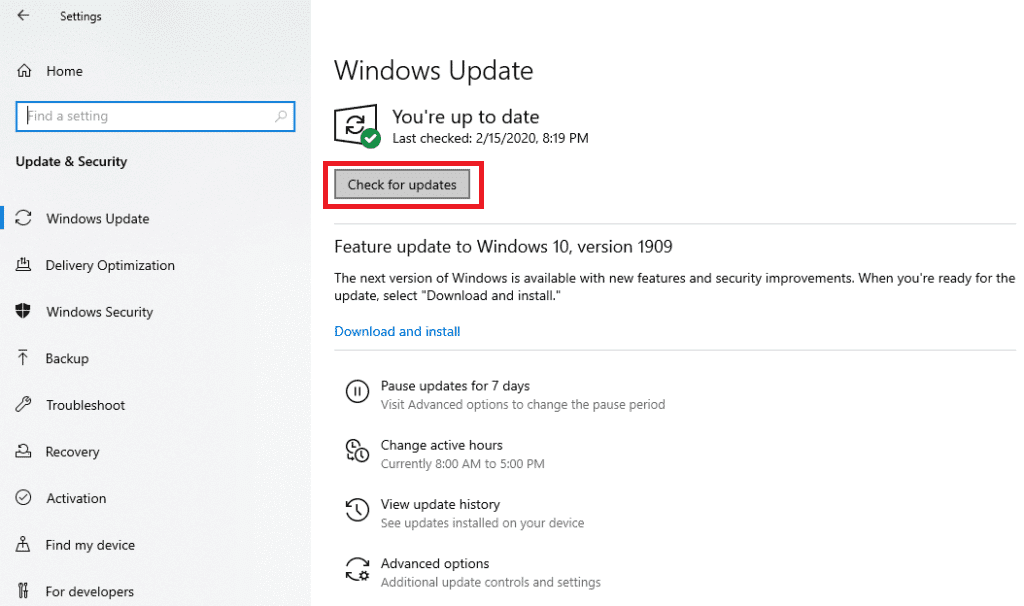
3. Here, click on Check for Updates in the right panel.
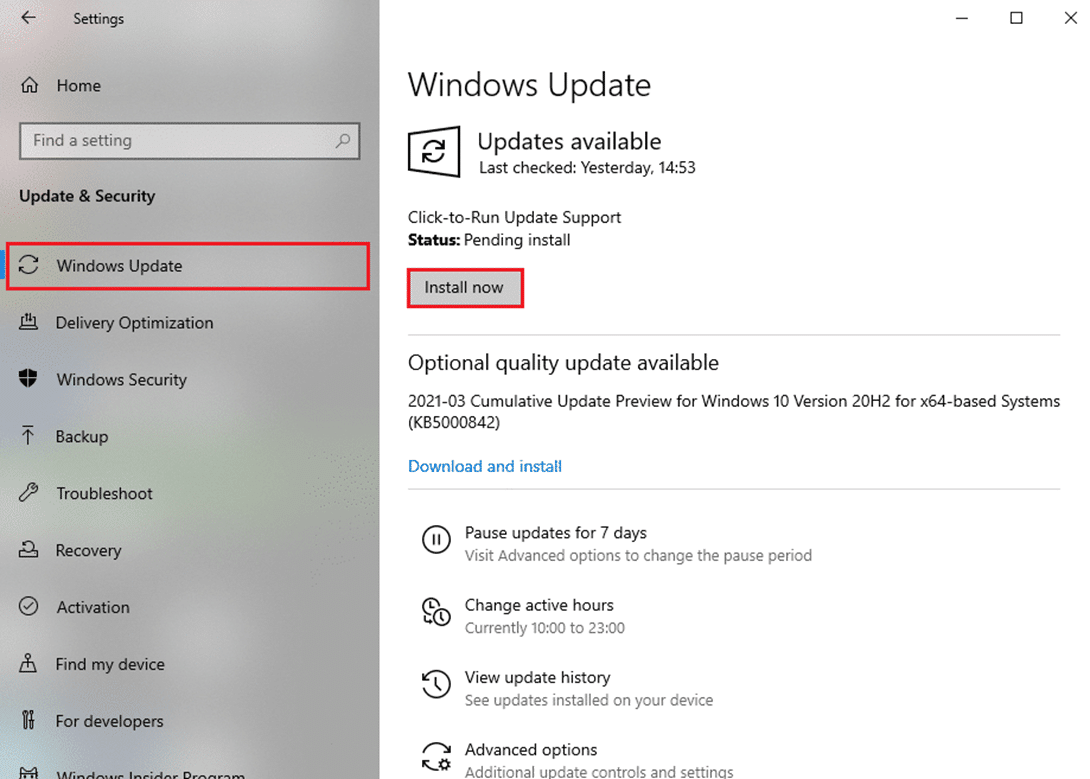
4A. Click on Install now button to download the latest update available. Then, click on Restart now to install it.
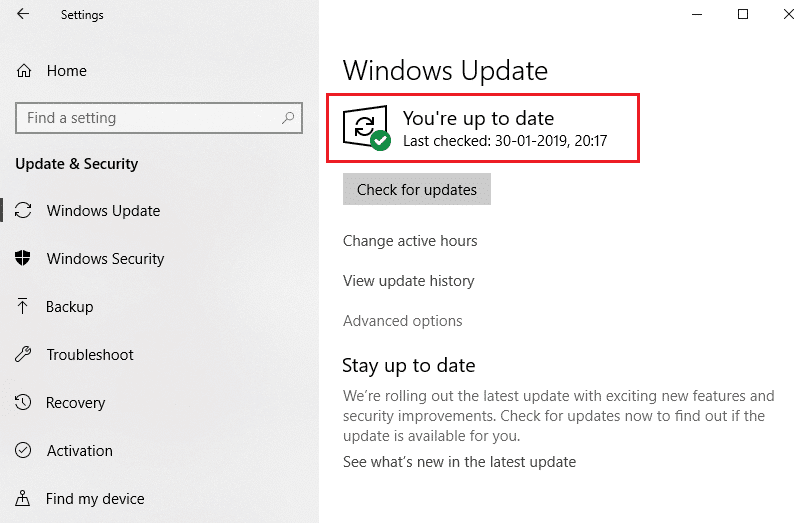
4B. If your laptop is already up-to-date, then it will show You’re up to date message.
Also Read: Fix Critical Process Died Error in Windows 11
Method 11: Replace Memory Card
If the memory card is causing this issue, so it is better to replace it with a new one. However, first run a test to confirm the same. Read our article on How to test your PC RAM for bad memory. Then, get it repaired or replaced to fix VIDEO TDR failure problem.
Recommended:
We hope that this guide was helpful and you could fix VIDEO TDR failure nvlddmkm.sys failed in Windows 10. Let us know which method worked for you the best. Also, if you have any queries/suggestions regarding this article, then feel free to drop them in the comments section.

