SysMain Causing High Disk or High CPU Usage? Here’s How to Disable It

The October update of Windows 10 pulled a move on us, those who had disabled Superfetch in Windows 10 because it was slowing down our computer with its high disk usage.
Starting now, it has been replaced with SysMain, which is basically exactly the same thing but under a new name.
And, of course, it soon started to act up on my computer. I knew I had disabled Superfetch and I was shocked to see this new thing called SysMain eating up my disk space and slowing down my computer to a state that made it unresponsive and extremely annoying. Fortunately, you can disable SysMain in Windows 10 and I will show you how to do it.
But first things first…
What is SysMain and should you disable it?
Basically, SysMain is the same thing as Superfetch, but with a different name. What this service does it analyzes your computer usage patterns and optimizes app launching and programs on your computer.
But the problem is that, for most people, SysMain starts using up too many resources, showing high disk usage and slowing down your computer to unbearable levels.
I personally went through this for a few days before completely losing it and starting to investigate the culprit (I initially thought it was the Windows Update downloader that was slowing me down, but it was SysMain).
In other cases, SysMain ends up eating up all your CPU power, not the disk… but in the end, it doesn’t really matter what it does because the result is the same: your computer is slower instead of faster as the SysMain service claims to make it.
So… should you disable SysMain in Windows 10? Unless you’re having no problems with it (yet), I see no reason why you wouldn’t disable it.
There’s no noticeable difference in speed on my computer with it activated or deactivated… the only difference is that I no longer have to endure it slowing down my computer in the morning when I start working.
So yes, if it is causing you problems, don’t hesitate to disable SysMain and fix your high disk usage or high CPU usage following the guide below!
How to disable SysMain?
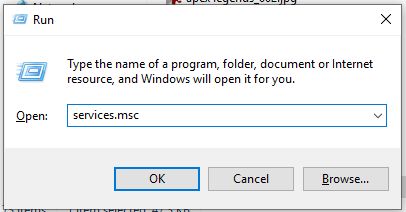
This is easily done: first, press the Windows key and R and then type, in the new window that appears, services.msc
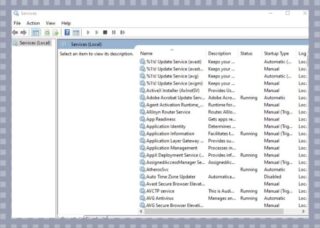
Now you’re taken to a screen that shows you all the services on your system (running, stopped or disabled) and it’s usually a good idea not to mess up with them unless you really know what you’re doing.
In this case, you are trying to disable SysMain which is safe to do and will actually help you speed up your computer or laptop if it’s causing problems.
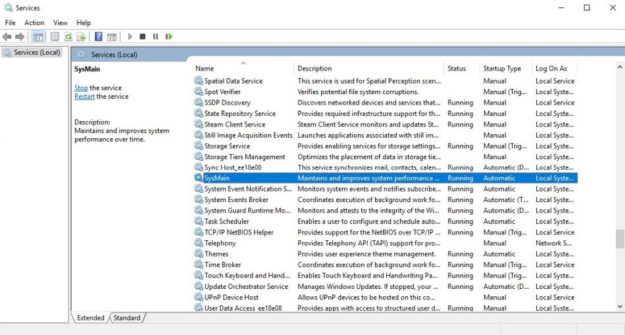
In the Services(local) category, scroll down the list until you find the entry titled SysMain, as seen below:
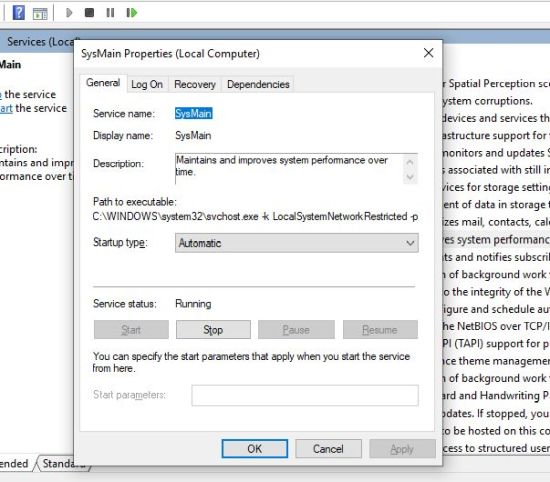
Right click it and select “Properties” to be take to its properties menu:
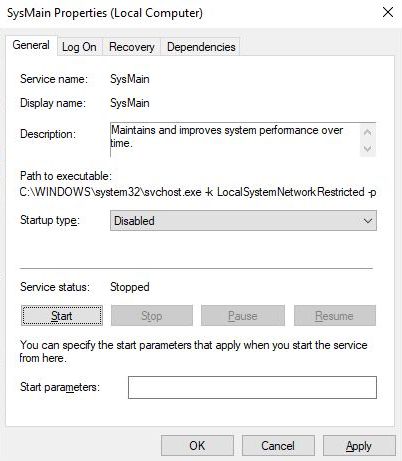
From there, first click the “Stop” button towards the bottom, where it says “Service status: Running”, then from the menu above, at the Startup type, select “Disabled” instead of Automatic:
Finally, click Apply and OK and you’re all set! The SysMain service is both stopped and it will no longer launch on Startup.
Now you have disabled SysMain in Windows 10 and you should no longer have performance issues related to it. It might reactivate at a later date (usually after a new Windows 10 update) but if it does, you know now how to disable it to regain control over your computer’s performance.
And this is it! I hope you found our guide useful and that it’s going to save you a lot of time in the future, now that you know how to disable SysMain in Windows.
Additional Methods to Fix SysMain High Disk Usage
Method #1: Scan for Viruses
The most telltale symptom is that your Windows 10 gets infected with malware, or a virus increases processing demand. Your SysMain service can stop working correctly and start throwing problems. Here are some things you can do if your computer is using too much of its CPU and memory:
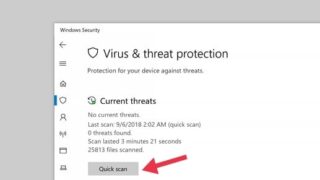
- Step #1: To access Windows Defender, hit the Windows key + S.
- Step #2: Activate Windows Security Center
- Step #3: Make sure you select Full in the scan settings, then hit the Scan Now button.
- Step #4: Once the Scan is complete, you can restart your computer.
- Step #5: Pressing Ctrl, Alt, and Delete keys will bring up the Task Manager.
- Step #6: See whether the problem persists by monitoring your computer’s CPU utilization.
Method #2: Utilize the SFC Scan
This command will repair or restore any corrupted system files on your machine. High disc consumption might result from a mistake in the SysMain Service, which should resolve.
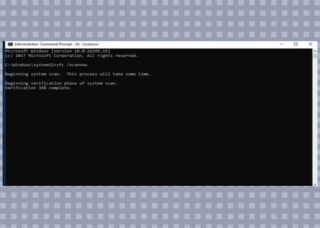
- Step #1: To open the Command Prompt, use the Windows key plus X. (Admin).
- Step #2: Type “sfc /scannow” into the Command Prompt window and hit Enter to run the Scan.
- Step #3: As soon as the Scan completes, a notification will pop up in the system.
(Note: Messages and their Meaning on Command Prompt
- Windows did not find violations: This indicates no missing or corrupted files in your operating system.
- Windows could not perform the requested operation: The repair tool discovered an issue while scanning. Therefore now we must do an additional offline scan.
- Windows found corrupt files and repaired them: Once the SFC has resolved the identified issue, it will show this notice.
- Windows found corrupt files and could not repair them: When this happens, you’ll have to fix the corrupted files by hand.)
Method #3: Stop the Intelligent Transfer Service
- Step #1: Select Task Manager from the menu that appears when you press CTRL+ALT+DELETE.
- Step #2: Select the Services menu item. Find Open Services down below:
- Step #3: The Intelligent Background Transfer Service
- Step #4: Use the “Stop” option under the right mouse button to turn it off.
Method #4: Utilize the Registry Editor
To stop the SysMain service, follow the Registry Editor procedures. Be aware of what may go wrong if you decide to do this. Experts suggest you make a copy of your registry in case something goes wrong.
- Step #1: Just hit the Windows key plus the R key on your keyboard. Using this method will launch the program’s Run command.
- Step #2: Without quotation marks, type “Regedit” and hit the Enter key. When you click this, the Registry Editor program will open.
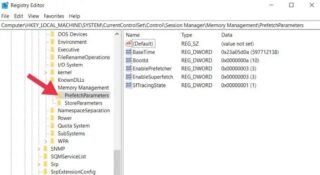
- Step #3: Get there by pressing the corresponding key: HKEY LOCAL MACHINESYSTEMCurrentControlSetServicesSysMain
- To speed up your searches in the Registry Editor, you may also utilize the address bar to input or copy and paste the key’s location.
- Step #4: Click the “Start” button. Select Modify from the right-click menu.
- Step #5: Set the Value to 4, please. After making your adjustments, select OK to preserve them. If you want this method to function as intended, you must not change any other parameters.
- Step #6: Close Registry Editor and reboot the machine.
FAQs
Q1. How can I Fix the SysMain High CPU Usage?
A: If you’re experiencing excessive CPU consumption due to SysMain, the methods described above should help. However, we also suggest running Windows Update and turning off BITS.
Q2. Should I Disable SysMain? Is It Safe?
A: To optimize, SysMain is required but not essential. Windows will function normally even without it. Boot up and program responsiveness may vary somewhat, but that’s all.
Developers designed SysMain to enhance system performance in the background discreetly. It means it should only be off if necessary.
You should turn off SysMain while working with a solid-state drive (SSD) or when it’s causing excessive disc utilization.
Q3. How Does SysMain Impact Playing Games?
A: The use of SysMain may have both positive and negative effects on games. If functioning correctly, it may drastically cut down on wait times.
However, the game may stall or even crash due to excessive disc utilization if something is wrong.
Q4. Can I get high FPS by disabling the SysMain?
A: SysMain typically does not affect the frame rate. The FPS drop might be a result of the increased disc consumption. It’s possible that deactivating will enhance FPS in this case.
Q5. Should I Turn Off SysMain for an SSD?
A: SSDs wear out quickly due to a process called Program/Erase (P/E) cycles. SysMain has almost little effect on boot times when using an SSD, in contrast to HDDs.
Manufacturers of solid-state drives typically advise against enabling SysMain since it does nothing except waste P/E cycles.
Q6. Is there a difference between SysMain and Superfetch?
A: Windows has made use of caching services for quite some time, but it wasn’t until Windows XP that the service was given a unique name (Prefetch).
In Windows Vista, Superfetch replaced Prefetch, and as of Windows 10 Version 1809, Superfetch has been called SysMain.
Q7. Does Service Host SysMain Involve a Virus?
A: The Service Host SysMain service is a valid component of Windows. It’s easy to see how people may mistake SysMain for a virus if it’s taking up too much system memory and CPU.
However, in most cases, the cause of excessive resource use is a mismatch or failure inside the software itself.
Conclusion
SysMain and Superfetch are the same things. The only difference is the name. Nowadays, people experience a problem where they find SysMain causing High Disk or High CPU Usage.
It can be infuriating and may want you wondering how you can disable it. In our article about SysMain, you will find various methods to help you disable it.
I hope this article was helpful to you. For more informative articles, stay tuned.
